
by Tom Gaylord
Writing as B.B. Pelletier
My S&W 78G pistol.
Today’s report is written by reader 45Bravo. This is his report to us on resealing the S&W 78G and 79G.
If you’d like to write a guest post for this blog, please email me.
And now, over to you, 45Bravo.
Resealing the Smith & Wesson 78G
This report covers:
- Where to start?
- The reseal
- Get started
- Assembly
- Wrapping it all up
So, all of the gas leaks out of your Smith & Wesson pistol as soon as you pierce the CO2 cartridge. It’s probably the piercing pin seal. Since these pistols are now over 40 years old, they need TLC. (And I’m not talking about the TV channel.)
Where to start?
The factory seals didn’t fare well with the lubricants used by most shooters at the time these guns were made, and the seals disintegrated over time. If you are going to change seals, I suggest changing them all at the same time.
Since this is a CO2 gun, you want to use o-rings that are not affected by carbon dioxide. If you use a standard hardware store o-ring, the CO2 gets absorbed into the o-ring material, causing it to swell to several times its normal size. The wrong type of o-ring on the outer rim of the piercing cap will continue to hold the cap tight, even when your cartridge is empty. It will be quite awhile for the o-ring to shrink back to its original size so you can open the cap and change the cartridge.
There are a couple of places in the gun where you probably could use regular hardware store o-rings, like in places where they are captive, but I would not suggest that unless you want to go back inside the pistol again in a year or so. Urethane o-rings are the best. With proper care, you should not have to reseal the gun for decades.
Normally I use a complete kit from Mac1 Airguns that includes a new redesigned poppet (Ed. — valve), and a complete set of 90-durometer Mil-Spec urethane o-rings.
But not everyone wants to or even can spend $35 on their project, so I decided to source a set of urethane seals from eBay without the valve as a test to see how well they work compared to the others. There are several sellers on ebay selling different seal kits, I chose the one that offered urethane seals with free shipping, and a good price.
A single set that works for both the .177 and .22 costs $5.50, but 2 sets were $7.15, shipped from a U.S. seller. I ordered them on Monday, they arrived on Saturday.
The seller also includes an exploded view, and an o-ring size reference as to where they go in the gun.

Ebay seal kit comes with seals and a diagram.
Normally, the seal inside the poppet is trashed like the rest of the seals, but the one in the gun I am resealing looks new. Since this is going to be a budget reseal test, I decided not to change it. I just replaced the o-rings, and will see how long it runs.
The reseal
As we go I will offer some tips to make things go easier and faster.
The largest o-ring goes on the co2 cap.
The next smaller one goes on the valve body plug.
Then there are 4 smaller o-rings that are the same size. They are used on the .22 bolt probe, the cartridge connector, and inside the piercing cap.
The single smallest o-ring is for the .177 bolt probe.
Tip: I suggest using a small zip tie, or velcro cable management tie like you use to hold laptop power cables to hold the trigger rearward while you do the reseal.
Using the cable tie is not necessary, but the trigger spring can be a little fiddly to get back in position, and you need an 11th finger to hold the trigger to the rear during assembly if you don’t use something to hold it.
Get started
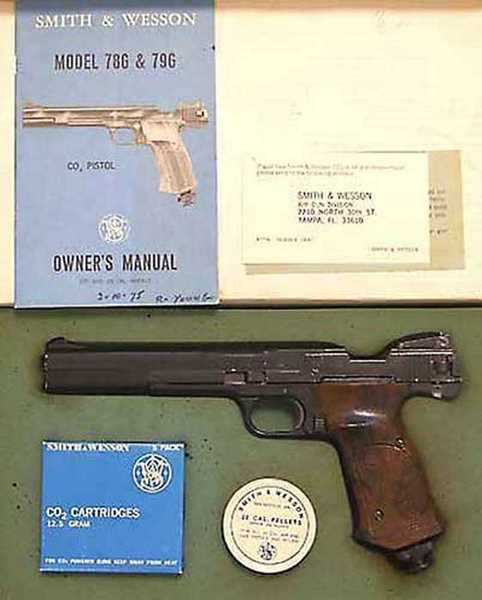
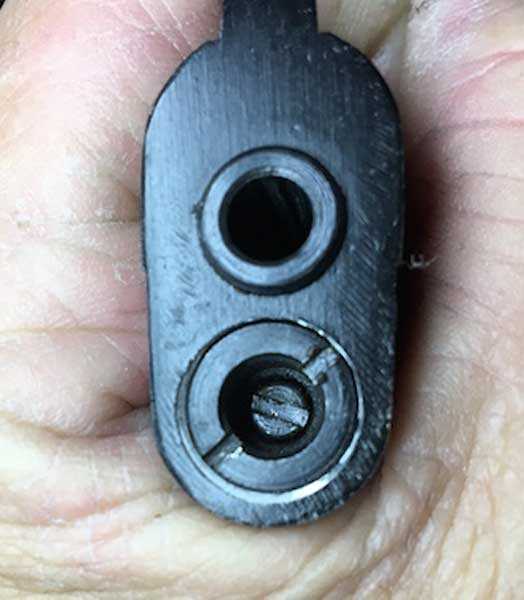
The seal that fails most often, and the easiest one to change, is the one in the piercing cap. You do not have to disassemble the entire cap to change the o-ring, just have the right tool for the job.
Tip: You can use a Dremel tool, or a file to modify a screwdriver tip as shown to make a tool that clears the piercing pin, but lets you unscrew the seal cover.
The right tool for the job. Sometimes you have to make it!
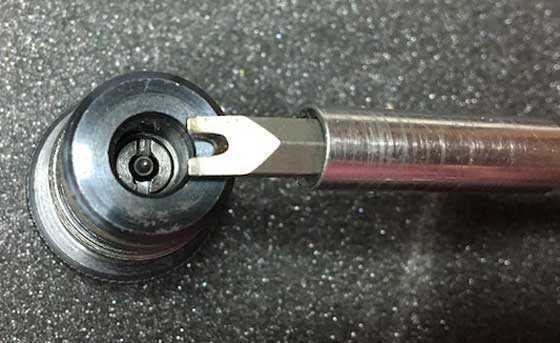
Use a dental pick or similar tool to carefully remove the old seal. Clean the inside carefully, lightly lube the replacement o-ring with your choice of lube then center it over the piercing pin, and then screw the seal cover back in place.
Since this is a budget build, I am using Crosman Pellgunoil as a lubricant, because I am sure every CO2 shooter has some on hand.
Then remove the large old cap seal o-ring, clean the groove and put the new largest o-ring on the outer part of the piercing cap.
All of the seals/o-rings in this pistol were in this condition. This one seals the piercing pin inside the cap.
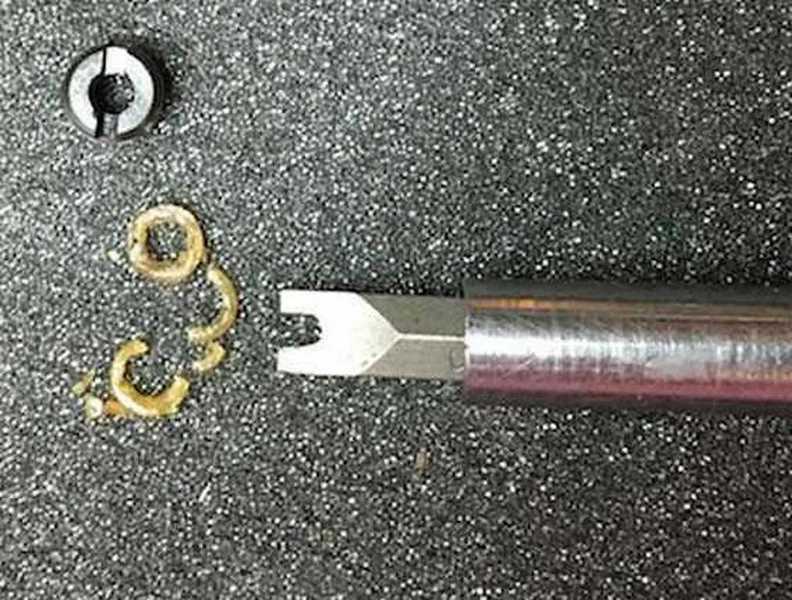
Remove the grip screws and grips, and then the rear screw under the right grip as shown below.
The rear screw on the right side of the grip is the takedown screw.
Then remove the power adjuster outer screw below the barrel.
Remove the outer power adjuster screw at the muzzle.
Tip: You can insert the eraser end of a pencil into the hole to remove the outer sleeve the power adjuster rides in.
The slide now comes off the frame. Be careful of the pin that holds the bolt in place.
Remove the bolt, and replace the old o-ring on the bolt probe with one of the 4 o-rings that are the same size.
The bolt or probe comes out of the pistol and the o-ring needs to be replaced.
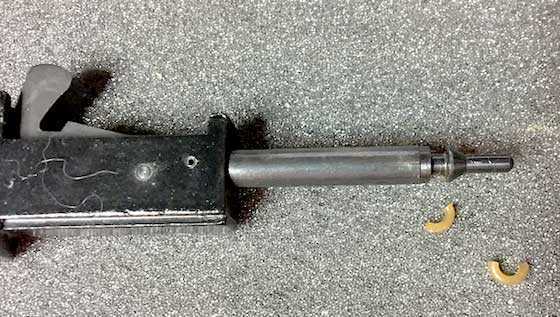
Now, remove the 3 screws that hold the valve in the frame.
Tip: For pry tools on guns I use bamboo chopsticks from the Chinese restaurants. They don’t mar the finish, and they are free…
Remove the valve cartridge, it may take some gentle persuasion as there is a short tube that goes from the valve into the frame. That tube passes gas from the CO2 cartridge into the valve. It is called the cartridge connector.
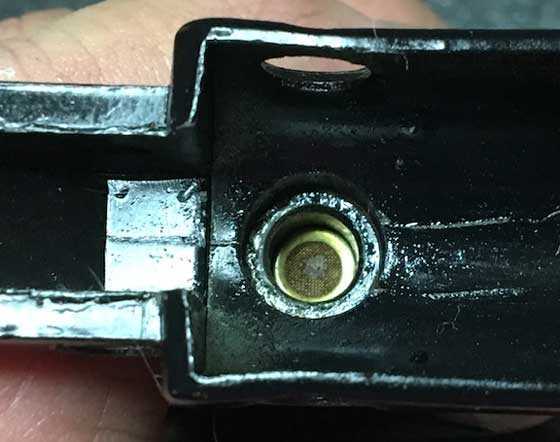
In the frame, under the valve cartridge connecting tube is a very small brass screen, be careful to not lose or damage it, as it protects your valve from debris that might get into the system.
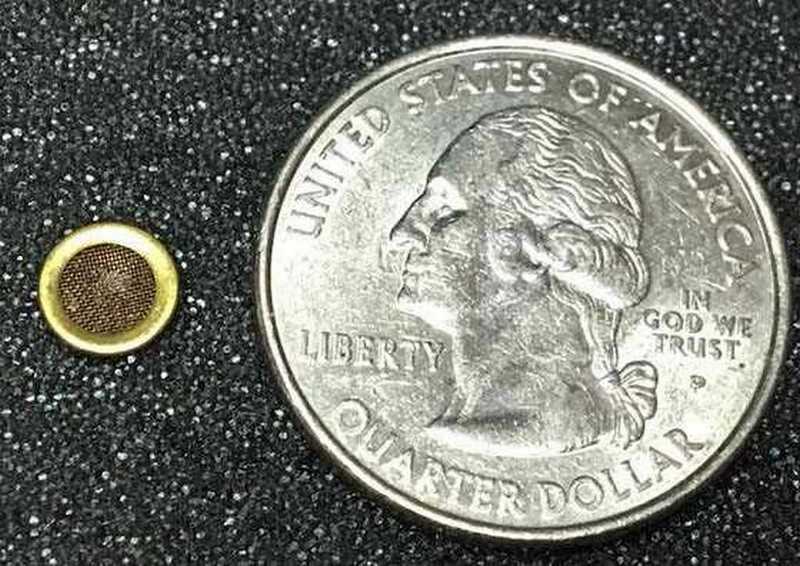
This tiny screen under the cartridge connector (gas transfer port) keeps dirt from entering the valve.
The rear of the valve cartridge is held in place by the cartridge connector, the rear cap is under spring pressure by the valve spring.
Once the cartridge connector is removed, the rear of the valve comes out.
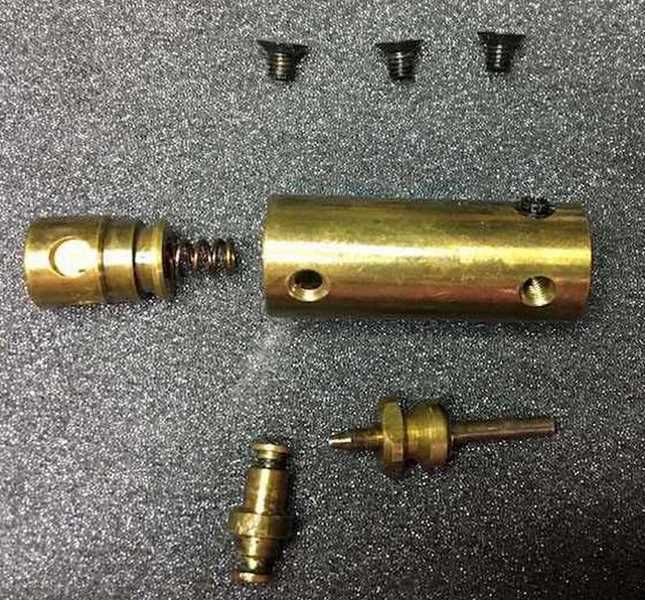
The valve parts.
The second largest o-ring goes on the valve body cap.
The cartridge connector gets an o-ring on each end.
Tip: when assembling the valve, the longer end of the cartridge connector goes into the valve.
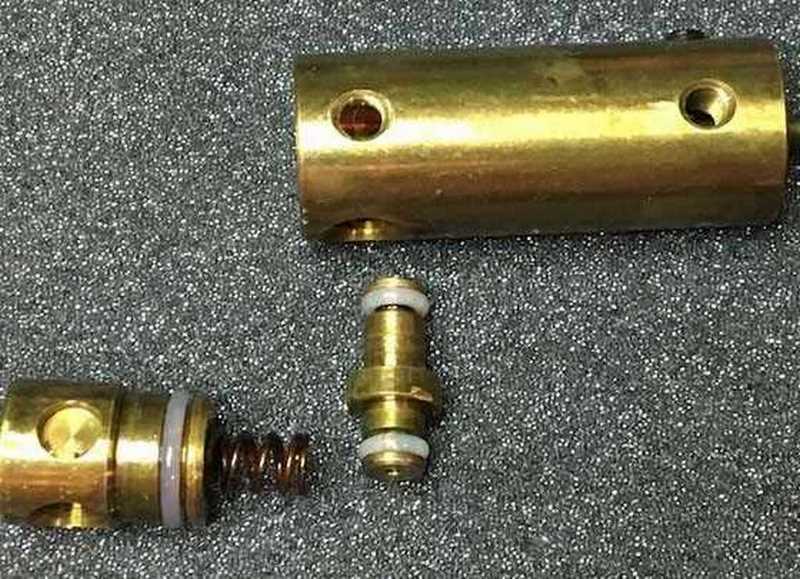
The 0-rings are in place. Note that the long end of the cartridge connector (gas transfer port) goes into the valve body.
Assembly
Make sure the small brass screen is down in the hole that the cartridge connector goes in.
The tiny screen is back in place in the frame, where the cartridge connector will go.
Once the valve is in place, replace the 3 screws that secure the valve.
Tip: I use blue Locktite thread locker on the screws that go into the valve body to help prevent any possible gas leak at these points.
Tip: Be careful not to tighten these screws too much as they will bend the cast frame. Eventually a crack will form at this point.
Smith and Wesson uses a metal-to-metal fit for the transfer port that connects the valve to the barrel. If it’s not aligned correctly, you will get a puff of gas from this point when you fire the gun.
Tip: To solve this problem, and make the alignment a little less critical, I use a small piece of silicone tubing to make a thin o-ring to seal this junction.
The silicone tubing I use is silicone fuel line left over from working on nitromethane-powered radio control vehicles. (one of my other hobbies.) It’s 3mm (1/8-inch) inside diameter for .60 engines and up. You can get 2 feet of it from Tower Hobbies for $2.69 and that will be enough for a lifetime of uses. I will have another guest blog project for you in the future that also uses this tubing, so it won’t go to waste.
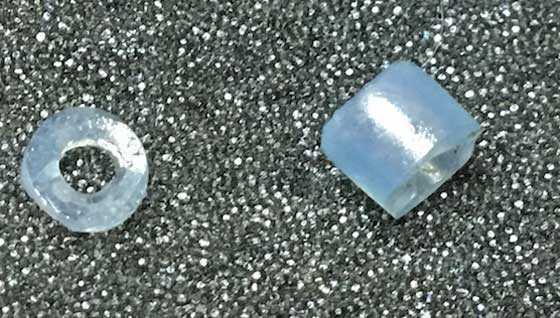
A thin slice of silicone tubing (left) makes a good seal for the gas transfer port that connects the valve to the barrel.
It’s just the right diameter, and very pliable, and I can cut it to the thickness I need.
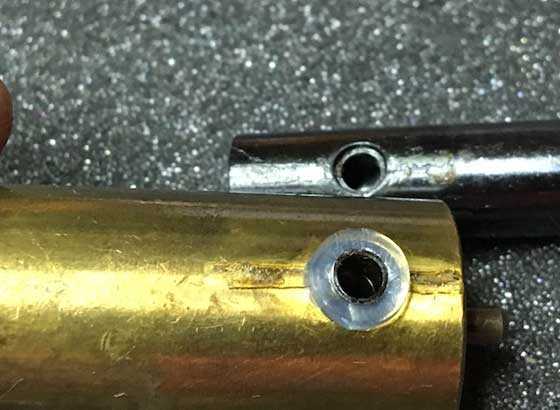
Here is the tubing seal on the gas transfer port that connects to the barrel.
When I assemble the slide, I loosen the barrel set screw just ahead of the loading port on top of the slide to ease assembly.
Tip: The eBay seller of this o-ring kit gives you a FREE exploded view of the pistol. Use it to double check the orientation of your parts during assembly.
Put the hammer, hammer spring, and the hammer spring pad assembly back in place, make sure the barrel port is aligned with the transfer port.
Put the rear disassembly screw back in, then insert the power adjuster assembly from the muzzle end.
Tip: Now I press the barrel rearward just enough to seat it in place, while holding it rearward, close the bolt completely, then tighten the barrel set screw in the upper that is in front of the loading port.
This set screw presses the barrel down onto the transfer port and valve, as you tighten it, try to close the bolt, if you tighten the barrel set screw too much, it will push the barrel out of alignment, and the bolt probe will not want to go into the barrel, so adjust accordingly.
Wrapping it all up
What do I think of these budget urethane seals? They are not as hard as the Mac1 seals, so they are easier to put in place. But they are harder than normal o-rings.
I heat the Mac1 seals with a blow dryer to soften them. It makes assembly easier.
Because of the hardness of the 90-durometer seals he sells, Mac1 also suggest when you pressurize the gun for the first time, insert the co2 cartridge, then heat the gun to “toasty warm” before piercing the cartridge. That will increase the co2 pressure and soften the seals.
I have left the pistol in the sun to do this, and I have also used a blow dryer. Both worked well, but monitor how warm the gun is either way you decide to try.
Tip: Leave the grips off when warming the gun, and don’t get the blow dryer too close to the gun to harm the finish.
Cock the hammer, put the gun on safe, and then pierce the cartridge.
After piercing the cartridge, and listening for leaks, I dry fire it a few times, then to test the transfer port and bolt seal, I then load a pellet, and lay a sheet of toilet tissue over the breech area and fire the pellet in a safe direction, if there is a leak from the transfer port area, or the bolt seal, this will show you.
As Tom mentioned in an earlier part of this series, always leave a partially charged cartridge in the gun.
Hopefully this will help anyone who has one of these pistols that leaks take the plunge to reseal it yourself.
These air pistols are accurate, excellent quality, easy to work on, and loads of fun to shoot.
If you use quality replacement parts, it will be another 40 plus years before it needs sealing again.
45 Bravo


45Bravo,
Good report. I would not be afraid to take on a reseal on one of these pistols with your report in hand. I don’t have one, but will keep a lookout for one that looks good but needs to be resealed. Now after your report I guess I won’t be the only one. I like the warming idea on the seals. I will try to remember that for sure, for many jobs.
Great job, with good descriptions and pictures, thanks,
Don
Can anyone help me out with my 78G? I’ve tried resealing it about a dozen times now and it’s not having it
I tried Mac1 kit (useless)
I tried calling him for a little guidance using his kit and got a barrel of abuse down the phone about how dare I have the nerve to call him for tips then ranting and raving and yelling at me how he doesn’t have time for people calling him as he makes no money from advice and stop wasting his time.
Swear to god.
I was shocked, never dealt with a more unprofessional pos
So my issue is after putting in his new o-rings or even regular new o-rings and reassembling the pistol after piecing the co2 cap I just hear the entire bottle empty and whoosh out,
So it’s not sealing obviously, if the gun is cocked it “may” hold the air for a bit, but then after one trigger pull and the cocking lever is in the test position again you just hear whoosh and the cylinder depletes
I’ve tried the heat, the toasty, the sun, the hairdryer, the heat gun, o ring oil, all of the above, none of the above, some of the above, and everything in between,
This bastard gun just won’t keep its seal,
But then everyone once in 10-15 cartridges of messing with it all of a sudden it will seal and I can shoot it. I get about 30 shots at full power and it’s amazingly fun to shoot and accurate, I think whatever I tinkered with last time must have worked, load up the next co2 cartridge for more shooting then whoosh, back to square one.
Incredibly frustrating, can anyone shed any light or offer any places for me to check? Or at this point anyone want to just seal it for me and I’ll pay you lol?
Starscream,
Sorry I did not get back sooner I was not paying attention to my emails. I am not familiar with the 78G pistols. If you followed 45 Bravo’s instructions that is all I know. If you can figure out where the leak is will help. If it is comming out the barrel it is the valve. If it is coming out at the CO2 cartridge it is the seal where the cartridge is pierced.
You can ask 45 Bravo directly be responding to one of his comments. He may not see it though like me. The best way to ask your question is to go to the current days blog. That way many folks will see your question. I am sure you will get help on fixing your leak.
If you need help with the blog let me know.
Sorry you had trouble at Mac1. I think everyone is a bit on edge with the pandemic.
Don
45Bravo,
Excellent report! Unfortunately for me the only samples of the 78 or 79 that appear locally to me are those that are practically parts guns due to the cracks in the frame. 🙁 Oh well someday I’ll be sure to apply your knowledge somewhere.
Siraniko
If you don’t mind, what country are you in?
Ian.
45Bravo,
I’m in the Philippines. I’ve only come across three samples. The only one that was for sale was the one with a cracked frame.
Siraniko
Are you a member of the gateway to airguns forum?
If so, please send me a private message through there.
I need to ask a question or 2.
Ian
45Bravo,
LOL! You have me wanting to get one for RRHFWA just so I can rebuild it. Great job.
It is true that airguns are more complicated than powder burners, not that much more.
45Bravo,
Thank you for taking the time to put together an excellent report. Fine pictures as well. I like all of the “tips” as tips are one of the things that can minimize frustrations and make the job more enjoyable. I liked the fact that the O-ring seller customized the exploded view in order to make things even more clear.
Good Day to you and to all,………. Chris
Chris,
I do appreciate the offer of the M-Rod, but I must decline.
When I discovered the world of modern airguns, the first one that I saw was a BSA Super Ten. I have always strived to keep my collection very small. Though the M-Rod is a very nice rifle, it is not quite what I want.
I have the RAW. and want to sell it to finance a Dreamlite. Would you take the M-Rod over the Red Wolf? The M-Rod probably does not get out much anymore, does it? 😉
RR,
Since you mentioned the P-rod,…. I thought that I would toss it out there. Remove the 6 position and the bi-pod and you have a giant pistol with finger groove pistol grips front and rear. 🙂
In truth,…. nothing (air guns) is getting out much these days. Moving/downsizing Mom and Dad are taking full priority this Summer. We (the kids) will be lucky to have it all said and done by Fall.
Get that RAW sold and onto the Dreamlite!
Chris
Chris,
I mentioned it because at one time it was considered, but just was not quite it.
Different reasons, same results. Not much trigger time. Sigh.
Thanks guys, I have written some short things in repairs and such on the forums, but the one helpful thread quickly gets buried under the hundreds of other post that a forum sees daily.
And forums change hands, photobucket photos get deleted, all sorts of things and links get lost.
I am thankful that Pyramyd AIR and Tom have given us this one place that will be around for a long long time than airgunners a can consolidate what knowledge we have acquired so others can access it in the future.
Mankind has a short memory.
Rome has been continuously occupied for over 2000 years, but historians THINK they held mock naval battles in the colosseum.
With all the people that attended the events, no one took the time to write it down in a place that would be around in a few hundred years for others to read.
Ian.
I liked that too, it separates him from the other sellers.
The diagram also has the parts list on the reverse side of the paper.
Ian
Ian,
He contacted me from Ebay when I bought the seals and I told him about this blog.
B.B.
Cool!
Hope he likes it.
“the outer sleeve the power adjuster rides in.”
This part sometimes is very difficult to remove. A broken screw extractor will help to remove it without damaging the sleeve. Even the proper size tap turned in just enough to grab the sleeve will assist pulling the sleeve out and if it leaves a slight burr, wet or dry paper over a proper size dowel will smooth it out.
The exhaust valve (poppet) will most times need resealing. They are available exchanged from JGAIRGUNS or you can reseal it yourself. However, it is not the easiest part to reseal. I’ve done three, but be careful as they are easy to damage. If I could write one of these blogs, I’d do so, but I don’t know how to do it.
Jonah, yes the sleeve can be a pain to remove, I try not to use metal on metal if I can use something softer like a wooden dowel or chopstick.
As to the exhaust valve I have ran across 3 out of 20 guns that I did not have to replace.
This gun being one of them.
I normally use the Mac1 kit as it includes a new one made of brass with a new urethane insert.
I have not tried one of the delrin ones sold by JG airguns yet.
I didn’t know how to write these either but with B.B.’s tips I was able to do it.
Now I can’t stop writing them.
45Bravo,
Thanks for the guest blog – very nicely done!
Always like reading about tips that people have learned while servicing their equipment.
Happy Friday all!!
Hank
45Bravo,
What an excellent tutorial. This is a large part of what makes this blog great.
My only question is, what are people like B.B. to do since they threw out their hair dryers years ago for lack of use? 😉
Ohh , that’s cold.
My only answer is without having to pay for haircuts, he was able to buy a proper heat gun.
45Bravo,
Okay — STOP RIGHT THERE!
Whadda ya mean, I don’t pay for haircuts? When the stuff on my dome came out (my mother always told me I would come out on top!) I started growing a bumper crop in my ears and nose!
Ya gotta do what ya gotta do!
B.B.
I can sympathize with that to a certain degree, but it’s ears nose and eyebrows!
B.B.,
Who says God doesn’t have a sense of humor? When I go in for a haircut I tell the them “I just came in to get the hair trimmed out of my ears and off from my eyebrows”. 🙂
Geo
Kevin,
I resemble that! 🙂
B.B.
One old boy I used to know always said “God made a few perfect heads and the rest He put hair on.”
You guys are too funny! You shoudn’t pick on B.B. like that. 😉 Probably many of us are in that boat.
Geo,
Still rockin’ a 2′ long, down to my belt pony tail. Full coverage on the roof. You would never know from a front on view. The ears, nose and brows are another story,……. as many can attest to. I manage on my own as a barber just eats up my air gun $ stash! Those little trimmers can do wonders,… but don’t buy a cheapie.
Chris
Chris,
I have a trimmer that my mother-in-law gave me for Christmas back in the eighties. Still going strong.
Something I noticed over the years is that my hair has not disappeared, it just moved down. Now I have hair growing out of my ears, eyebrows and nose instead of on top. I guess that before all is said and done I will have a pretty hairy chest and belly.
RR,
So,…. based on that “top/down” hypothesis,…. I suppose that when your feet get hairy, that you are very near your “sell by/use by/expiration date”? 😉
No slippers required in the elder years then,………. More air gun/pellet money! 🙂
Chris
Chris,
That is a logical conclusion, but I am afraid it is mistaken because it does not take recycling into consideration. When my feet get hairy I become a very large hobbit.
Oh…an old hippie from the 60s 😉
Geo,
Not quite.’61 vintage. It was at about 30 I started to grow it long. I have always been a bit of a non-conformist while conforming enough to get ahead. And,…. while I may shoot rifle left,….. I for sure as heck ain’t a “lefty”,…..as defined today! 😉
I do get quite a few compliments from the ladies on the long hair though. One problem,… they are all older than me or near the same age. The last one had to have been 70+! 😉 I was rather hoping for two 30 year old’s anyways. While I have never seen a (fur covered) “Cougar” in Ohio,….. I can say that they do exist in other forms. I just chalk it up to my naturally devastatingly good looks and endearing charm,… just ask me. 😉 Note: I did leave out the well chiseled physic,…….. which is a bit on the “pudgy” side of things these days. 🙂 Hey,…. just being honest! LOL
Chris
physique!,………. darn,… I hate when I do that! I am thankful for the 30 minute edit feature though. Just got to see/fix it in 30 minutes.
Things to remember older women.
1. They don’t normally play games like younger women.
2. They know that they want, and don’t mind telling you.
3. They have their own money…
45Bravo,
🙂 Yes,… all for (very) true in general. Maturity and responsibility levels are something to be taken into account too. I have seen that work both ways with regards to age. Generally, get past 30 and people have “been there/done that/that was stupid/I will not be doing that again”. Then,…. some never learn or mature no matter how old they are.
Chris
Well we can’t all be a Jack LaLanne, nor would I ever want to work that hard to achieve his level of fitness. I used to use weight machines and later a bow flex for workouts. After my second go-around with a hernia surgery, I gave it up.
RR,
I remember a bit that Gallagher did where he said that he wasn’t losing his hair, it was just sliding down his back. He had that hair attached to his cap and when he removed the cap, the hair came with it.
Geo791,
I think I remember that routine. I used to enjoy his comedy.
SLEDGE-O-MATIC
I remember him..
45Bravo,
How could anyone forget the SLEDGE-O-MATIC? That was his.
RR,
And don’tcha wanna know how it works?
B.B.
BB,
I watched all of the videos he put out that I could find. I have a pretty good idea of the engineering involved.
Chris U,
My hair was a few inches below my sholders till Thursday, I finally decided I looked like a half bald old guy with scraggly hair. It is now cut off with a #2 guide on the clippers. It doesn’t look better as my head is kind of lumpy but I don’t need a comb or brush. Good thing I have lots of hats.
You are lucky to have a full head of hair,
Don
Don
I cut mine off a couple months ago. And been wearing my hat all the time like I use too. Not just at shooting time. And same. No combing is fine with me. Maybe it’s because the other part of my hair ain’t as long and it just a illusion making it he top look longer.
I swear it’s starting to grow back on top though. My wife and kids even mentioned it last weekend. We’ll see how that turns out in a couple more months. I think they was just trying to be nice really.
This very informative post reinforces the truth contained in “when all else fails, read the instructions.” More so when these are well and clearly written.
If you want to read an informative manual, read the one for a Webley Tempest.
It actually walks you through what needs to be done for a rebuild and reseal of the gun.
Probably because of legal reasons, not many American airgun manuals do that.
Ian.
Thanks 45Bravo for a very informative report. Well done. Armed with the new knowledge I now wish I had kept my S&W pistol – I gave it away to a friend a long time ago. Oh well, water under the bridge.
A technical question for you or anyone else that can help, are the urethane o-rings – of the proper durometer of course – also appropriate for PCPs?
I want to add a heartfelt thanks to BB and Pyramid air for allowing and encouraging these guest blogs. Having all this information in a single place is an incredible service to the air-gunners community. Cheers to you!
Henry
I don’t see why not, air is less harsh on orings than co2.
And as long as the rating will hold the pressure needed, why not?
They do tend to be more expensive than lesser ones though.
Ian
Henry,
Most definitely. I also on occasion put a drop or two of quality silicone oil in my female foster fitting when filling my PCPs. This will migrate to the seals and increase their lifespan and help seal any minor leaks. It also helps lubricate the valve, regulator, etc. Any excess will be blown out and coat the pellets, barrel, etc. It will likely also cut down on any possibility of rust issues. No need to overdo it, maybe every 10 fills.
Good advice RR. I have used RWS silicon chamber oil in very small quantities in my Urban and it seems to work well.
Henry,
I do the same with my Urban. What pellet have you found to be most accurate in it? I haven’t tried a lot of pellets but mine seems to like the JSB 18.13g best. I have also tried RWS Superdomes, H&N FFTs, and Crosman Premiers.
Geo
Geo, I will gladly answer your question, but the truth is that I haven’t had the time to shoot as much as I had planned when I retired a year or so ago (unexpected work) so take my comments with the proverbial grain of salt.
For short distances I like Meisterkugeln – they are very accurate and make clean holes with their flat head. They are also very effective on pests, although that is not their intent. For cheap practice at longer distances I use Premier HP (just OK) and the few rimes when I got serious in a relative’s farm I used AA Diabolo Field Heavy (better) and the Kodiaks 21.14gr, made by H&N, the best I have tried in my rifle.
Henry
Give the JSB Jumbo 15.89g and the JSB Jumbo Heavy 18.13g a try. I think you will be pleasantly surprised how well they group in the Urban.
45Bravo,
Excellent report! You did a fine job with the tutorial and pictures. I don’t have one of these but found it interesting and informative in any case. Anyone who does own this model should surely bookmark this blog for future reference. I think these types of blogs are just great. I would like to see more reports on airgun repairs. At some point most of us will have to do some re-sealing of our airguns I would suppose.
I have an old Crosman model 130 pistol that I bought many years ago. The piston seized in it from lack of use and I tore it down to attempt a repair. It’s still in the box in pieces. I think at the time I was in over my head with the re-assembly and gave up on it.
Great job on this report, and I look forward to more from you 😉
Geo
The 130 is a self cocking design am i correct?
When you start pumping, it automatically cocks the hammer?
I have a first generation Crosman 761 XL that is an autococking design also, it has never been apart since it was new in the early 70’s.
Its finally starting to have some issues after decades of abuse by kids and adults alike.
It has been my loaner to friends and family to teach their kids to shoot.
I thought of trying B.B.s trick of the ATF sealant to get it going again, but since I have never been into a self cocking gun, I figure I may as well do it right, and we will learn how to reseal/repair one together.
I just need to order the parts and get to work on it.
I don’t know if anyone has taken notice, but the synthetic stock ASP20 is now available at Pyramyd AIR.
/product/sig-sauer-asp20-gas-piston-breakbarrel-air-rifle-synthetic?m=4598#8983
One of these might even replace my Tomahawk. You never know.
Well, kind of, no delivery date on them yet. I am waiting on one of these too, although I am not sure if I need it.
Hmm. Yeah, on second thought I most definitely need one.
Henry
Henry,
Oh yeah, you need it. So do I.
RR
There is a used one for sale that was used as a gun for a report and is .177 and a wood stock. It’s for sale at a place on the left cost if you know what I mean.
GF1,
I saw that earlier. Wrong caliber and stock for me. That is what took me to PA to see if the plastics stocks were in yet.
RR
And I imagine it’s been around the block too.
What kept catching my eye was that used HW30s with the stainless action and regular wood stock. It’s a nice looking gun. And it’s a .22 caliber which I would like to try. But I got another gun on the way. It’s new though. It’s one of those HW30s black guns they call it. It has the normal colored action in .177 caliber but it has a black and gray laminate stock. I haven’t owned a gun with a laminate stock and have always wanted one. I figured another HW30s wouldn’t hurt either. 🙂
GF1,
Laminate stocks are nice. I believe stock on the HM1000X is the same color. You have less concern of warpage or flex as with regular wood. They are heavier though.
RR
I bet that RAW is a good look’n gun.
And less flex is good I think. And I can put up with a little extra weight I suppose if it looks good. I’m excited to get it.
GF1,
You should be. It is the top of the line. This oozes quality. There is no other airgun out there that you can buy that is made better. Period.
RR
They are nice. But don’t forget the Tx 200’s. They are nice too.
GF1,
Most definitely. Just another category.
RR
Yep guess so.
45Bravo,
This is an excellent report for posterity’s sake. I don’t even have one of these, but it’s so nice to know that, if I did buy one, I could just come to this blog, search on “Smith & Wesson 78G and 79G,” and poof, this report would pop up.
That’s very cool. =>
take care,
dave
Catapult gun: a bullet-shooting crossbow
Hey all, something B.B. said a while back about catapult guns made me do a search that led to this article:
http://www.ctmuzzleloaders.com/ctml_experiments/bulletbow/bulletbow.html
I really like that the author did velocity testing, and related the power to slingshots and air rifles. While he did not yet do accuracy tests, he at least found some ancient texts that spoke of the expected practical accuracy.
While they may not be practical, they are basically a catapult shooting a heavy lead pellet, plus they are historic; hence, I just think they’re cool.
*shrugs*
It’s something to check out over the long weekend till we get to see B.B.’s next report.
And again, great job 45Bravo!
Wishing a blessed and happy weekend to all,
dave
I know it’s not the same, but I had the Daisy version. I sure wish I hadn’t let that one go. It was in .22 cal. So I thought it was weak cause my C02 bb pistols shot faster (more FPS). I knew nothing about energy back then. Also the shots dropped so much faster than my .177s so it had to be weaker, right? And my bb pistols would stick in a tree and the pellets would flatter and fall out at the distance I was shooting. Geez I didn’t know better.
Doc
Doc, if you read part 4 of the blog, I compare the Daisy and the Smith & Wesson guns.
Other than disassembly, resealing them is the same.
Ian
I’m bummed. I saw the tip in an earlier blog that Hatsan USA was selling out the Dominator carbine, so I got one. I put a scope on it and was so pleased, the first pellet I tried (H&N FTT) was one hole at 10 yds, and had been shooting at targets out to 50 yards with great success. Then it started to grind when it was cocked 🙁
I see that I have to ship from my end to get it repaired. Not going to be much savings on this “sale” after shipping this heavy gun back. Didn’t even get 500 pellets through it.
MMCM13,
Ugh. I feel for you.
My experience is that warranties are rarely honored in any way that add value to the purchase vs. buying used off of Craigslist. Still, maybe Hatsan is an exception. There definitely are some. Would you please keep all of us posted about how they treat you?
Michael
Well, so far, I got an email asking me to remove the stock, clean anything I find around the cocking shoe and apply some moly-grease. That was unsuccessful and I replied to the email. I’ll wait to see where it goes next.
Bill
Off-topic, but this is the place to ask.
My nephew was given a new, low-cost fixed blade knife he would like to make suitable for bushcraft (which I had to look up). Unlike me, haha, my nephew is pretty handy, and he would like to use a Dremel tool to cut a series of perpendicular grooves on the spine of the blade for fire-starting with a steel (which I did not need to look up :^). I told him he should get a diamond impregnated wheel. Then he asked me what type, because the blade is D2 steel alloy. My wife gave me a katana a couple years ago that has a blade of T10, so I know from reading up on that that tool steels are exceptionally hard, but I don’t know about D2. My guess is about high 50s HRC or so, harder than my 1095 Ka-Bar, anyway.
Is there a diamond wheel for a Dremel that would cut four or five shallow grooves in a D2 blade? My nephew showed me the knife, and the blade has got to be 5 or more millimeters thick, quite a brute.
Thanks in advance,
Michael
Michael,
While not responding directly to your question,….. a tip I would like to share. I have found the new? variety of diamond imbedded files and sticks to be (MUCH) easier to use to sharpen knife blades. It is much more natural to use them as you would a file. To “strop”,… a worn out diamond stick or file will do a nice job with a light back stroke. Not ideal maybe,….but easy and nice to maintain a daily use blade.
Chris
Michael,
I think this will work for that application: https://www.dremel.com/en_US/products/-/show-product/accessories/506cu-7-8-premium-metal-cutting-wheel
Siraniko
45Bravo
Nice report and I like that the seller included the print and where the o-rings was located and what size. I hope he mentioned in his description that was included. It would make mr hit the buy now button right then and there. I’m betting that would be the difference from selling some and selling alot.
Anyway out to shoot my Sig MPX. Got a fixed 4 magnification UTG scope on it right now. It’s a blast to shoot. Been using the Winchester round nose pellets in it and it’s shooting great. Well at feral cans anyway. I haven’t even shot any target paper with it yet. And I guess I should try some of the different JSB pellets in it I have. Heck it might be real accurate with some good pellets in it and I don’t even know it. Yep that’s what I’m going to do today. Oh and I’m getting over 200 shots on the 3000 psi hpa bottle regulated at 1200 psi.
And again. Nice report.
Here’s a picture of it.
And one more thing. I just recovered these 4 Winchester round nose pellets that were in a aluminum can I was shooting at with the MPX. And no ice or water in the can. Just a empty can.
Remember a while back I posted a picture of a round nose pellet with a hole all the way through the center.
We’ll now I see why by looking at these 4 pellets. The inside of the back of the pellet that’s hollow goes real close to the head of the pellet. In other words the head of the pellet is thin on top.
The picture is looking at the top of the pellet head. You can see the one on the left started to make a hole all the way through and the other 3 look like hollow points.
These just might be good hunting or pesting pellets. I have shot some starlings at about 30 yards with them and the exit hole is bigger than the entrance hole. And they did make a slight pop when they hit. I’ll have to check this out more. If so a cheap pesting pellet as well as a plinking pellet.
Just a quick update on the accuracy.
It’s a 30 yard gun pretty much with the JSB pellets and the Winchester’s. The JSB’s about a 1/4″ better. And that was bench resting it on a bag.
It’s getting around a 1-1/4″ at 25 yards. Out at 30 yards about a 1-1/2″ and at 35 and out it opens up to much to hit a 12 oz. can consistently every shot. So 30 yards and in is fine by me. That’s what I got it for was a can plinker anyway.
Took out my second woodchuck this afternoon with the Urban. This chuck wasn’t quite as big as the first one. He was about 25 yards from me and I had nothing to prop on so I sat on the ground and braced on my legs. A single head shot did the job and tomorrow the vultures will feast. 😉
Geo
Geo,
Way to go!,…. especially with the not usually practiced sitting position. Not so sure I would do well with that. The main thing is that you got it. I have not seen any since the one I got.
Chris
Geo
What are you. A Ninja? lol.
They won’t let me get that close out here let alone take the time to sit down and take a shot.
GF1,
That is funny! I thought the very same thing. All I can say is that Ol’ Hoggy must have been really distracted. I swear them suckers can hear you blink!
Chris
Chris
I know the ones out here can hear you blink no doubt. 🙂
GF1 & Chris,
I have a salt lick out behind the house about 35 yards. The first big chuck was busy working on that salt
lick and I sneaked around some pine trees to where my lawn barn is located. I peaked around the edge of my barn and the chuck had his head down working on the salt lick. When he raised his head, it was over before he knew what hit him.
Yesterday, I saw a smaller chuck out by the salt lick. I had seen him a couple of times but he didn’t stay in one place long enough for me to get my rifle and get out to take a shot. My grass was getting a bit tall because I don’t mow every week like some. Anyway, I looked out back and saw the chuck munching on that nice tender tall grass. So he was distracted a little. He was about 20′ from my lawn barn. I got the Urban and went out to the side of my garage. I knew I wouldn’t be able to stalk any closer, but I also was pretty sure that at 25 yards I would be able to make a good head shot. I sat down on the ground so he wasn’t able to see me as easily and again, he had his head down eating the grass. When he raised up to look around, it was over. Another clean head shot and one less woodchuck. End of story.
Geo
Geo
Yep that’s the way to do it.
Geo,
Salt licks and tall, tender grass aside,…. I still think that you deserve Ninja status! 😉 Well done.
Chris
Off topic:
O.K. everyone, I have a Hatsan BT65 Elite in .25 cal.
Caldwell Chronograh, old one that is not upside down.
it is consistent with other airguns as well as the original cylinder when I re-chronographed it.
What is going on between these two air cylinders?
Old one that came with the gun has 02/2016 date on it.
New one has 11/16 date on it.
Why is there such a difference in fps between the two?
Does the new one have a regulator in it?
I think it acts like it does. Or am I missing something?
Does the new one have a different valve pressure release pressure?
Hatsan BT-65 Elite QE
JSB Match King 25.39 gr.
Old Cylinder New Cylinder
————————————————– ———————————————-
Shot Number FPS Cylinder FPS Cylinder
Pressure Pressure
(BAR) on gun (BAR) on gun
============================ ==========================
1 861 180 669 200
2 868 691
3 887 696
4 893 697
5 906 700
6 915 701
7 921 708
8 941 711
9 948 722
10 950 160 732
11 949 731
12 963 746
13 965 757
14 972 758
15 968 767
16 975 150 761
17 979 770
18 987 145 771 150
19 988 769 150
20 972 784 150
21 971 785
22 964 785
23 954 784
24 949 140 787 140
25 937 DNR
26 928 788
27 922 120 791
28 912 796
29 908 795
30 896 100 805 130
31 end of string 799
32 DNR
33 D/R=Did not chronograph 800
34 DNR=Did not register on 789
35 chronograph 797 110
36 794
37 789
38 793
39 793 100
40 584
41 786
42 783
43 778
44 777
45 774 90
46 763
47 758
48 761
49 744
50 737
51 732
52 702
53 702
54 694 60
55 684
56 672
57 659 50
58 659
59 643 40
This is very frustrating for me…
Sorry for the formatting. I did not know how to place an Excel spreadsheet into here.
Sorry for the inconsistent recording of the cylinder tank pressure.
This is what makes me want to leave the Dark Side!!! and go back to onboard pumpers i.e. Benjamin 392.
I don’t expect exact FPS numbers between the two, but to me this is ridiculous.
Thank you for any help on interpreting these shot strings,
John Carlisle
DRC,
That is for sure odd. I would start with the 2 cylinder gauges not reading the same,.. but,.. that can be eliminated by insuring your fill tank reads the same while filling.
Both indicate a slight over fill,…noted by the lower to higher (to) level off (to) drop off = shot curve.
I would lean towards a restriction at the cylinder fill port,.. but,.. that could/should be eliminated by waiting for say 2 minutes between shots on the new cylinder. A restriction would act the same as a regulator that is slow to recover.
A quick check shows the rifle is not regulated,… but that new cylinder sure does act like a regulated cylinder. The date spread is quite odd. New is new, so I would not be concerned. If it was used or a refurb, someone may have put one in (or) have swapped it with a cylinder that was the same, but came factory regulated. (I would check into that to see if Hatsan does in fact offer the same cylinder in 2 versions)
That is about all I got for you. It will be interesting to see the replies that come in.
Good Day,…….. Chris
Hi Chris,
Both cylinder gauges read very close to the same as on the gauge on the Hill hand pump gauge, even at different pressures while filling.
About 170-110 bar on the old cylinder seems to be good.
I don’t believe that Hatsan puts the regulator into the cylinder and sells it that way. At least not that I’ve ever come across online.
And yes it will be interesting to see what other replies do come in.
Thank you for your reply,
John
DRC,
I did find this,….
/product/hatsan-pcp-regulator-bt65-class?a=7342
It appears to go inside the cylinder, so not even sure that you would know it is in there. There is 5 Hatsan cylinders offered, but none show regulated as new. That is looking at the PA site. There may be something else out there though.
You could weigh the two cylinders. If one is regulated, that should easily show up on a scale. You might even note it by hand feel.
Chris
Chris,
I don’t know if my bathroom scale would detect a difference in weight, but a great idea.
My friend just bought an air tank, so I might open it up to see if there is a regulator in there. A lot easier to fill back up with the tank than the hand pump. If it is even possible to fill from empty by the hand pump. I may try to fill it back up by the hand pump to see if it possible with this one before finishing off with the tank.
Someone may have bought it and tried a regulator in it and decided to return it as new. Thus, being resold as new. I need to look up where I purchased it. I bought it from another source other than Pyramid Air at the time.
Thank you again,
John
DRC,
A kitchen scale might be ideal. Maybe a grain scale (like for weighing powder and pellets). I would not trust a bath scale. Rig up a simple teeter-totter if all else fails.
If there is one in there,.. and if it is the Hatsan I linked,… then it is adjustable. The spread over the string on the new cylinder is pretty wide though. Too much so for a properly working reg. in my opinion. In that way,…. it acted like a well matched pressure/valve combo. Pretty gradual overall. Either way,… that is an impressive shot count from a cylinder.
Chris
John
Looks like the right column is regulated and the left not regulated.
Can a gauge be put on the tube where it attaches to the gun? That will tell you the output pressure of the cylinder going to the guns valve. And the other way would be open up the tubes and see what’s inside.
Gunfun1,
I believe that the gun’s valve is attached to the removable air cylinder. That way you change out cylinders without degassing.
Thank you, all insights are a learning experience for me.
John
DRC,
My guess is the tube has a valve that can be filled, sealed when released and then unseated when screwed back on the gun. Once on, the main valve is now supplied with air inside,…. which then is released when the hammer hits the valve stem. I could be wrong on that though.
I do believe the hammer is adjustable on what you have, by the way. I think that I recall that when I looked it up on the PA site.
Chris
DRC,
I just went to the PA site and looked at the comments (briefly). There is a fellow that goes by Robert that has 2 cylinders acting differently. BB also just mentioned the firing valve maybe being inside the tube as a possibility. Read Robert’s comments,.. and others:
/product-all-reviews/a/hatsan-air-cylinder-fits-hatsan-at44-short-at44pa-hammerli-pneuma/4883
If so,… that ups the variable possibility from tube to tube if the valves are acting/built/performing a bit differently.
Chris
John
Still air will release somewhere to depressurize something.
So can you get some fittings and set something to check output pressure. That will tell the story. I have my Maximus set up with a 3000 psi regulated bottle. The bottles gauge shows my full fill pressure. I left the guns gauge in place to tell me the guns working pressure or regulated pressure.
That tells the truth is all I can say. I have regulated bottled hpa guns now. I have 5 bottles that are regulated at different pressures. The reason is to control velocity without changing the guns setup. Basically the striker pressure.
Sounds like you need a way to test to me.
B.B.,
I was eagerly awaiting your observations/speculations on Desert Rat Caver’s quandary. Or,… perhaps the “teacher” is sitting back in order to see just how much the students have learned? 😉 While the data was not perfect, it was good enough to give a guess a go, I thought.
Chris
Chris,
Are the firing valves inside the removable tanks? If so, question answered. If not it’s probably an airflow thing.
B.B.
B.B.,
I do not know for sure. I just read some comments from the PA site and it would appear that it might well have the valve inside. That would be like the Air Force Talon, etc. set up then,… yes? (of which I have not studied in depth) I am only familiar with fixed tank/tube PCP’s.
Chris
Chris,
My bathroom scale reads the same for both cylinders. No one near me has a kitchen scale, go figure.
I’m taking both cylinders to a big box store to use their scales for weighing food for processing. That should be sensitive enough to see a difference in weight.
I also looked up how to insert a regulator into the air cylinder. It states in the instructions for a Hatsan regular to remove the outer o-ring on the valve, that’s attached to the cylinder, to allow excess air to escape from the regulator. My “new” cylinder does not have that o-ring in place.
Seeing that, I’m pretty sure there is a regulator in there. After finding out the weight of each cylinder, I will open it up and see what regulator is in there, if the weights are different.
I will probably shoot Hatsan Vortex 19.9 gr. pellets first to baseline those and accuracy also, before I start to play with any regulator that might be in there.
It will probably be awhile before I can shoot at any real distance as I live in Phoenix, AZ. And it’s 110 degrees plus for the next few days.
Northern climate bloggers don’t shoot as much in winter. Southwesterners don’t shoot as much in the summer. Without driving about 2 hours to cooler climate ranges.
Thanks Chris,
John
DRC,
Sounds like a solid plan! Keep us posted. Hopefully more comments will be posted. Like you,… I would be looking for any and all help that I could get my hands on,.. given your dilemma.
Chris
John
That’s what the instructions say basically too if you use a internal regulator on a Maximus and other guns. Sounds like it has a Huma regulator in it.
Oh and by the shot string on the right chrony chart I think the striker spring pressure needs to be increased some. That will get that air resivior working closer to the other resivior tube you have. By that I mean velocity along with the higher shot count.
If your wanting to know what tube has what. Do your weighing and gauge and such.
But I’m thinking you already know by the info you have gave. So the next question is do you want to make both cylinders work the same if you intend to switch them. Or document what the different tubes shoot like. And I’m talking aim point and fill pressure. Sounds like you got a extra variable that was unexpected to me.
Keep us updated on what you find.
45Bravo You did a very good write up on the rebuild of the Smith Wesson 78G/79G air gun. BB suggest I make a reply to this writeup. I have rebuild kits and most any part you need for the 78G,79G, 77A, and 80G Smith and Wesson. peter_built78@hotmail.com