by Tom Gaylord
Writing as B.B. Pelletier
Daisy Buck BB gun.
This report covers:
- Little Buck Rail
- Mounting the rail
- MIL STD 1913 Picatinney rail
- Weaver rings
- Won’t the ring move around?
- What scope?
- Discussion
- Summary
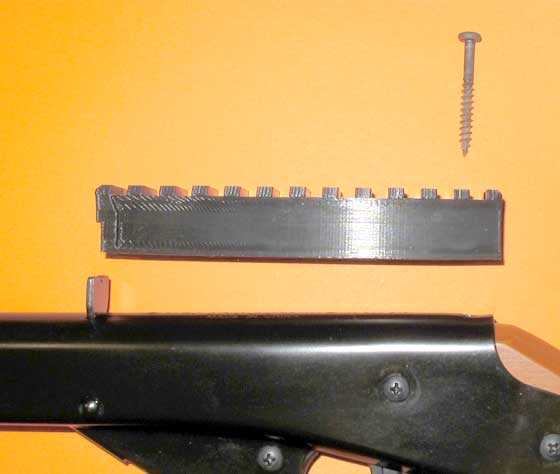
We have now looked at the Daisy model 105 Buck BB gun. We’ve seen its velocity and we have seen its level of accuracy with the factory open sights. Today we begin to look at the reason for the report. Today we look at mounting a scope on the gun, using the Little Buck Rail from Buck Rail.

The Buck Rail is a synthetic adaptor that fits a Daisy Buck BB gun to provide a MIL STD 1913 Picatinney rail for mounting an optical sight.
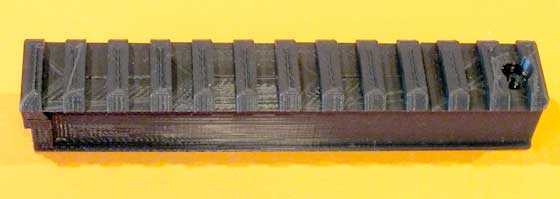
Little Buck Rail
The Little Buck Rail is an adaptor that fits over the rear sight on the BB gun. It has a hole at the rear for the wood screw that fits the top of the pistol grip on the BB gun.
Reader Terry Harman asked if I would be interested in reviewing the scope base his company makes. I had already tested a scope base for the Daisy Red Ryder back in 2016, and there was enough interest that I thought I would see what Terry’s company makes. I’m glad I did because it is very different from the previous mount I tested.
When I first saw the rail I wondered how it had been made. It wasn’t machined yet the angles and cuts were precise. Then I read the website and discovered that it was printed on a 3-D printer. I think this is the first time I have seen a 3-D printed part sold for retail. I’ve seen plenty of them used for testing, but never as the finished product. Let’s take a look at the design.
One end fits over the Buck’s rear sight. But it isn’t a simple slip fit. There is engineering involved so the fit is solid, once the part is in place. Let’s look at it.
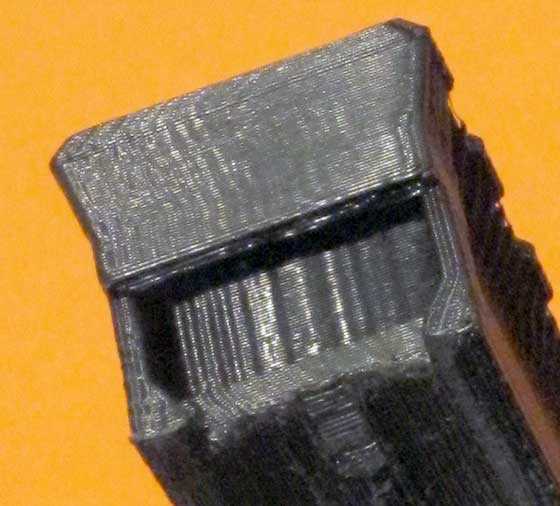
The Buck’s rear sight slides up into that slot you see here, but it isn’t just a simple slip fit. There is a ledge at the base that presses against the rear sight once it’s in the slot, so the fit is very tight!
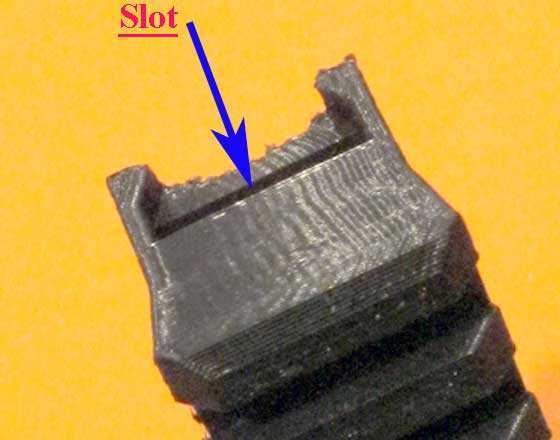
You’re looking at the rail from the other side in this view. The rear sight fits into the slot (arrow) and here you can see the ledge (the arrow passes through it) that presses against the sight.
Mounting the rail
To mount the rail on the Buck you first need to unscrew the Phillips wood screw located at the top of the pistol grip. Remove the screw from the gun.
Next, the rail is positioned over the rear sight like a lever or a shoehorn and the rear of the rail is pressed down. That fits the rear sight into the slot at the front of the rail.
This is how the Little Buck Rail fits on the gun, but not how the rail is installed.
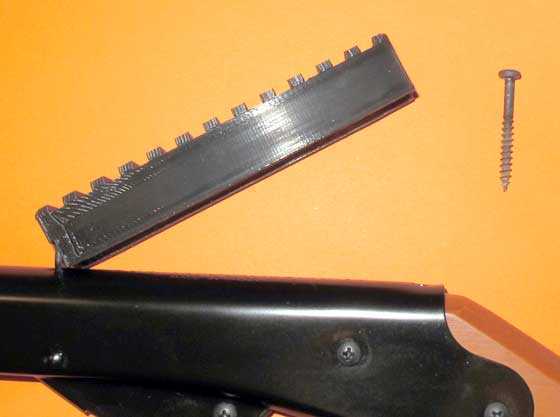
Here you see the rear sight slipping up into the slot on the front of the rail. Press the rear of the rail down and the slot fits tight around the rear sight.
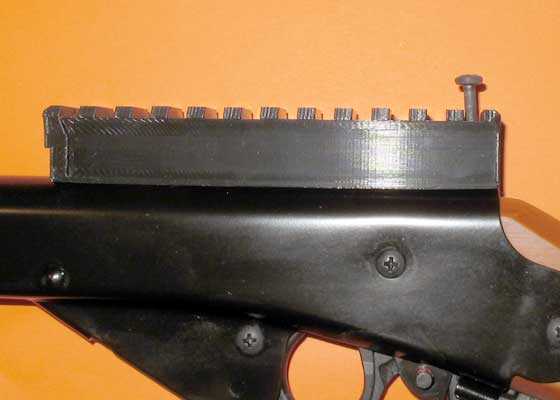
The rail has been pressed down onto the top of the gun. Now the wood screw fits through the hole in the rear of the rail and screws back into the top of the pistol grip.
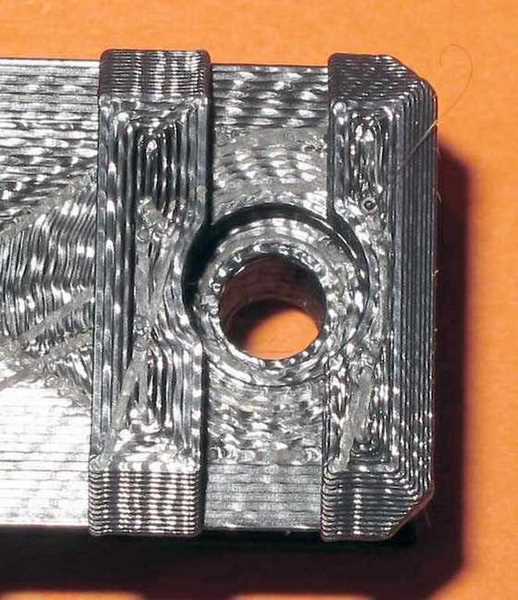
The hole in the rail that the screw passes through has a recess for the head. So when the screw is down all the way the head is out of sight.
The wood screw is not going back into the gun’s stock as deeply as it was before. But the taper of the screw shaft is very gradual, so there will be plenty of wood for the screw to grasp. Just don’t tighten the wood screw too much or the hole will strip out.
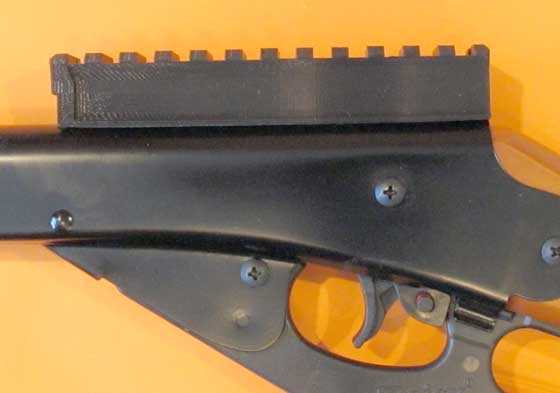
The rail is now tight against the top of the gun. It’s ready to accept scope rings.
MIL STD 1913 Picatinney rail
When I examined the rail I thought it was probably an exact MIL STD 1913 Picatinney rail — not a close copy that you see on many scope rails today. MIL STD 1913 is an interface MIL STD. It describes the fit that any scope or optical sight mount must attach to. The thing about it is you are going to need scope rings that will attach to a real MIL STD 1913 scope rail. Just be aware there are many that won’t do it — even though their packaging says they are for Picatinney rails.
To illustrate what I mean, I measured one of the slots that cut across the rail. It should be 5mm in width. Let’s see.
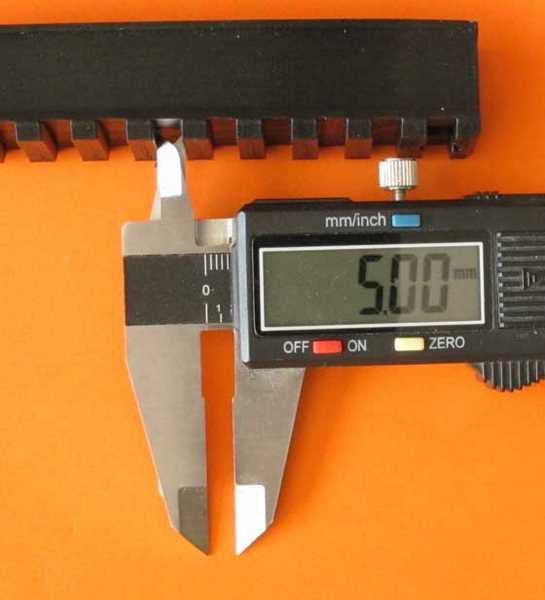
I’m measuring the width of one of the rail’s slots. They are supposed to be 5mm.
When I saw this measurement I figured the MIL STD specifications had been used in the 3-D printer to create this rail. That’s easy enough to do. Well, that is where some scope rings that don’t exactly meet spec will have problems.
The first scope mount I attempted to install on the rail did not have legs long enough on both sides to reach down over the rail and clamp. I spent 45 minutes with this ring set, thinking I was doing something wrong, before realizing the ring was not really produced to MIL STD 1913.
Oh no, the sky is falling.! Now we need an expensive set of scope rings!
No — you don’t. I decided to show you how easy this really is.
Weaver rings
I selected a set of medium height Weaver rings. Weaver rings have a specification that the width of the rail base is identical to MIL STD 1913. But the cross slot is 3.8mm — not 5mm. That means Weaver rings will fit a Picatinney rail or base, but the reverse is not true. So I took the El Cheapo ring set I found and measured its crossbar for you. Remember, the cross slot is 3.5mm.
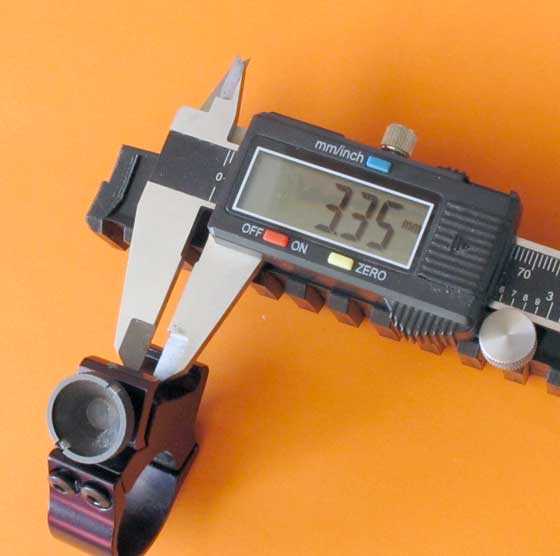
I’m measuring the width of the crossbar under this Weaver ring. It will fit into a Picatinney rail with room to spare.
Won’t the rings move around?
Since the crossbar is smaller than the slot, won’t the rings tend to move back and forth on the rail? No. In a centerfire rifle, recoil will keep the ring’s crossbar or key butted up firmly against the back of the slot. On a BB gun, the ring can be held in place by clamping pressure, alone, as it would be on a rimfire rifle. This is why you can use Weaver rings with Picatinney bases. I wrote a whole report on this 14 years ago.
What scope?
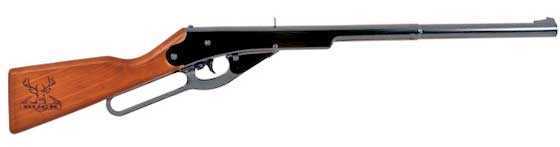
For this BB gun you need a scope that won’t be out of focus at close distances, because BB guns don’t shoot that far. That means either low power or a scope that focuses (parallax adjusts) very close. And we all know there is one scope that adjusts closer than any of them — the Bug Buster! It focuses down to 3 yards or 9 feet. I selected a Bug Buster 3-12X32 for the test. It had a UTG 80mm Sidwheel add-on already mounted and I thought, “What the heck? As long as we’re scoping a BB gun, let’s have some fun.”
The scope mounted in the one-inch Weaver rings easily enough and when I was finished I had something I never thought I would see — a scoped Daisy Buck!
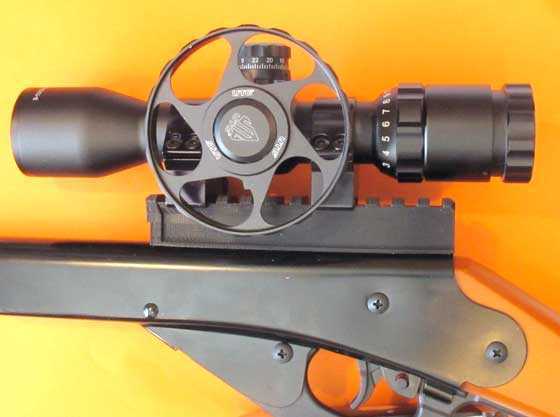
The Daisy Buck is scoped and ready to go!
Discussion
A lot of thought went into this scope rail, and while I do not believe new shooters should be allowed to use a scope until they can use open sights, that’s just my opinion. Plenty of people want to scope their guns, even their BB guns. I remember back in the 1960s, I would have scoped my BB guns if I had the money. I thought scopes meant more accuracy, period. I think a lot of people today believe they do.
In the test I did scoping the Red Ryder, the gun actually was more accurate with the scope. So maybe this is a good thing. All I can so so far is this Little Buick Rail is certainly well thought out and seems to be well made.
Summary
We have the baseline on the Buck with open sights. Accuracy with a scope is next. And given the scope I am using, I think the Buck is getting its best chance to shine.
There is one more thing I want to show you, but it will come in the next report. I can’t wait to hear what you think!


B.B.,
A scoped 105 Buck,… I love it! Very nice on the mount. Looking forwards to the test.
For those that have difficulty with opens,…mounting optics of some sort IS better and does make them shoot better. It may not be right, or proper,…..but it is fact.
Good Day to you and to all,………….. Chris
B.B.,
Putting a scope on this makes it look like 1917 Enfield if I squinted one eye and it was dark.
Siraniko
PS: Section Little Buck Rail Second Paragraph third sentence: “I’m glad I did because it is very different from the….” (sentence ends abruptly like you were going to insert a link but forgot to do so)
Figure 6 (/blog/wp-content/uploads/2019/07/08-01-19-05-Buck-Rail-install-2.jpg) : Here you see the rear sight slipping up into the slot on the front of the rail. Press the rear (front) of the rail down and it fits around the front (rear) sight tight.
Siraniko,
Got them, and also the misspelling of the word thought. The caption had to be rewritten a bit because it was clumsy and confusing.
Thanks,
B.B.
B.B.
That final picture is something I never thought I would see…a scope on a little Daisy Buck…it’s good, though!
It’ll be nice to see how she shoots with it. =>
Take care & God bless,
dave
This mount would be perfect with the little red dot mentioned a couple of months back.
/product/utg-reflex-micro-dot-red-4-moa-single-dot-adaptive-base?a=8738
At first I went “Aaah, OK.”, but after thinking about it I might just give one a try. My reasoning is that my grandson has pretty much outgrown the Buck already. To shoot it he has to place the butt on top of his shoulder and lay his head over to look down the sights. With this and maybe a riser a dot sight might work for him.
This could possibly open the door to my being able to mount a scope on some of my antique air rifles. I would not dream of modifying one to accommodate a scope, but with a specialized type of mount I could do such on them without marring the air rifle.
If this mount was indeed made with a 3-D printer as BB mentioned, then almost anything is possible. You would need to actually design the mount on your computer before you “printed” it, but think of the possibilities.
Later
Bob
B.B.
I wonder how many scope rail parts can be plotted at a time? Way to go Daisy.
Could sintered metal be far behind? Looks like the trigger has been updated too?
Precision shooting with Iron sights needs precision equipment, like eyes, so I enjoy
my new UTG 2×7 with etched glass reticule. With the excellent quality pellets now,
I feel like I have way more control than before. I will continue to be amazed by what
an experienced set of peepers and trigger finger can do the traditional way.
thank you, Robert
Robert
From what I understand there is different types of 3D printers that can do different material. And I do believe metal is one. And of course the printers can get pretty expensive as the applications goes up.
I haven’t searched lately. I guess I should again to see what’s happening out there now.
But I believe your right. It’s just a matter of time before it kicks in. It will be a new type of machining in a sense is the way I see it. The new machine shop will be a a 3D shop. Really I believe it’s coming.
B.B,
Great product placement!
Please pass on (although I suspect he will read this post himself) to The Little Buck Rail creator, Terry Harman, that he should give thought to adding a replacement wood screw of the correct length to ensure that his customers don’t strip out the stock. I doubt it would effect his bottom line by all too much if he bought in bulk.
shootski
shootski,
You know — that dawned on me, as well.
B.B.
B.B.,
At; Civil, Naval or Astronomical?
See: https://www.timeanddate.com/
Above sight has gotten me out of a great deal of trouble with Game Wardens!
shootski
My scoped rimfire Ruger 10/22 is how I got my visually-impaired friend/coworker into firearms 40 years ago; had a Bushnell scope on it, the specs long ago forgotten. After he found out he could do some fair shooting with that combination, he was bitten by the bug and has never looked back. We still enjoy some range time together, and he’s acquired several firearms over time.
Now he’s even talking about buying an ASP20 in .22, though I’ve suggested he not hold his breath waiting for that elusive bundled rifle-and-Whiskey 3-scope offer. Bottom line: if it leads to more fun with your gun, scope it!
Cool 3-D printed consumer parts.
I definitely got my nose buried deep at work in our 3-D printer.
If they call that work now days I don’t see myself retiring soon. Pretty amazing machines. Fun stuff.
And I do right now know there are places that put up 3-D work for people to bid on to make what they want.
I have visions of like 8 or so 3-D printers in my garage at home belching out production parts. Heck I got the back ground. I just need the equipment and the work. I really see this as something coming about in the future. Maybe not so much for me. But maybe so. But I bet it will eventually be part of the future. And you know as it catches on and gets bigger that it will evolve even faster. I’m actually excited about all of this.
Gunfun1,
Yea, we have specific knowledge of a popular consumer product. I think a small home based buisness
making aftermarket parts and selling them on Ebay, like some others do right now. That’s what I like about the internet; it allows me to connect with folks, and niche markets around the world, in a way we could never do in the 80’s. R
Robert
It’s going to get big I believe. Heck it might already be and I don’t know it.
My plan is to retire at 62 years old. But I could see myself doing something like we are talking about after I retire. You just never know. It could really turn into a nice biusness.
The last community college machine tool shop class I took was 10 years ago. All the mills, lathes etc were
manually operated, no computers.A lot of the youngsters were trying to make their own AR receivers and stuff like that. But they had a new CNC machine in the corner. It worked sometimes.
My teacher made radial engines in the 50’s, and little two stroke motors that he would push start with a stick,
and drag race, until the motor failed. He knew beforehand exactly how and where the motor likely would break.
He could walk into the shop in his pink slippers and overhauls and just whip out a new part/ parts. But when the CNC didnt work, thats when I got to see a bunch of older expert tool and die guys standing around, scratching there heads, wondering about the future. For now, I want a manual lathe/ mill in the garage, but yea, it would be cool to just draw the part up and plot it out. I think that day is coming, but not yet!
Best, Robert
Robort
I grew up on the manual lathes and Bridgeports. Then screw machines and Hydromats right after that.
All I can say is I have evolved with the machines as time has gone on. Now even the Hydromats are cnc controlled. In the old days you used a indicator and stand to make a depth move. Or tapped the cutting tool to change a diameter. As crazy as this sounds but you could get good after doing it all the time to tap the tool and make .001″ adjustments in diameter.
Now it’s all pushing buttons. I talk to the youngsters out there and ask them if they know how to center a unit and they have no idea what I’m talking about.
What is good about the Hydromats and adapting them to cnc’s is they are a precise high speed machining center. A Hydromat will blow a regular horizontal cnc away in parts produced and be as precisely made.
So in my opinion after being in the machining world for about 36 years now I can say I do like the cnc’s. But give me a good old fashioned lathe and Bridgeport and I can be happy for hours. At least I’m lucky enough to still get to use the manual machines making and repairing machine parts at work being that I work as a tech and maintenance person. For the most part I got a pretty cool job. But when stuff breaks under the machines it just ain’t no fun. You can let them drop off for days but still go under them and get drops of oil all over you. And it’s hard to work under there.
Anyway enough of all this. Time to get back to shoot’n.
Gunfun1,
I was told, “The beauty of 3D printed parts is that there is no swarf!” That was said by a Design Engineer (with common sense) when he showed me one of the first industrially viable machines.
The place where these machines really shine is in very expensive raw materials where the swarf IS, or is almost worthless. The savings in those expensive raw materials is where the profit is found.
shootski
Shootski
That is true I suppose for 3D printing.
And in the machine shop world it goes both ways. We call it chips. In otherwards the shavings from the drills and turning tools. One machine in 8 hours could fill one or more chip tubs which is about 4 foot long, 3 foot wide and about 3 feet tall. Some metal you get good money for the scrap or chips. Some not.
And another thing about having a 3D printing shop is the start up cost would be much cheaper than starting a metal cutting machine shop. One machine at work is right at a half million dollars. Multiply that by 20 or so machines and that’s alot, alot of money. Plus the parts need washed and heat treated and so on.
The 3D parts would pretty much be ready to put in a box for shipping right off the printer. Maybe a little flash trimming but still alot less processes than a machine shop. And again alot cheaper.
I would say for a decent printer and computer setup you could get one for around $4,000.00 or even cheaper. Take that times 8 machines and you only have $32,000.00 wrapped up in your print shop. Plus one person or maybe 2 could keep it going. Where as in a machine shop you have probably a hundred employees for all the processes.
To me a 3D printing shop sounds like a good idea.
B.B.,
I found a version of MIL STD 1913 (AR) online dated Feb 3, 1995. It shows that the slot gap spec is 0.206 to 0.206+0.008 (0.214) inches, 5.23 to 5.44 mm.
http://www.biggerhammer.net/picatinny/1913_specs.pdf
Don
Don,
Thanks. That’s a change I was unaware of.
B.B.