by Tom Gaylord
Writing as B.B. Pelletier
This is Part 13 of the Hiveseeker guest blog on the Crosman 2400KT. Today is titled Modding the Crosman 2400 family — Primer 2.
This is the most popular guest blog series we have ever published. The marketing folks over at the Crosman Corporation have got to be dancing in the streets!
If you’d like to write a guest post for this blog, please email me. Now, over to you, Hiveseeker.
Crosman 2400KT CO2 Air Rifle – Part 13
Modding the Crosman 2400 family — Primer 2
By Hiveseeker
Part 1
Part 2
Part 3
Part 4
Part 5
Part 6
Part 7
Part 8
Part 9
Part 10
Part 11
Part 12

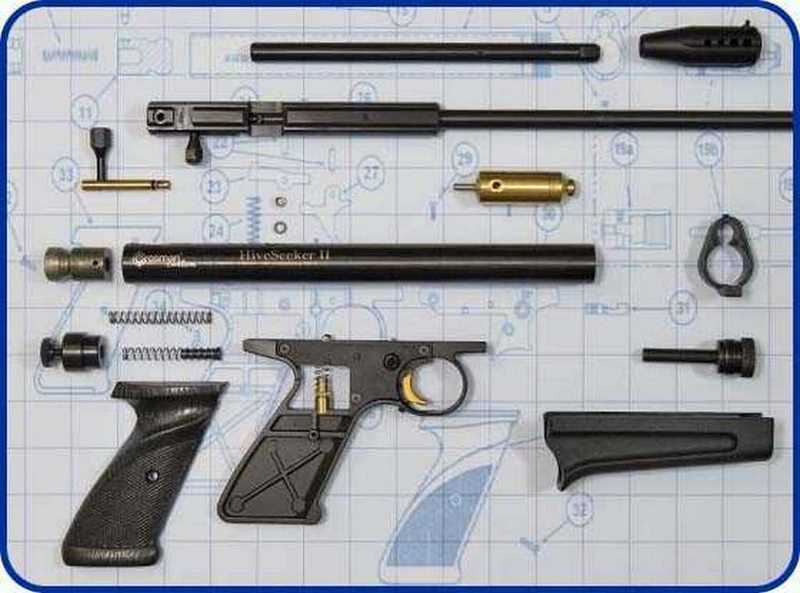
The 2400KT CO2 Air Rifle that I modded for this report is only available directly from the Crosman Custom Shop. It is shown here disassembled with a mix of stock and modded parts. For scale, the background grid on all photos is one inch square.
WARNING: These modifications can change the operation of a gun in ways it was not designed for. Non-factory or modified parts can fail, especially if subjected to higher pressures than originally intended. Pyramyd AIR advises against making such modifications or conversions. This report is for information, only.
This report covers:
- The mods:(1) Steel breech
- (2) Power or boss valve
- (3) Power adjuster and hammer spring
- (4) Max flow transfer port
In Part 12 we provided an introduction to modding the Crosman 2240 family of CO2 guns. We are now ready to actually mod! I’ve ranked the difficulty of these mods from easiest (*) to hardest (*****), based primarily on how much disassembly is required. The gun I modded was the HiveSeeker II from Part 9, a 2400KT with 14.6-inch Lothar Walther .22 barrel. All velocity testing was completed with 14.3 grain Benjamin Discovery Hollowpoints. Temperature was 84 to 88 degrees F for all testing, except for the extended hollow bolt probe which was tested at 76 to 78 degrees F.
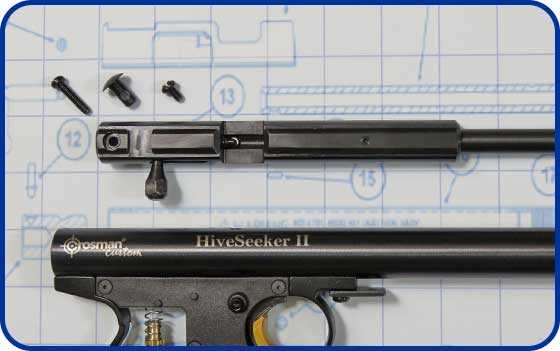
The Crosman steel breech comes standard on the 2400KT and a number of other Crosman CO2 guns, but can also be purchased separately. You can see here that the breech screw remains hidden under the retracted bolt, a big difference from the 2240.
The mods: (1) Steel breech
Difficulty **
Cost: $40 or included with 2400KT, 2300KT, 2250, 2260MB, 2300S, 2300T
I’m going to start with the Crosman steel breech first because this mod arrives already factory installed on all 2400KTs. It provides a slot for the Crosman LPA MIM Rear Sight, and a dovetail rail for various open sights and scopes. Anyone who has made do with the Crosman 459MT Dovetail Intermounts for years like I did — though they certainly work — will really appreciate the solid steel breech! The 2300KT in the Custom Shop also comes with a steel breech, and offers short and long versions. This is one of the main differences between the Crosman 2240 and the rest of this CO2 family, and is one of the first upgrades to consider on that gun.
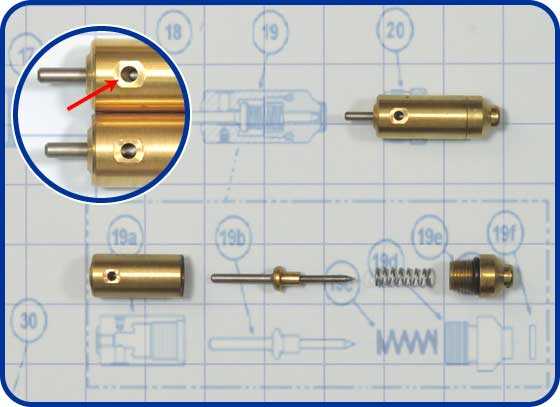
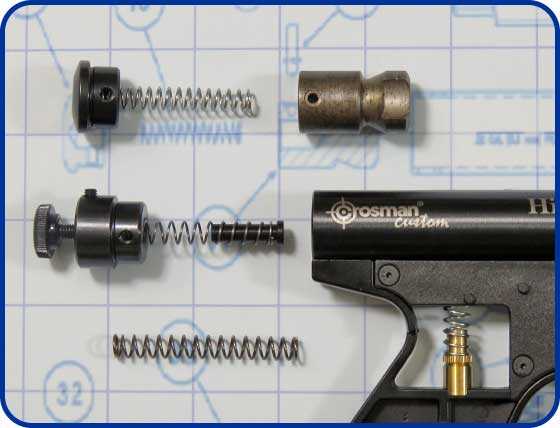
Shown here are the Aftermarket High Performance Power Valve from Alliance Hobby (top right), and the Crosman power valve (disassembled at bottom). The arrow in the inset points to the angled exhaust port on the Alliance Hobby power valve, compared with the straight port on the Crosman power valve immediately below it.
(2) Power or boss valve
Difficulty ***
Cost: $60 or included with certain 2400KTs
I completed the power valve mod next, and it gave me the velocity to which I will be comparing all the subsequent mods. We saw in Part 9 that my HiveSeeker II shipped with what I call the Crosman target or standard valve, giving me a velocity of only 434 f.p.s. This was 124 f.p.s. less than my HiveSeeker 2400KT which was ordered identical except for an 18 inch barrel. I had a valve equal to the one in my HiveSeeker installed in the HiveSeeker II, and got 522 f.p.s. — almost 90 f.p.s. faster!
But this velocity came with a price. If you spend more CO2 on f.p.s., you have less left in your wallet for shots per fill. I got more speed, but my shots per fill dropped sharply from 60 to 25. This matched reports I found online that the Custom Shop power valve adds 10-20% in velocity (21% in my specific case) but cuts the shot count in half. Another way of looking at this is that it will now cost me twice as much to shoot this gun. Most modders, however, are quite willing to pay this price. In some extreme examples I read about mods that granted even higher velocities, but got only 10-15 shots per CO2 cartridge! I also noticed that the report of my HiveSeeker II was much louder with the power valve than it was with the target valve.
So as you can see, not all 2400KTs ship with the same valve. Unfortunately the Crosman valve swap I just mentioned is not commercially available. So how do you get a power valve? There are two ways: Based on my own purchases, ordering a 2400KT with an 18-inch or 24-inch Crosman barrel gets you the power valve. However, my 2400KTs with 14.6 inch Lothar Walther and 10.1 inch Lothar Walther barrels shipped with the lower velocity target valve.
But what if you want a Lothar Walther or short barrel? The other way to get a power valve is to buy an after-factory power valve or so-called boss valve. These are readily available on eBay and from various online mod vendors. These valves are often modified with thinner walls and fewer screw threads to create a larger internal reservoir of CO2 for each shot — more CO2, more velocity! Many also incorporate an angled exhaust port so that CO2 flows more directly from the valve into the barrel. (See the arrow marking the angled exhaust port in the aftermarket valve in the photo. In the Crosman valve below it, the CO2 has to come straight up the exhaust port and make a 90-degree turn as it enters the barrel).
I purchased the Aftermarket High Performance Power Valve from Alliance Hobby, a reputable eBay vendor that sells a wide variety of mods. When I tested this valve I got a marginal increase to 525 f.p.s. (3 f.p.s. over the Crosman power valve), but also gained about 5 shots per fill. So to be a little redundant — but this is important! — certain Crosman 2400KTs ship with a legitimate power valve factory installed. Considering that the Crosman power valve does not appear to incorporate the internal alterations that the aftermarket valves do, I’ve developed an even deeper appreciation for Crosman engineers and the velocity they can squeeze from the 2400KT.
Pro tip: Crosman Customer Service informs me that the Lothar Walther barrels are sometimes in short supply and not always available for standalone purchase. If you want a Lothar Walther barrel I recommend that you order it with your Custom Shop gun (and forego the Crosman power valve) rather than trying to buy the barrel separately. Between the barrel and the valve, the valve will be easier to buy aftermarket.
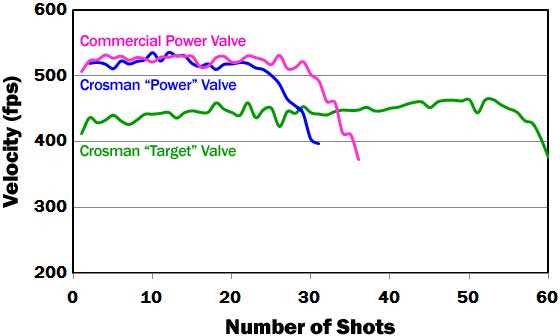
The velocity curves (starting from bottom) for the Crosman target valve, Crosman power valve, and Alliance Hobby (commercial) Aftermarket High Performance Power Valve. The Crosman power valve provides a significant velocity increase of 90 f.p.s., but at a cost of half the shots per fill. The Alliance Hobby power valve gave only a 3 f.p.s. increase over the Crosman power valve, but provides about 5 more full power shots per fill.
If you choose to modify a valve yourself, exercise caution when disassembling it. Some force may be required to unscrew the valve body and chamber plug. Most modders use vise grips and pliers, with some padding such as rubber garden hose to protect the parts from the teeth on the tools. Do not over-tighten the vise grips!
Also, be aware that modders have documented that valve springs having the same part number on different Crosman part lists are sometimes actually different. Some of these modders have achieved higher velocities or more shots per fill simply by varying the combination of hammer and valve springs, or by modifying the springs themselves by cutting off coils. It is possible that the Crosman power valve differs from the target valve only in the valve spring and/or hammer spring. When using a power adjuster (see below), an internal valve spacer such as in the 2300S can influence velocity at either the high or low end of the velocity scale. As you can probably tell, of all these different parts the valve is by far the most complex!
A concluding comment on valves: As I researched the 2400KT on various modding sites, I came across diverse and sometimes contradictory information about this gun. Reported velocities varied, and identical mods that worked on one 2400KT would do nothing for another. I think the source of most of this contradiction is the different valves that ship, unmentioned and undocumented, within the 2400KT line. I completely understand the value and role of a target valve and a power valve. But I wish there was more transparency in the Custom Shop as to exactly what valve you’re buying when you place your order, and the opportunity to make an informed choice.
From top to bottom are the stock tube plug, hammer spring, and hammer (first row); the Crosman 2300S Pressure Adjust Assembly which includes spring and spring guide (second row, note that the black spring guide actually goes inside the pressure adjust barrel on the opposite end of the spring from shown); and Benjamin Discovery hammer spring (third row).
(3) Power adjuster and hammer spring
Difficulty *
Cost: $30-$35 for power adjuster, $10 for hammer spring
This is the easiest mod of all and a good start for the beginner. All you need to do is remove two screws and the tube plug. The hammer (or striker) in a CO2 gun strikes the valve stem, causing it to release CO2 to propel the pellet. A tighter or stronger hammer spring makes the hammer hit the valve stem harder, causing it to remain open longer, release more CO2, and push the pellet faster. An extremely popular mod for controlling this is to replace the tube plug with a Crosman 2300S power adjuster that lets you fine-tune the hammer spring tension (Crosman 2300S Pressure Adjust Assembly, part 2300-124). However, when I tried this using the original 2400KT hammer spring, I got velocities that varied between 507 and 520 f.p.s., all below my base velocity of 522 f.p.s. I suspect that some of these power adjuster settings would provide more shots per fill, but I was strictly after more velocity and did not test this. This mod did not work for me.
Another popular mod in this category is a heavier hammer spring, for the same potential velocity increase outlined above. One that is often used is the Benjamin Discovery Air Rifle hammer spring (part 2261-009). When I tried this spring with the Crosman 2300S power adjuster, it seemed to produce too much tension even at the lowest pressure setting. It was very hard to cock! Velocity testing provided only 509 to 517 f.p.s. across the full range of adjustment. When I was finished testing and tried to remove the CO2 cartridge, it would not come out. The heavy hammer spring had forced the valve stem so deep into the CO2 cartridge that it got stuck! I had to fully disassembly my 2400KT to remove it. When I researched this, I found reports of others experiencing the same problem. This was another mod that did not provide a velocity increase.
Pro tip: To reassemble, you will need to pull the trigger in order to slide the hammer, hammer spring, and tube plug or power adjuster in place.
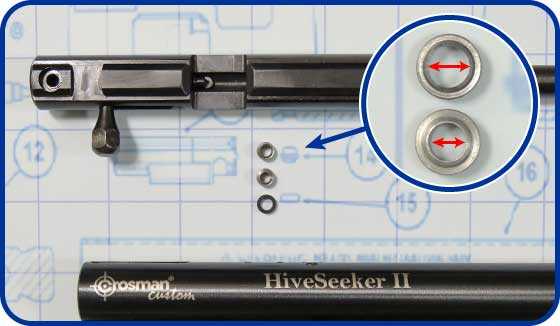
Shown in the center of the photo are the Max Flow Transfer Port Bushing (top), stock Crosman transfer port (middle), and breech gasket (bottom). The inset better shows the larger reamed opening of the Max Flow Transfer Port at top.
(4) Max flow transfer port
Difficulty **
Cost: $15
I told you earlier that there is usually no free lunch in modding, but here’s one that does not have any trade-offs! The transfer port (or sleeve, part 1322A026) is the narrow passage through which CO2 flows from the valve exhaust port into the barrel. A modified transfer port is usually a stock Crosman part that has been reamed out to a wider inside diameter, allowing CO2 to flow more freely into the barrel to provide more velocity. I purchased the Max Flow Transfer Port Bushing from Alliance Hobby on eBay. This one sounded like a no-brainer and I was fully expecting at least a modest velocity increase. Nope — this did not provide any improvement, yielding the exact same velocity (525 f.p.s.) as I was already getting with the commercial power valve. I would have bet money this one would work — and would have lost!
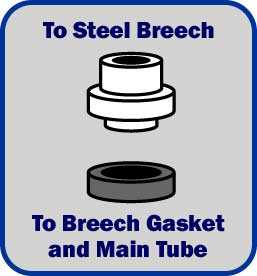
Pro tip: When reassembling, the longer and slightly wider end of the transfer port goes up, into the steel breech. The narrower, shorter end seats into the breech gasket resting in the main tube. Tightening the breech screw while maintaining good alignment of the transfer port top and bottom was one of the trickier operations I encountered during my modding efforts.
That wraps up the modding for today. The final installment will cover 6 more mods, and some last words about the Crosman 2400KT CO2 Air Rifle!


Its definitely as good to know what not to do as to know what to do 🙂
Idaho,
Whoo, yes. “What not to do” was one thing that kept me from trying my hand at modding for a long time.
Although–I found nearly all the mods to be fairly straightforward. If you’ve assembled furniture, you can mod too!
HiveSeeker,
That gave me an idea — an air gun section at IKEA stores! ;^)
Michael
The wife could go furniture shopping ANY time, and I’d come along to “help”!
Hiveseeker,
There is a question on the 3-9-20 blog that you might be able to shed some light on. BB sent out a SOS and I figured you were the guy to know if anyone would.
Chris
Idaho
You get any shooting in yet with your Wolverine?
Hiveseeker,
Another great report. I also wish Crosman was better at letting us know what parts are in the custom shop guns. Your graph on velocity vs number of shots looks a lot like what I get between the 2260 and the 2240. My 2240 gives many more shots than the 2260 even though the 2260 and the 2240 have the same valve assembly, spring, and the same transfer port orifice listed in the parts diagrams. The difference is in the Hammers.
The 2300S and the 2300T have the same hammer as the 2240 but different valve assemblies than the 2260 and 2240.
Here are the Crosman part numbers:
Gun……..Hammer…….Hammer…………Valve………….Transfer
……………………………….Spring………..Assembly………..Orifice
2240……..2300-050…….782-024……..2250-003…….1322A026
2300S……2300-050…..2300A046…….2300-122…….1322A026
2300T…….2300-050……782-024……..2300-122…….1322A026
2260……..2250A006……782-024……..2250-003…….1322A026
1760……..2250A006……782-024……..2250-003…….1322A026
2260..older version……………………………………………..7-2289-001
1760..older version……………………………………………..8-1760-001
I have a Maximus barrel on the 2240 that brings the velocity up near the 2260 with the stock barrel. The 2240 with the long barrel is very quiet though. I am getting about 550 fps with Crosman Premiers 14.3 gr and the Maximus barrel on the 2240. I have not measured the velocity on the stock 2260MB it is the PA Sheridan version.
I may still pull the trigger on a custom shop gun, you keep me interested. If they offered the 2400 kits with the Marauder Pistol trigger that would make the deal for me.
Again excellent report, I’m waiting for the next one.
Don
Hello Don,
Well–thank you! I didn’t come across any mention of different hammers or hammer swapping in all my research and will be checking that out. Changing valves definitely affects velocity, so there may be multiple factors involved. Yes, the 2240 comes pretty close to the Crosman target valve in performance–more shots per fill at a lower velocity.
Hiveseeker,
Once again, a superb report with nice pics and graphics. Your testing dispelled some of the benefits of mods that I was considering (when I get one). Food for thought and possibly saved me some bucks and time. The (revised) plan at this point is to go with a std. 2400KT, long Crosman barrel and do a Maximus barrel swap.
I am very much looking forwards to your final report on modding, as modding is one of the aspects of this hobby that I enjoy the most. Too bad it is a work day. If not, I would be spending more time (all day) reviewing your fine reports (again) and taking (more) notes. 🙂
Chris
(Thanks for all of the hard work and time you have invested for the benefit of us all)
Hello Chris,
More than welcome; it HAS been a lot of work, but fun the entire way. Your stock 2400KT may arrive mostly modded for you, but there are still one or two things you may be able to add for a moderate velocity boost. I’ll also mention that even though the Max Flow Transfer Port didn’t provide a velocity increase, I think it may contribute to another mod’s effectiveness that I’ll be discussing in the final blog. One concept that I came across several times is that some of these mods work in combination with each other and not just individually.
Hiveseeker
Read my comment at the bottom about why the mods you did today are important and why they give a certain performance.
And did you use a caliper to measure the inside diameter of the transfer ports you showed by chance? And also the port diameter on the two valves you show.
That would of been very useful info. That way a person could reference that to a stock 1322/77 or 2240. And help determine why different performance out of the components.
Also the print you have the gun laying on gives a little showing of the trigger componants. You really need to open up or show a drawing of those trigger componants next to a drawing of a .22 Marauder pistol or 1720T trigger assembly. It is a night and day difference in the components. And likewise makes that much difference in performance of the trigger.
I’m guessing that’s what you have in the next part to come. If not you should.
Hi Gunfun1,
Thanks for the additional comments! I’ll reply to the batch of them here.
Yes, the Marauder is highly tune-able. I have one, but actually have not adjusted anything except the trigger a little and I’m pretty happy with it. I was strictly after more velocity, and took the approach that once I had gotten the gun as fast as it could go would try different pellets to find which ones were most accurate and “tune” the gun that way. With the Lothar Walther barrel, almost everything I tried shot pretty well. So I guess I went a reverse route of “tuning” my gun.
I didn’t measure the transfer ports, but Alliance Hobby where I bought the Max Flow port states that the OEM part (which is the same in all these guns, part 1322A026) has an ID of 0.140″ compared to the modified port with a reamed out ID of 0.161″.
The background illustration is a modified 2240 parts diagram which I thought would provide a good backdrop for my parts photos (I tried to cleverly photograph each part on the appropriate area of the diagram…) Anyone can get the parts diagrams for the Marauder pistol and 1720T off the Crosman site for comparison, and those triggers being interchangeable with the 2400KT was something I didn’t try. Out of the box, and with a couple adjustments, I have been happy with nearly all the 2400KT triggers as-is…but we’ll cover that a little more next blog.
Hiveseeker
Like I said. The gun will only speed up so much. But detuning comes easy.
Hiveseeker,
Yo have done a fine job. I know that when you first inspired me, I started to delve into the “sites” and came upon a VAST amount of opinions and so called facts. You have managed to sift through all, or most, of that. That had to be some of the hardest work. I will be waiting for your final report before ordering anything. The “combo” mod comment has my interest. Nice “tease”! 😉 Borrowing one out of B.B.’s book of tricks,… ehh?
Hi Chris USA,
Wow, I have to agree that there is a ton of information out there to sort through! One of my main goals here has been to collate a lot of that disparate information, in an organized fashion, in one place. Though some of my testing, like the barrel length test (/blog/2017/12/crosman-2400kt-co2-air-rifle-part-10/), was a direct result of not always being able to find an answer I was really curious about. I have to say that this blog is just covering some rudimentary basics, and I’ve been humbled by our fellow readers, and modders at other sites, that know a lot more than I do. And that own personal machine shops for making custom parts! 🙂
Chris and all
Read my comment below to Hiveseeker.
Chris
Think of it this way. I’ll use a Marauder rifle as a example.
The Marauder has a striker/hammer stroke adjustment. A spring pressure adjustment and a transfer port opening adjustment.
What you have is a gun that shoots at a max velocity. But you have the option to reduce the output with the 3 adjustments I just mentioned.
You can slow it down with the components that ate in the gun. You can’t speed it up unless you modify/change something in the gun.
So what is nice about them adjustments is you can set the gun to preform as you like. And that’s what the other components Hiveseeker mentioned will do for the 2240’s and 1322/77’s.
It’s about tunning. Not so much about increasing velocity. The tunability is nice to have for getting your pellet to fly how you would like. Hopefully consistently accurate. 🙂
Hiveseeker,
You have just about convinced me to buy a 2400 and start playing with it. All of the parts and modding would make it a most enjoyable pistol to fool with for years.
Hi RidgeRunner,
If you like to tinker, start with the 2240 (I knew what you meant). If you want a lot of work done for you, order yourself up a 2400KT. One nice thing about this family of guns is that, thanks to the Custom Shop, you can choose your entry point into the modding world.
HiveSeeker,
I do like to tinker. At the moment I have three tinker jobs going on right now. Also, I have never been a big fan of CO2. I think that is because all of my experience with it has been with “action pistols”. I became bored with those very quickly. Also, it can get a bit chilly around here sometimes.
Now something like that 2240 may be pretty nice. I can shoot with it for a while and then upgrade this and then that. I can even convert it to HPA. Put on a nice LW barrel and I would really have a nice plinker.
RidgeRunner,
As much, or as little, as you want to do, you can with the 2240. I’ve been amazed at the variety of mods, including those from folk that apparently have their own garage machine shops!
HiveSeeker,
If all goes as planned, I will be one of that group by the end of this year. 😉
Oops! I meant the 2240.
B.B.,
Thank you for a very generous introduction. It has been an unexpectedly long–but fun–journey! My thanks to you for making it happen, and to my fellow blog readers for joining us on this trek!
I love the 2240 series guns. They make me feel like a magician. I buy a $50 2240 pistol and POOF. I can turn it into a $300 co2 pistol/carbine.
Hi TJKing,
Ha, yes you can quickly pour some cash into a $50 gun! But, it’s entirely yours and no one has another exactly like it.
Yes they are.
HS,
Reading your above valve data and comparing my data (.22, 14″ LW, 2400KT) I conclude the CShop put the power valve in my unit in Fall 2017. 511 FPS and 34 shots before power falls off seems consistent with your findings. Maybe the valve is just what’s in the bin that day.
Anyway, thanks so much for all the work and data. Definitely increases enjoyment of this carbine.
J
Hello Jumpin,
VERY interesting, thank you. In all my research I came across one, maybe two, other mentions of similar velocities from a stock 2400KT with the 14.6″ LW barrel that apparently got a power valve.
What I DID come across were multiple opinions supporting your “just what’s in the bin that day” theory. I think that’s actually due to the different target valve or power valve that a specific gun might get, based on the barrel as far as I can tell. Except for the valve, quality control has seemed to be consistently good across the five 2400KTs I’ve purchased.
And most importantly, there’s a lot of data here but you’ve managed to wade through it and get to my real goal for all this: just enjoying and appreciating this fun gun a bit more!
HiveSeeker,
I do enjoy this gun. I am in no way suggesting a quality shortfall in this rifle. It exactly meets our expectations – great groups and flat enough trajectory to take a feral can at 50 yards. Like you, I watch my better half shoot it, as its actually her Christmas present. BTW, she shoots JSB 15.89 Exacts which may account for the modestly lower MV.
Jumpin
Jumpin,
No problem, and I think the issue in some of the comments I came across was not quality control per se, but consistency. The Crosman Custom Shop is great but still a bit of a “black box” in some ways. Keeps things alluring and a bit mysterious, I guess!
Hiveseeker
I believe in the old days before it was named the custom shop it use to be called th skunk works. Of course as that name has been used in other things. Like car eacing and motor cycle eacing and so on.
It’s kind of that secret testing place where no telling what can happen.
Now with the custom shop they kind of give you a open smorgasbord along with the added availability of factory gun parts that can be added.
Racing not eacing. Fat fingers on that one. Twice even.
Interesting–I’ve never heard that! (I sure hope they didn’t use real skunks.)
Hiveseeker
They even came in plane brown boxes. No writing on the box.
I know I had one of the 2300T’s back I bet 8 or 9 years ago.
Pretty neat. The Custom Shop has really upped their game, and they really present the products well with the custom box label and serial number certificate. I wish they would add a bit more foam inside the box, though, as the guns slide back and forth the whole trip. Been really nice to see the Custom Shop just explode lately–I thought the new LW barrels for the 2400KT were big news until they added the 1300KT and Marauder!!
What’s next? A Custom Shop Armada with all kinds of options would get me in SO MUCH trouble with Mrs. HiveSeeker, who does the family bills!
Hiveseeker
Yep no telling what they might release.
I would love to see an Armada there!
If I remember correctly, my .22 2400kt 14″ LW barrel does around 530fps, while my .177 2400kt with a 14″ LW barrel does 560 fps. I lost my chrony data, but if those aren’t the right figures then 515fps and 530fps are. I was quite disappointed that the .177 only went marginally faster.
Hi Rambler,
Those figures reflect what I got with my first .22 and .177 2400KTs–almost the same velocity in .22 as in .177 which mystified me for a LONG time! It was partly a longer barrel on the .22, but I think my .177, which had a LW barrel, came with the target valve instead of the power valve my .22 definitely has. A lot of my subsequent testing was to answer that specific mystery.
Great stuff, Hiveseeker! The is definitely a point of diminishing velocity returns, when all of the mods serve to increase the volume of gas released for each shot. The’s mods do, however stack up nicely once you add more pressure into the system (i.e. HPA).
Awesome series so far, and thank you for publishing this compendium of reference material!
Hello Diaboloslinger,
Thank you, sir, and hoping this will remain a good reference for some time to come. These guns have not changed much–they are a great design and a great product.
Another excellent guest blog HiveSeeker!!
I really appreciate the time and effort you are putting into these blogs – you have done a ton of work!!! Thank you!!
Co2 is not my thing and I am not a pistol-person but your series has really sparked my interest in assembling a custom piece.
Not being familiar with all the different 2*** models, what would you suggest as a starting platform for an accurate plinker with a decent shot count?
Hank
Vana2,
More thanks! For “an accurate plinker with a decent shot count” you would want the 10.1″ LW barrel (.177 in the 2300KT or 2400KT) or 14.6″ LW barrel (.177 or .22 in the 2400KT). Either should some with the Crosman target valve based on my purchase experience. The longer barrel will provide more velocity. Check the options in the Custom Shop, and as long as you get a LW barrel I think you will be happy.
HiveSeeker’s work is excellent!
But like you, Hank, I lose interest when I see CO2 involved. My 1720T is a very accurate pistol, although I enjoy shooting it with the carbine stock more than the somewhat awkward hold of such a long barrelled pistol. I wish it had a more secure and attractive carbine stock.
Jerry
I had two 1720T’s. One with the 1399 stock and one with a RAI AR butt stock. Both nice handling guns and accurate and quiet. And I like that they came with to different size transfer port orifice. I like the idea of the small one they give. Then you can open it up to the size you like.
JerryC,
I’ll tell you the #1 thing that led me to the 2400KT: Owning a lot of pneumatic pump guns! Compared to pumping a pneumatic 5-10 times or cocking a spring-piston for each shot, the CO2 is pretty convenient and will hold its own in velocity (depending on the gun) with nearly any other pistol except a PCP. Now, I know Crosman has changed the name of this gun to an “Air Rifle” instead of a “Carbine” but most of the available Custom Shop grips continue to be pistol grips and I continue to think of the gun as a pistol. There are AR stock adapters available to use tactical stocks, or you can buy one pre-configured at PA (/product/crosman-1720t-tactical-combo?m=3510). There are also a ton of compatible third-party grips and stocks available for this entire series of guns, and we’ll touch on that next blog.
Hiveseeker
That’s what one of my 1720T’s had. Matter of fact I got the first one made by Dave that use to make the parts.
Oh that Dave was the one that owned the RAI adapters. Matter of fact I had the first one made for a Marauder rifle.
How do I know. Because we dimensioned my two guns for him to make the first ones.
Pretty neat–playing a part in airgun history!
Hiveseeker
I even had the first double resivoir Marauder rifle made by Lloyd Sikes that was making the Disco doubles BB reported on back I can’t remember when.
We connect here on the blog. He made it and sent it to me for a first try. My Marauder was a heavily modified .25 caliber that was using alot of air per shot. Was only getting like 8 usable shots out of it. Did the double tube and was back up to 20 or so usable shots.
Yep needless to say I been around the block with these Crosman/Benjamin guns.
Amazing the stuff that’s out there for them.
Way cool. Back in MY old days around the late 1980s, my little brother (who was actually the one who got me into shooting) did some competition shooting with a local airgun group, and this member had a PCP called a Shimali, if I’m spelling that right. I had never heard of such a thing and it seemed totally bizarre to me, each one custom made but having to be “pumped up” to shoot. Ever heard of it?
Hiveseeker
No don’t think I have heard of those gun’s.
It was waaaay back in my college days. I won’t mention which millennium…
Hiveseeker
If you find out post information about the type of gun your brother had.
HiveSeeker,
It could be the Air Arms Shamal as reported by B.B.: /blog/2014/06/air-arms-shamal-part-4-2/
The owner could have been pumping it to maintain the pressure at the sweet spot for best accuracy.
Siraniko
Thanks, Siraniko, I have heard of the Shamal but I think the custom gun my brother told me about was much earlier than that. I think it was years ahead of a commercially available PCP…I’ll have to ask him and see if his memory is any better than mine.
JerryC,
I would prefer a HPA pistol/carbine but alter reading HiveSeekers blogs I just might give Co2 another try.
Making a custom stock is not difficult and is well withing the capability of someone with basic wood working skills and common tools.
Carving a stock out of an expensive piece of hardwood can be daunting. There are easier ways to make a stock. I need/want to make a couple of stocks and (time permitting) am considering documenting the process to make a guest blog.
Just to show you, here is a picture of the stock for my AR20 that I made from (literally) scraps of wood I had in the shop. Not a design I would recommend for a first stock but not difficult to make if you take your time.
Hank
Hank,
It may not be everybody’s taste but that is beautiful!
Siraniko
Siraniko,
That design is a bit on the “wild side” for my more traditional tastes but it is fun to make.
The real beauty in making your own stock is that you can customize the fit and balance to be exactly what you like.
The high check comb is that shape because it aligns my eye to the scope perfectly – there is all kinds of fun to be had when you carve you own stock 🙂
Cheers,
Hank
Way cool. When you can really customize your gun (moreso than buying “custom” parts that someone else makes), it gets pretty interesting. I’m guessing working with the thin sections of that stock was the hardest part.
HiveSeeker,
Yes, the ultimate in customizing is when you make the components from raw materials.
Bending, fitting and gluing the strips of wood is a bit fiddly but is not difficult if you work on a jig and use lots of clamps.
For the next level of customizing I just got a lathe/mill/drill combination machine to help me with making metal parts – much more convenient than a hacksaw and file 🙂
Have a great day eh!
Hank
Hank
I remember when you showed me that gun with that stock you made. I think it brings out the best look for that gun. It matches great
And I like laminated stocks a lot. But your wood working skills are excellent. You really should make custom stocks for people. Just throwing out a number but I bet that stock could go close to $400 to the right person.
GF1,
Thanks for the compliment! I do like making things.
I have made stocks for people but to make a custom fitted stock the person has to be there to get the dimensions right.
Hank
Hank
Well you could add in the price of the airplane flight to your house into making the gun.
Heck you could even tell them it’s part of the package and you knocked 25% off the price of the stock and still charge them $400+ for the stock.
Of course I’m joking I know it takes alot f time to make the stocks and get them right. My dad use to make Italian guitars. You know the ones with the round backs on them. He would take months just to finnish one.
Wow, neat stock. Slightly reminiscent of the wood skeleton stock that was available for the 2250 back in the day. I spent a summer working in a shutter and door shop and learned some wood finishing (not woodworking) skills, but a bike rack and folding tray are about as far as that’s gone…trade??
I’m heading off to the job that keeps a roof over Mrs. HiveSeeker’s head and gives me a place to store my guns, but please keep the comments and questions coming and I’ll be back by evening!
HiveSeeker,
Another great segment. I don’t see how you have been able to keep all the variables and permutations straight enough to write these reports over such a large time span. Mad Props to you.
Do you think that the breech screw under the bolt is to eliminate, in the premium gun, the aggravating tendency of the pellet getting jostled and flipped around by the breech screw as as it passes over it in the “standard” versions?
That would be harder to tolerate at the higher price point.
Halfstep
The Discovery and Maximus have that screw relocated also. In my opinion that was a very good move by Crosman.
Agreed. I don’t remember where, but recall reading something directly from Crosman about the relocation being for that purpose.
Halfstep,
My thanks, though I have to confess that I do forget over time which gun did what and have to check my old blogs regularly while writing the next installment! I do think the breech screw position is specifically to avoid that annoying pellet-flipping problem in the 2240, and you can actually buy a tiny plastic insert that will pop in there to smooth that out. However, pellets still tend to flip around like tiny acrobats and it took both me and my wife some time to get used to loading pellets. What I do is lay the pellet on the flat of the steel breech to the immediate right of the bolt channel, and just gently roll it into position before closing the bolt.
HiveSeeker,
I do the same, but pushing the bolt forward sometimes flips the pellet on that little flat head cap screw.
There’s a few different tricks for dealing with that…Not for the public shooting range, but tilting the barrel up while retracting the bolt will often flip the pellet back into the right orientation.
Halfstep and HiveSeeker
I lay my finger on the skirt of the pellet whole I’m closing the bolt. It picks it up on the head of the pellet and pushes in as easy as can be.
Gunfun1, I just realized that I’ve been doing that kind of instinctively as I roll the pellet into the bolt channel and start to engage the bolt–great observation.
Hiveseeker
My phone is not wanting to let me spell tonight.
Suppose to say (while) I’m closing the bolt. Not whole.
No worries. Some days I have ten thumbs.
Hiveseeker
Yep
HiveSeeker
Very informative thank you for sharing this with us . I can see how I might get into this I like getting old penn reels and tinkering with them it’s fun to see them work again. I would and get it going then maybe try my hand a modding .
Thanks again
Bill
HiveSeeker
My typing is horrible would like to get a old air gun and get it going
Bill
Hi Buckaroo,
I fish and have a fishin’ buddy that has several customized Penn Jigmasters. There is a pretty extensive modding scene for those reels too!
HiveSeeker thank you
Your series here has informed and inspired me. Here is a picture of my modded 2240.
Gerald
Gerald
How does it shoot?
GF1
I have not shot it in the new configuration. The weekend was all about clearing snow. When that was done there was not daylight or energy left. So far the coming weekend looks more open.
Gerald
Gerald
Make sure you let us now how it does. What barrel is it?
GF1
I’ll give an update. All I know of the barrel is it came from a site, Magnum Airpower and is 10.5″ long. It was $20 with shipping.
Gerald
Gerald
Ok will be waiting.
I see a steel breech, longer barrel and much better rear sight. You’re off to a great start! If you want some more velocity, I think my next suggestion would be an aftermarket power valve though be aware you’ll halve your shots per fill. Nice lil’ pistol!
Here’s a pic of my .177″ 2300kt and my 1322. I also have a modded 22cal and 25cal…I’ll try to snap a pic after work…
Diaboloslinger
Nice guns. Repeating shrouded breech and looks like the RAI AR butt stock adapters. And looks like the Hi-pac conversion on the Co2 gun. How about triggers?
And interested in hearing about the.25 caliber on you have. Give a discription when you post the picture.
I can’t get pics to upload
I did it!!!
Anyways, the camo one is the .25 cal M-Rod barrel. The black one is .22 cal. All three Hipacs are set up for 2k psi fill. As for triggers, all 4 are stock, but with moly lube and fairly light hammer springs( I’m used to ’em)…
Also in the pic, are some of the parts that I’ve amassed to build my .177 into an HFT gun (including the P-Rod 2 stage adjustable trigger).
Diaboloslinger
Nice. Where did you get the parts for the .25 caliber. Very interested in that.
I got the kit from BNMcustom.com
Poor communication, but great product.
Diaboloslinger
Thanks I have seen those on that sight. Thought about getting one but didn’t know how well they work.
How does your .25 conversion do? What pellets and velocity and what kind of accuracy?
I can only test it at 25 yards, but I’ve laid down a few .25″ 8 shot groups at that range. It pushes a JSB 25.39 grain at around 600fps. That’s on a 2000 psi fill. I get 3 magazines per fill with this tunexpected (The Hipac has 3 extensions).
Air Arms 19 grain pellets show promise too, but I haven’t had a chance to see how they group on paper yet. They actually have slightly more muzzle energy than the heavier JSBs, but I can’t remember the exact numbers…I’ll have to rummage around and look for those shot strings.
Diaboloslinger
There is nothing wrong with those groups at 25 yards.
And that’s 20 fpe with those JSB’s. That would put the thump’n on a critter at 25 yards. I think you got a excellent .25 caliber gun. I really need to take the time to build one.
Whoo, these are modded way beyond anything I’ve done.VERY nice. When you move from .177 or .22 to a .25, you are talking custom parts all the ‘way round! Folks, here’s someone who could teach the college level version of this blog!
No way, Man…You’ve put alot more pragmatism into this than I have. All of my mods are Bolt-on.
I love the BNM breech/shroud kits.
I have to shoot stealthily, so these shrouds fit the bill nicely. The breeches come with mags, but the M-Rod single shot trays work too.
Pretty neat, and what I meant was that, if you’re not actually machining your own parts, you’re buying totally customized breeches and maybe barrels from someone who does. A lot of mods use at least a base Crosman stock part (like the reamed out transfer ports), but this is a couple steps removed from that. Totally custom. Way neat guns you’ve got there.
Thanks, pal…I just got back into it. I’ve been deep into slingshots for a few years.
I’m very impressed with your exploration/reporting with regard to these guns…They’re a lot of fun to tinker with, ‘eh?
Diabolo,
It’s a lot of fun–along with blowguns (which I know a bit about) and slingshots (which I just shoot but haven’t read much about). Just curious, what kind of velocities do you get on your slingshots? Is there much of a range in velocity there?
Hiveseeker
I was going to mention that it looks like the transfer port is already opened up when the gun comes from the custom shop. Looks like it’s bigger on the inside diameter than a Maximus or Discovery transfer port. So that’s probably why the aftermarket transfer port didn’t add much.
That’s the thing about a transfer port. They will make a big change in velocity up or down from a certian size. But here’s the the thing. The valve will only flow so much. So increasing velocity is harder to do than slowing velocity down.
And same on the striker spring and adjustment. You can slow them down easily in velocity put increasing velocity will only go so high. After that your just making the gun harder to cock and putting more wear on the components. It’s like what a magnum spring gun does to shot cycle and components.
So saying that the other mods are worthwhile you mention. Like anything. You have to learn the capability of what the mod can or can’t due. Once you learn and understand that then you will be more happy with the out come.
Hey Gunfun1, I realize this may be one of the comments you were referring to above. You prompted me to grab my calipers and check my OEM 2400KT transfer port. I got 0.140″ to 0.143″ when I measured multiple times, basically the same as reported by the Max Flow Transfer Port vendor (0.140″). What do you get on your 2400KT, and have you compared to a 2240? I don’t think I’ve come across mention of the Custom Shop transfer port being any different, though that would certainly go toward explaining why I didn’t see a velocity increase. As I mentioned, I would have put money on this mod–it seemed like a no-brainer.
Hiveseeker
That’s why I asked you. I don’t have a custom shop gun. I wanted to know what size the inside diameter is for the transfer port is for your gun you have and the aftermarket transfer port hole so I could see how much difference between the two. Also the exhaust hole in the valve of your valve and the aftermarket one.
The factory valve looks to be a smaller hole.
But here’s a little secret for you. Did you measure what size hole the barrel has in it that transfers air from the valve and transfer port hole to the pellet.
If you open the hole in the valve or transfer port it still won’t change velocity unless the hole in the barrel is made bigger. And that’s a whole nother ball game.
But where ever the restriction is. That’s were the control of air flow will be. So maybe that’s why your not coming seeing no velocity increase also.
Suppose to say…So maybe that’s why your not seeing no velocity increase also.
Not…”So maybe that’s why your not (coming) seeing no velocity increase also.”
Gunfun1,
I was thinking you had done some modding yourself, maybe just some acquired knowledge you had shared previously. Anyway, stock on the transfer port appears to be 0.140″ ID, and the modded part I bought is listed as 0.161″ ID. I came across no discussion of opening up the barrel port, and lots of folks report a velocity increase without doing so–only from swapping the transfer port.
I did not measure the valve exhaust port openings. The exhaust port on the after factory valve may look larger because it’s oval at the exterior valve surface, due to being angled. However, one discussion I did come across was that the hole in the main tube is not always drilled in quite the same spot, so the valve exhaust port doesn’t always line up the same way on every gun (2240 was the gun in question), which can affect velocity. Don’t know if that is a variable on the 2400KT.
Hiveseeker
I have not had custom shop guns. Yes on Marauder’s, Discovery’s, 2240’s, 1322/77’s and so on but no custom shop stuff.
That’s why I was looking for how big they had the openings in the transfer port and valve.
And have you checked any barrels for the inside diameter where the transfer port orifice meets the barrel?
If it’s smaller than .140″ then a bigger inside diameter transfer port orfice will do little to nothing.
What I’m trying to point out is there is more things to look at than just swapping parts. People use to do that when building race engines and wondered why their cars ran like junk.
More to modding than just switching parts is what I’m getting at.
I was just looking at the Marauder Rifle in the Crosman custom shop and was surprised that the .22 caliber Crosman barrel is a 1:20 twist and that the Crosman .177 or .22 caliber barrels are not choked. I will try to check the twist rate in the Maximus barrel. Is it also 1:20? My Maximus barrels do not feel choked.
My original Marauder .22 caliber barrel feels choked when I push a pellet through it. Maybe that is why it was not accurate. Not because it is choked but because there is a restriction at the muzzle.
At some point they should run out of the old .22 Marauder barrels and only offer the new improved ones, that would be good to know. I would order one now if I was sure it would be a new improved one.
Don
Benji-Don,
I’m in the same boat. My .22 Mrod is not very accurate but I am afraid to rebarrel until I know I can get one of new manufacture. Crosman, if you are listening, find a way to inform your fans when they can get the new style barrel.
Halfstep,
That is so frustrating, I fought mine for 18 months before I gave up and got a new barrel.
I ordered a MM hammer forged barrel and am happy with it. It does lead up after about 200 shots though and need to be scrubbed. Also the L/W Marauder barrels in the custom shop would be a good choice if they make them available.
With the trouble Crosman had with the .22 Marauder barrels they should make a point of getting good barrels to the owners who have bad barrels. If they did it right there should have been a recall on the .22 barrels. With some pellets I was getting 6 inch groups at 20 yards. With the new barrel I am getting less than 1/2 inch 10 shot groups at 42 yards my longest range.
Don
Don
What pellets are you using that lead up the barrel? And what velocity are they shooting at?
GF1,
Mostly JSB Diabolo Exact Jumbo both 15.89 and 18.13 gr. Most folks I talked to have the same problem with the MM hammer forged barrel. It also talks about it on the website. Seems to be a added effort thing with these barrels.
If I slowed the velocity down I might reduce the leading some. I am running about 950 fps with the 15.89 gr JSB’s.
Don
Don
Yep maybe a little on the fast side.
And yep I did see that about the twist rate.
The JSB 15.89 and 18.13 grains are what everybody seems to be shooting. Finally got around to ordering a tin of those heavies and my Armada likes ’em.
Hiveseeker
Which ones the 15.89 or 18 grain JSB’s?
You should try both if you didn’t get both already.
Oh, did you notice what I said about the new Marauder barrels having a 1:20 twist?
Don,
What is a MM hammer forged barrel and where do I get one and at what cost?
Halfstep,
The barrels were from Marmot Militia that is now part of Wicked Air Rifles. They are not cheap but are very good barrels.
The link is:
http://www.wickedairrifles.com/hammer-forged-barrels.html
I would check with Crosman and beg plead badger to see if you can get a Lothar Walther barrel or even a new improved Crosman Barrel. The Lothar Walther barrel will be about half the price of the MM hammer forged barrel and the Crosman barrel with be less than 1/4 of the MM barrel. I don’t think the L/W barrel is better than the MM barrel but probably just as good?? I have not tried either the new Crosman barrel or the new L/W barrel in the Marauder so I don’t realy know how they all compare.
I am happy with my hammer forged barrel they are about $225. They are a direct drop in barrel so that makes it an easy replacement.
Don
Don,
Thanks for that info. It was exactly what I needed. I think that I will contact Crosman to see what kind of barrel they can guarantee and I will get back with my results.
If anyone gets part numbers for any of those Marauder Custom Shop barrels, please post!
Gents, sorry to hear. I’ve been pretty happy with my .22 Marauder (and .22 Armada though I think it’s a different barrel) and both are quite accurate to 20 yards, which is as far as I have really tested them.
The only corollary I have for the 2400KT is that the 18″ barrel got a bad reputation for a while, though mine was good. On the other hand, other shooters have reported pellet-on-pellet accuracy with the 18″ Crosman barrel, so there are some really good ones out there, too.
Hiveseeker
That’s the problem (some) really good ones. They all should be good ones.
And what size groups did your .22 Marauder get at 20 yards?
Gunfun1,
I agree, at the Marauder price point–as good a deal as I think it is–there shouldn’t be any barrel issues (and I haven’t had any). My 20 yard groups have been in the neighborhood of half an inch or so, and that’s without even trying many pellets. Same with my .22 Armada.
Hiveseeker
Not bad at 20 yards. But I think 50 yards will tell the real truth. Kind of like how BB likes to shoot 10 shot group’s instead of 5 shots you know. I just think the distance tells more of what’s happening.
I agree. Need a bigger backyard and just have not gotten out to one of the local ranges.
Hiveseeker
That is where you see when changes happen on air guns for the most part.
You got what you got when it comes to a shooting place. At least we can enjoy shooting. 🙂
The oddest thing I’ve seen is that the best pellets at 10 yards are not always the best pellets at 20 yards. It’s not a perfect ice cream cone ballistic spread! I’d like to eventually retire on a bit of land and set up a really nice permanent outdoor range.
Hiveseeker
Right about the pellets.
And I got the same plan as you. I’m working on it. I already got the land finally. Now I got to work on the retirement part of the plan.
I still got a little bit of time before I retire but I’m getting there.
BB, I am looking forward to your next report on the Gauntlet. If your experience is like mine, you’ll find that accuracy drops off fairly quickly and necessitates a good cleaning. I put J-B Bore paste on a bore whip and ran it through 20 times or so and that seems to have helped smooth the bore out a bit and I haven’t noticed accuracy dropping off again, at least so far.
Rambler,
The Gauntlet runs tomorrow. Gonna be a good one.
B.B.
Rambler
I have close to 1500 pellets through my .177 Gauntlet and is still extremely accurate. Still shoots the same as it came out of the box. Very happy with mine.
What caliber is your gun and what pellets do you use?
Mine is the .22. I shoot H&N and JSB. I went from 1.1″ at 80 yards to 1″ at 50 yards to an inch at 35 yards. Steve Scialli also mentioned having to clean the bore every 100 shots, but he also had the .22.
Rambler
What velocity is it shooting those pellets at?
It was shooting them in the low 800s, now after a little switcheroo it is shooting them in the high 800s to low 900s.
Rambler
Man every 200 shots. I don’t think I would care for that. Something don’t sound right. Maybe velocity is to high?
I don’t know. Right now it shoots JSB 18.13s at 870fps which is just where I want them. Ever since I polished up the bore with JB bore paste I haven’t noticed the accuracy dropping off. On the other hand I haven’t had a chance to shoot it a ton and I’ve just been shooting JSBs, both of which may be factors in the continued accuracy.
Rambler yep I don’t like to switch pellets back and forth.
And did you have to take the shroud and baffles of the gun to clean the barrel?
Maybe that had something to do with helping accuracy. In that I mean maybe the shroud wasn’t screwed on tight to the breech. I have seen that with guns with shrouds. I have even seen the point of impact change after putting a shroud back on.
I myself try not to take the shrouds off and same on cleaning. I can’t remember the last time I cleaned a air gun barrel other than a few drops of silicone oil in the barrel and shoot the gun. You would be surprised how that works.
GF, I did take the shroud off, in fact I took the barrel out and put it in a vise. I also filled a hole near the base of the shroud to draw air away from the air stripper. I leave the shroud slightly backed off from the breech block as I understand that can help avoid changes due to temperature with Marauders, which have a similar system.
I don’t usually clean barrels either, apart from running a few patches through them when they arrive.
That should be “drilled a hole”
Rambler
I had several different caliber Marauder rifles in gen 1 and gen 2, along with Marauder pistols and 1720t’s.
I always screw the barrel on tight to the breech block threaded peice.
Ran into big accuracy problems if I left the shroud loose.
Odd, the “Reply” link is not coming up on some of the comments.
Anyway, I’ve got a couple more expensive PCPs but the Gauntlet looks interesting. Despite the hype one thing I’ve got to wonder about at this price point is build quality and longevity. But she sure is looking good right out of the starting gate.
Wow that is intense. That is my first look at blueprints in action. I suppose they make sense if you persevere, but I would never try at this level.
B.B., it sounds like that episode with the light armored vehicle and the car would have required some explanation. During one of the Gulf Wars, I saw a TV report on Marine reconnaissance that described a kind of armored car called the Light Armored Vehicle (LAV). It had large wheels and could go up to 80 mph, bounding over the terrain. It looked like something out of Mad Max. I suspect that might be preferable to sitting inside of a tank, among other things because of the possibility of escaping the scene. I know of an ex-Marine who said that when he was training in the Mojave Desert, he would relieve a lower-ranking person to take control of the light armor and zoom around.
ChrisUSA, you’re right that the most difficult part is getting started. My protege has had any number of ambitious schemes that never went anywhere. If he can make it through the transition into the military, then I think he has a decent chance of making it all the way.
Matt61
Hi Matt61,
Don’t let the blueprint background discourage you. Most of these mods involve only a half dozen screws and parts, and the assembly is pretty straightforward. B.B. provided the best step-by-step instructions I’ve found online when he completed his “2240 Conversion to Air” (/blog/2014/07/crosman-2240-conversion-to-air-part-1/). The 2400KT is pretty similar except for the steel breech, and a less accessible breech screw. If I can do it–ANYBODY can!
Hiveseeker
The reason no reply button up above is we ran out of room on that thread. Usually we will say go to the bottom and continue our conversation at the bottom of the comments.
Gunfun1,
I eventually realized that, and THEN recalled a previous issue where comment threads got squeezed down to just a couple words wide and a foot tall! Got it, thanks.
Hiveseeker
Yep we use to kind of go to the extreme stretching them out in the past.
Hive Seeker,
Great serial blog on the 22XX Crosmans!
I have a BIO Valve equiped DAQ .25 receiver and barrel mounted on a 2250 tube with a DAQ bulk fill extension screwed into the front. It shoots my dwindling supply of .25 Diana pellets at the same velocity you have achieved with the .22!
BREAKING NEWS Dennis Quackenbush currently has some of the last of the .25 receivers up for sale:
http://quackenbushairguns.com/currently_available.htm
Back in the day it was one of the go to first mods for CO-2 Junkies.
You can occasionally find a BIO Valve on classified sections. It was a collaboration with Dennis to make a really big Valve that flowed lots of CO-2 to push the heavy pellet out the barrel fast.
Once again a great trip down memory lane with you very well executed blog
Thank you for all your work this far!
shootski
Shoo
What barrel does the .25 caliber breech accept? I been wanting to build me a .25 caliber 2240 and run it on HPA. Would like to do up a .25 caliber 1322/77 too.
Gunfun 1,
If you read Dennis’s advert he says to send your barrel to him if you are not equiped to thread it.
If you really want one just call the man. He doesn’t bite, even if he is one of the “God’s of Airgunning,” and his wife is very pleasant also. Just call him on his posted hours and don’t ever call him on a Sunday.
Tall him what you want, his steel breech, and then talk barrels with him!
shootski
gods was supposed to be lower case! Their is but one GOD!
shootski
Shootski
I do have a way to thread it. Heck been a machinist close to 35 years now.
But threaded. That sounds a little odd. But ok I’ll check it out. Thanks anyway for trying.
Gunfun 1,
“That sounds a little odd.” Hope I understand your meaning?
Is that in reference to the method of joining the barrel to the receiver?
All of the DAQ airguns, regular and Big Bore, I own have the barrel and breech threaded!
I have had no issues with that system; I will however point out, (experience TIP) that I have “witness marked” RECIEVER and barrels to ensure the POA remains the same if I remove or change out the barrels on each of my DAQs.
shootski
Shootski
Yes that’s exactly what I’m talking about the POA to POI. Definitely would need the witness marks to get the barrel threaded back to eliminate that. Not that your changing barrels all the time.
And I suppose with bigger calibers that are making alot of power it would be better to be threaded.
I myself like the barrels that have a precise slip fit to the breech and are looked in with setscrews.
Just me. But that’s what I like.
Hello Shootski,
Thank you, and some interesting observations on early modding. I’m a better follower than leader and usually don’t jump into something until the trail has already been blazed–it took me a long time to even decide to start modding my 2400KT last year. Sounds like you’ve got a nice .25 setup. I think I’d like to play around with a big bore next, but the .25 has been catching my eye more and more lately…
HiveSeeker,
You are wise to learn from all the others before you…and I might add it is a significantly cheaper way to mod!
I have gone down many Dead Ends that were not only disappointing but cost money and more importantly my time.
At this point I have learned to shoot more ⚫⚫⚫⚫⚫ and mod less
Thank you once more for your guest blog
shootski
Shootski,
Okay…how are you making the dots?? 🙂 😉
HiveSeeker,
It’ll cost you! NOT!
in my tablet’s Emoji library!
You will recognize the five of a Biathlon target.
⚪⚪⚪⚪⚪ I strive to Shoot Clean!
shootski
Since we are talking moding these type of guns I thought I would post this.
Here is a 1377 I converted to a rifle with Discovery parts. Basically the stock from the Discovery with a little wood work. The steel breech and the barrel and the trigger assembly.
And I should add it was a solid fine shooting gun.
I had to do this with a video. It was the easiest way to post a picture on the blog before we had the picture posting option we now have had for a while. It’s short. Check it out.
https://www.youtube.com/watch?v=E2g7QSCknKI
And that brings me to this. A gen1 Marauder rifle trigger will bolt on to a 1322/77 or 2240 pistol also and work. You just have to come up with your idea for a stock.
Cool looking mod, Gunfun1. That’s one way to get a photo up but I’ve been enjoying being able to drop a graphic or photo in the blog here with that capability added in. What’s great about that is it’s internal to the blog. A lot of blogs got stung by Photobucket when they suddenly started charging for posting pics.
Hiveseeker
Right I used Photobucket in the past before we had the picture posting option on the blog.
Photobucket was a pain at times to use so short YouTube videos is what I did cause it was simpler.
And if we hold our breath we might end up with a option right on the blog to post videos without going to other sources. Fingers crossed.
And yep I was surprised how easy that conversion was to make the pistol into a rifle.
Gunfun1,
I still think of the 2400KT as a pistol with a shoulder stock, even though only one of mine currently has pistol grips. Crosman recently changed the name of the 2400KT from “Carbine” to “Air Rifle,” but I notice that most of the available grips remain pistol grips. And for comparison, the 2260 is basically a CO2 pistol in rifle’s clothing, though the trigger is actually a bit different on that one. So it’s pretty easy to see how a 1377, a near relative, can go from a pistol to a rifle!
Hiveseeker
Yep on the 1377.
Hi, great series by the way. It would be interesting finding out exactly what was causing the increased velocity from Crosman power valve. Did you ever get a look inside the more powerful valve to compare it with the target valve? Some of Crosman’s other target style guns are known to have a brass insert limiting valve capacity or slightly longer stock on the brass part of the valve stem limiting travel. As you said it could also be the internal valve spring or hammer spring effecting output.
chrisginn90,
Welcome to the blog.
B.B.
Thanks, Chrisginn90, and let me echo B.B.’s welcome. Without putting my calipers to it, many commercial power valves start with a stock Crosman valve and mill out screw threads or reduce wall thickness to increase the internal space. This stores more CO2 for each shot and, presto!, more velocity. The valve and hammer springs also play a big role and modifying those can increase velocity or shot count.
Hiveseeker I have enjoyed these blogs. A couple months ago I purchased a 2400KT from CCS but I had no idea there were different valve options. Since I purchased it with the 18″ barrel I guess I got the Crosman power valve. That’s good on me since due to vision problems all these guns are more accurate than I so power is a good priority.
Years ago I modded a Crosman Mark I with a heavier hammer spring and the results were amazing, so I guess that is where I will be headed with both my CCS 2400KT and my stock 2240.
BB, When I added a heavy hammer spring and power adjuster, I had the same problem with the co2 cartridge piercing pin jamming in the co2 cartridge. This only seemed to happen when the co2 was empty or nearly so. What I did to fix it was to disassemble the valve assembly and re-profile the end of the piercing pin to have a more blunt angle. After all the work I put into this 2240 project, I no longer use the gun because it is never ready to shoot when I need it. Either no co2 cartridge in the gun or the co2 has leaked out. Now I use a customized Crosman Maximus. Always ready for the next squirrel at the bird feeder. All my other air guns – At44w-10QE,Customized Discovery w/ multishot breech, QB78, etc – have been replaced by a custimized UX .22 Gauntlet. Definitely the best that I own in regards to accuracy, power and shot count.