by Tom Gaylord
Writing as B.B. Pelletier
This is Part 12 of the Hiveseeker guest blog on the Crosman 2400KT. Today is subtitled Modding the Crosman 2400 family — Primer 1
If you’d like to write a guest post for this blog, please email me. Now, over to you, Hiveseeker.
Crosman 2400KT CO2 Air Rifle – Part 12
Modding the Crosman 2400 family — Primer 1
By Hiveseeker
Part 1
Part 2
Part 3
Part 4
Part 5
Part 6
Part 7
Part 8
Part 9
Part 10
Part 11

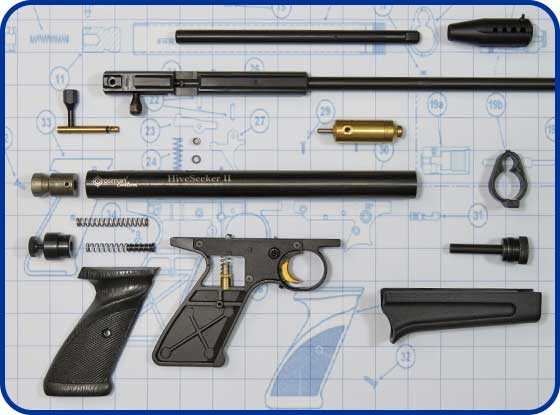
The 2400KT CO2 Air Rifle that I modded for this report is only available directly from the Crosman Custom Shop. It is shown here disassembled with a mix of stock and modded parts. For scale, the background grid on all photos is one inch square.
WARNING: These modifications can change the operation of a gun in ways it was not designed for. Non-factory or modified parts can fail, especially if subjected to higher pressures than originally intended. Pyramyd AIR advises against making such modifications or conversions. This report is for information, only.
This report covers:
- It’s a mod, mod, mod, mod world
- Definitions
- The guns
- The parts
- The tools
- Disassembly
- You’ll need a chronograph!
- Modding: The need for speed . . .
- . . . And the price of power
It’s a mod, mod, mod, mod world
I need to start this blog by stating that many of my fellow readers know a lot more about this topic than I do. When I started this blog series — way back in 2014! — it was in response to B.B.’s Crosman 2240 conversion to air. I was searching for the gun he created, but without the need for modding. The 2400KT CO2 Air Rifle from the Crosman Custom Shop came pretty close.
Throughout these blogs, I’ve rather stubbornly adhered to reporting stock data. However, it is impossible to research any of the Crosman CO2 guns without coming across an overabundance of information about modding them. Reader Halfstep put it succinctly, “As extensively as you’ve covered the stock guns, you’d almost have to write about mods!” Well, that’s where we are today!
I’m approaching these final three blogs on the Crosman 2400KT as a new modder taking his first steps into that arena. I’ll tell you about the mods I tried and the results I got. But my larger goal is to create a primer on this topic that collects the basic information I gathered from a wide range of sources, that any modder should know.
Definitions
For those new to this topic, “stock” means not modified; i.e. straight off the shelf from store stock with no changes. “Modded” or “modified” means changed to customize or improve performance in some way. A “mod” is one of these changes or alterations that you can make. “CCS” or “CS” refers to the Crosman Custom Shop which sells the 2400KT and 2300KT.
The guns
The Crosman 2240 is by far the most popular CO2 gun to mod. The 2400KT and 2300KT are also quite popular, and I’ve seen it stated that a majority of these Custom Shop guns are purchased specifically with the intention of modding. Despite being out of production, the 2250 “Ratcatcher” also remains a modding favorite, particularly in the UK. The Sheridan 2260MB is basically a Crosman CO2 pistol in rifle’s clothing and also regularly targeted for modification. The Crosman Crosman 2300S and 2300T are in the same family, but these higher end pistols already include upgrades and as a result are not so frequently modded. Although we will be looking specifically at the Crosman 2400KT CO2 Air Rifle, most of the mods described here can be performed on any of these Crosman guns.
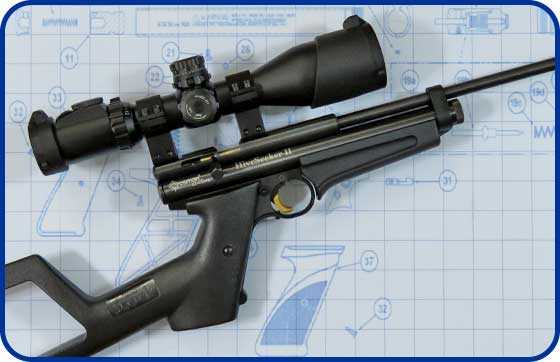
The HiveSeeker II was ordered with a 14.6-inch Lothar Walther .22 barrel, gold trigger shoe, gold muzzle brake, and black shoulder stock and cost $128 plus shipping. The scope is a Leapers UTG 3-12X44 AO SWAT Compact.
The parts
For the different parts we’ll be discussing, you may wish to refer to the Crosman 2240 exploded parts diagram. There are Crosman parts lists and owner’s manuals available for all their guns, but this particular diagram was the one I found most useful. Next most helpful to me was the 2300S Exploded Parts Diagram. Note: This is a PDF that must be downloaded from Crosman’s website. Some parts have names commonly used by modders that don’t match the Crosman names, and in those cases I’ve stuck to the common name but also included the Crosman name parenthetically.
[Editor’s note: Crosman diagram and parts list are reprinted with permission from Crosman Corporation. The type is too small to read and cannot be enlarged with clarity. I recommend you get this information directly from the Crosman website.]
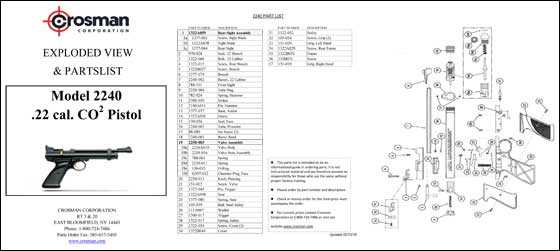
Crosman provides great product support with easy access to parts diagrams and owner’s manuals.
Word is that you need to have purchased a Custom Shop gun before you can order parts directly from Crosman, although policy seems to vary a bit depending on who picks up the phone. I’ve also been told that you can only order enough parts for the Custom guns you’ve purchased — in other words, if you’ve bought two Custom guns you can’t order five barrels. Screws and other small parts like seals seem to be a no-limit exception. Most Crosman parts are also readily available on eBay, but generally cost twice as much as they do directly from Crosman. I’ve provided a Crosman 2XXX Parts List of the most commonly used parts compiled from all the relevant Crosman parts diagrams. On this list you can really see how many parts this family of guns shares, as well as where they differ.
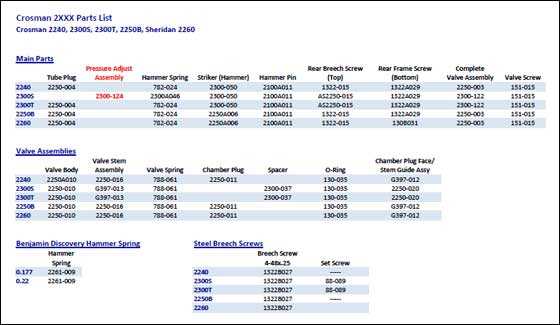
The Crosman CO2 gun parts list shows which parts the 2240 family of guns shares, as well as where they differ.
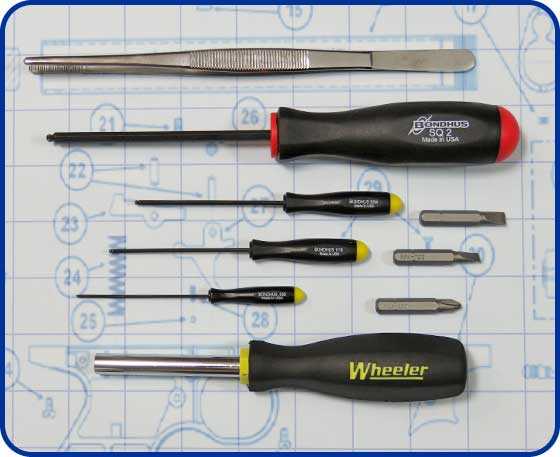
Top to bottom are jumbo tweezers, Bondhus #2 square bit driver (red trim), three Bondhus hex drivers (yellow trim), and a Weaver style gunsmith driver with three bits. These tools will handle most modding tasks.
The tools
I’m always amazed at the pile of tools that accumulate on my workbench by the time I finish a project! You’ll want a screwdriver set like the ATK Weaver tool kit that provides an assortment of Phillips, slotted, and other bits. You’ll need several hex wrenches including 0.050 inch (for the breech screw), 1/16 inch (trigger cover screws), and 5/64 inch (barrel, muzzle brake, and other set screws). The red trimmed driver in the photo is a specialty Bondhus brand #2 square bit for the front frame and rear frame screws; these screws incorporate a slotted head too but I like the square driver because it is slip-proof. My crafts-making wife gave me a pair of jumbo tweezers that have proved to be extremely helpful for handling and positioning small parts. If you’ll be disassembling valves, you’ll also need vise grips and pliers.
Pro tip: The breech, front frame, and rear frame screws must all be tightened or loosened at an angle. I found the Bondhus brand of ball head drivers to be ideal for this task. The handle on the 0.050 inch Bondhus hex wrench is small and was hard to generate torque with, but they also manufacture balldriver L-wrenches that provide more leverage if needed.
Disassembly
B.B. provides outstanding step-by-step photos and instructions for disassembling the Crosman 2240 in his blog Crosman 2240 conversion to air. The 2400KT and other guns we’ve mentioned here are similar, except for having a steel breech with a breech screw that is located farther back under the bolt. In order to unscrew it, you must first remove the tube plug from the main tube. This allows the hammer and bolt to be retracted far enough to access this screw. The hex screwhead is still only partially exposed, which is why I find the Bondhus balldriver hex wrench that I mentioned earlier so convenient. Note that as you unscrew it, the breech screw rises to hit the bottom of the bolt and you must lift the steel breech assembly slightly off the main tube as you continue unscrewing to fully remove it. Similarly, the breech will not sit flush on the main tube when you reassemble this part, but will settle into place as the breech screw is tightened. Be very careful not to strip the head of the breech screw! Third party hardened breech screws are available to reduce the chances of this happening if you do a lot of modding.
Pro tip: Disassemble your gun on a towel so you don’t lose parts, especially the tiny safety detent ball which is notorious for disappearing.
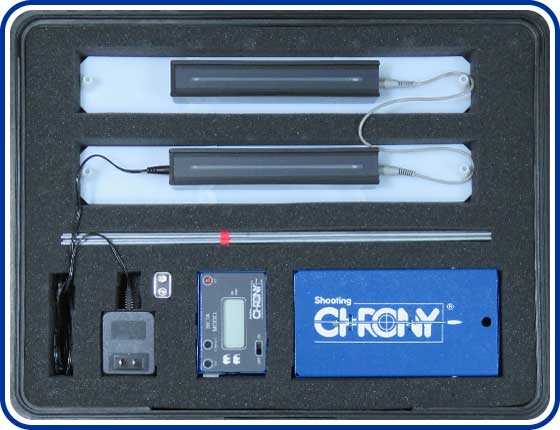
My Shooting Chrony Beta Master includes a remote display. I strongly recommend the Shooting Chrony LED lamps shown at top!
You’ll need a chronograph!
The vast majority of mods for these guns are intended to increase velocity. Even if your goal is to increase shot count, you will still need to know where the power curve begins to fall off. Obviously, you are going to need a chronograph to determine how effective each mod is. I use a Shooting Chrony Beta (my version is the Beta Master with the remote display shown in the photo). After years of dodging clouds, sun, and rain, my recent testing finally prompted me to break down and buy the Shooting Chrony LED lamps for indoor chrony testing (at top in photo). I wish I had done that much sooner — while a little pricey, they are incredibly convenient and very reliable!
Pro tip: Be sure to read the owner’s manual for your chronograph. For example, Shooting Chrony recommends placing the skyscreens at least 3 feet from the muzzle for airguns for best measurement accuracy. I see this ignored all the time in YouTube videos!
Modding: The need for speed . . .
B.B. constantly tries to guide his readers toward the straight and narrow path of handling and accuracy. However, many of us choose to wander the broad road of velocity, velocity, velocity! And indeed, the vast majority of modding is done to increase speed.
The gun I modded was the HiveSeeker II from Crosman 2400KT CO2 Air Rifle Part 9, a 2400KT with 14.6-inch Lothar Walther .22 barrel. When I tested the stock velocity of this gun, it averaged only 434 f.p.s. with 14.3 grain Benjamin Discovery Hollow Points. This was a full 124 f.p.s. below my other HiveSeeker 2400KT which was ordered identical except for its 18 inch barrel. I knew the HiveSeeker II could perform better. I needed more speed — and a modder was born!
. . . And the price of power
If any of you are fans of the “Once Upon a Time” series like my wife and I, then you know that each character must learn that “Magic always comes with a price!” Modding — and the laws of physics — are subject to the same rule! If you buy more velocity, you are going to pay for it somewhere else. In Part 9 we saw that when I changed valves in my HiveSeeker II, I bought 90 f.p.s. but paid for it with half the shots per fill. There is usually no free lunch in modding!
That wraps up today’s blog and lays the groundwork for the mods themselves, which we will cover in the next two installments.


Hiveseeker,
Lovely series of blogs.
Are the guns to heavy to shoot single handed?
Crossman must have better lawyers than everybody else. They seem to encourage customer’s alterations, while most companies discourage customer’s alterations.
Thanks again,
Yogi
Yogi,
They probably already have the wording in the contract stipulating that the warranty is voided by any and all alterations and the customer proceeds at his own risk.
Siraniko
Siraniko is correct. I bought (and made pretty good use of) the lifetime warranty on my first two 2400KTs. If you are not planning to mod, definitely get the warranty. But if you ARE planning to mod, save the ten bucks as modding most definitely voids the warranty.
Hi Yogi,
Thank you. These guns can certainly be shot one-handed, depending on barrel length. From handling a pretty wide range of barrels, the 10.1 inch barrel is the longest I would recommend for the average shooter. The next step up is 14 inches, which I think would be doable for an adult male with strong arms. I’m referring to target shooting, where you might be holding the gun at arm’s length for an extended period. For hunting, where shots are occasional and infrequent, you can get away with a longer barrel.
Nope, Crosman’s got lawyers! The official word is here, and as the disclaimer on this blog also states, you modify at your own risk and without the consent of Crosman or Pyramyd AIR. The only exception is the steel breech:
https://support.crosman.com/hc/en-us/articles/203164410-What-are-the-benefits-or-disadvantages-of-installing-a-hammer-spring-power-adjuster-on-a-2400KT-
Hiveseeker
Nice collection of part numbers and descriptions.
Reminds me of those little sticky notes I had scattered all around my desk with part numbers and who had the different parts or mods. I do remember I gathered them all up and wrote them all down on a peice of paper one time. But I sure don’t remember were I put that paper.
Anyway nice report as usual. And of course I’ll be waiting for the other parts when you do the mods and starting putting them to action.
Oh and only one thing. I wish you would of took the side cover off the trigger assembly. You do know all the two stage trigger parts from a Marauder pistol and 1720T will fit right inside a factory 2240 or 1322/77 pistol grip assembly. Maybe those are some other part numbers you can add so people can convert the triggers to fully adjustable 2 stage triggers.
I know that’s extra work but you came so far with this series already. You almost have to include a trigger improvement. And really. You been doing this series for 4 years now. It seems like it was just yesterday. How time flys when your having fun. 🙂
Hi Gunfun1,
You’re one of the readers that knows more about modding than I do! A lot of your comments and suggestions helped guide me on this path. You will see the trigger assembly before we’re done, though I didn’t actually perform any trigger mods and cover that mod briefly. I’ll request that B.B. add your comment to that section when the time comes — if I haven’t already worn him out!
I’ll add that for a Crosman trigger, the 2400KT is reasonably good — as good as I’ve found on a gun in this price range.
HiveSeeker,
An excellent series — very well done. I am eager to see the next one as well.
I am with Gunfun1 regarding trigger improvements. Then again, he and I are trigger aficionados, er, well, O.K. trigger SNOBS. ;^) I have had a few Crosmans of this general design (1322/77, 2240, etc.) over the years, obtained through trades. Each was a souped up heavily customized improvement with many aftermarket parts. Still, the one mod none of them had was a trigger mod. I find the trigger on these more than a little spongy. Two-stage and adjustable would be a huge improvement, and I look forward to reading that.
Again, this series is an impressive undertaking, and you deserve many pats on the back for it.
Michael
Michael
How about this. A trigger and accuracy addiction. 🙂
Gunfun1,
More and more I have discovered that a light, crisp trigger makes shooting accurately much less difficult. So, one addiction helps “fix” the other. :^)
Michael
Michael
You got it my friend. 🙂
Michael,
Thanks for the kind words. The 1300KT was recently added to the Custom Shop, but from what I understand it does not include the adjustable trigger of the 2300KT / 2400KT. The trigger on one of my most recent 2400KT purchases was a bit “grittier” than its predecessors so I’m actually looking a little closer at those mods than I had before.
Hiveseeker
Yes the triggers are pretty good from the factory. But what’s nice is the option is there by adding a few factory available parts and you can have a very, very good trigger that can be adjusted for legnth of first stage pull and how you want the second stage to break and of course trigger pull pressure. I myself compare the trigger to a Marauder rifle trigger after the parts are installed.
And about modding. Don’t know if I know more. Just messed with these type of Crosman guns you mentioned for a long time. In most cases I call this parts swapping more than modding. And yep as I said. I know it’s a lot of extra work on your part and BB’s also. But sometimes you just got to do what you got to do ya know. 🙂
Hi Gunfun1,
Thanks for the added trigger comments. I have seen two-stage trigger kits out there but did not realize how wide the compatibility of the Marauder pistol and 1720T trigger parts were with the 2400KT. Very nice — if I follow up with more modding, that will be the likely direction.
Hiveseeker
I just replied to Chris below about the difference those componants make. Read below. And I think you will agree the parts are worth getting and adding to a custom shop gun or a 2240 and1322/77.
Hiveseeker
You have given us an all inclusive look at what is possible for a relatively few bucks from Crosman’s Custom Shop. They must be the only airgun company to offer such an extensive array of parts for seemingly all possible airgun applications. After convincing my neighbour to have a look at your extensive series of blogs, he has decided it is more practical to go the custom shop route, and purchase the air pistol he has always dreamed about owning, rather then fix his clapped out CO2- 2240 for more money then a new one would cost from a local box store.
I have the older Beta Chrony with the incandescent lights you mount on the sky screens. They have never failed to give me accurate readings, but are rather cumbersome due to their weight, and having to plug each light into a separate socket. Obviously the LED lights would be much less weight, but are they quite a bit more expensive? My “remote” readout is connected to the chrony with an 8 foot cord. Is yours an actual cordless remote?
Ciao
Titus
Hello Titus Groan,
To let the cat out of the bag early, one of my final conclusions to this blog is that buying a Custom Shop gun does a lot of modding for you, which ended up being my own preference. Of course, there are also those that enjoy doing it all themselves, and there’s nothing wrong with that either. I hope your neighbor enjoys his gun!
I did see the cheaper Shooting Chrony skyscreens with the incandescent bulbs, but decided to go with the newer LED lights because they looked less cumbersome, and because I didn’t want to worry about having to keep spare bulbs handy and swapping those out. I will say that the LED skyscreens seem expensive for what you actually get, but they have more than made up for that in convenience and reliability. I do not hesitate to recommend them; they have been extremely convenient for me and very reliable. Also, they plug into a single outlet, though there is a wire that has to connect from one light to the other.
Oh — and my remote display is NOT wireless. It has about a 20 foot cable, and I actually need to hunt down a shorter one. The truth of the matter is that the room where I shoot is in enough disarray that I couldn’t get an uncluttered shot of the Shooting Chrony all set up, and decided to just put it in the case for that photo!
Do what I did and throw your Chrony in the trash. I got so fed up with Err this and Err that. With Sun screens, without Sunscreens. It’s just a bad design. Awful reviews but “Chrony” is still the default..? Just look at the pics and posts right here re what you have to do to make them work right. Go with the ProChrono-Digital from Competition Electronics. It is MUCH better than the terrible Chrony. Its sensors use the infrared spectrum in sunlight. Chrony is based on visible light. ProChrono’s infrared LED light bars cost 50 bucks. And, you don’t need it outdoors. Night and day performance upgrade was my experience.
I finally got the LED light screens and they’ve been quite convenient and reliable. Being able to shoot indoors has been a major improvement.
Believe me HiveSeeker, given maybe 30 minutes outdoors, side-by-side, same conditions I would wager that you’d agree that the Chrony (as I knew it) is just not right. I found it consistently just maddening. Can’t figure out what could make it “happy”. Ya know, it gets rather tiring cocking and re-cocking a magnum air rifle b/c the Chrony got a front sensor or back sensor error or, saw nada. I’m just sayin’….
They can definitely be finicky with natural light but as far as I can tell mine has been very consistent. Again, the LED lights make a big difference and my life got a lot easier when I finally bought them. From the blogs you can get an idea how many hours (and hours) I’ve spent shooting over them. But agreed, it would be great if they worked that well out-of-the-box.
Titus
Hiveseeker just commented about the custom shop guns. But I wanted to add that the part swapping can be done to a 2240 or 1322/77 as well by just going to the Crosman site and getting part numbers from other similar guns like the Maximus or 2300s and so on. So everything does not have to be obtained by the custom shop.
And not trying to take away from the work Hiveseeker has done. But just adding to it.
Gunfun1,
Definitely adding, and not subtracting. You’re one of the fellow readers that have helped me learn more than I have taught here at the blog.
Hiveseeker
Just do’n what we do here. 🙂
Hiveseeker,
An excellent report as usual! I always appreciate your pics, visual aids and admire your methodical approach to the topic at the time. I am very close to ordering a Custom Shop 2400 myself along with some misc. parts. I had not heard of the parts limit. Benji-Don has ordered several Maximus barrels along with other parts I do believe.
Yes, it boggles the mind as to all of the modding possibilities with this platform. It can get confusing pretty quickly. A HUGE hats off to Crosman for providing the resources to permit modding!
Perhaps I should wait awhile longer to pull the trigger on a 2400 CS? Plan at this point is to get one, do a Maximus barrel swap and a power adjuster at the rear. Maybe a port swap too.
Great job once again and looking forwards to seeing more. You have really created quite the master piece with your series. In fact, given the popularity of the topic (not just here) and all you have accomplished, what you have done may be book/publish worthy.
Chris
Hi Chris USA,
I do think you will like your gun when you order! They are VERY nice in this price range.
The parts limit and other policy points depends a bit on who picks up the phone — which is not much different from most other companies that have actual human beings answering their calls. Also, I’ve established a relationship with a couple Customer Service personnel and that helps when requesting something a bit unusual or exceptional, which I did several times. Even when I couldn’t get what I wanted (like velocity figures) Crosman’s entire Customer Service team was wholly polite and professional.
Without a crystal ball in hand, I would say there’s no need to wait on your purchase of a 2400KT. There have been some recent additions to that line, like the Lothar Walther barrels, but otherwise that and the 2300KT have been the Custom Shop mainstays and I don’t expect big changes there. Of course, if anything gets added later you can order the part and install it yourself!
I never thought of a book, but I guess it’s gotten to that length, ha! I never expected things to go this far when I sent B.B. my first blog. It’s been a fascinating subject, driven by my curiosity to know and understand more and more about these fun guns.
Hiveseeker
A book would be nice.
Hiveseeker,
I would have ordered last Fri., but opened my credit card bill on Thurs. and found a 400$ fraudulent charge, which led to a cancelation and re-issue, 7-10 days. No rush on my end. I am thinking the Carbon Fiber looking stock (unless you say otherwise). (Any issues with the finish?) Plain black would work, but I know that I would always be wanting the Carbon Fiber one, if I did not get one.
*** Oh,… to be sure, the CS comes with the steel breech and the trigger adjustment in the grip,… right?
On the book,… I would say yes. You have the skills. I would run it past B.B. to get his thoughts on marketing and marketability though. I think that he “might” have published a thing or two,…. 😉
Thanks, gents, for the kind encouragements on a book! B.B. will tell you up front how hard it can be to get published, and with the information already available for free I’m not sure how strong the market would be. One of the things that’s great about the Pyramyd AIR blog is how readily accessible it is, and getting some of my own contributions out there for others is actually one of the more significant events in my recent years. I really appreciate B.B. taking me under his wing and letting me contribute.
Chris
Don’t forget a steel breech. That is a must have. I know you probably have it in mind and you just didn’t list it. As well as other mods I’m sure. 😉
GF1,
I am pretty sure that the Custom Shop gun comes with the longer steel breech. If it does not, then I may be hitting the brakes. I do believe that it comes with the trigger pull adjuster in the handle too.
So, no steel breech and trigger adjustment parts were in the plans, as it should already have them.
Chris
Your right about the custom shop guns having the steel breech. I keep thinking your modding your 2240.
And me and Mike had a reply about the triggers. I won’t post anything about them yet because that will be part of Hiveseekers as time goes.
But I will tell you where you can look at to see the difference. This is all on the Crosman website in the schematics and manual section.
First search up the 2300S. Look at the trigger componants. This is the trigger componants that the custom shop gun will have. The pull pressure adjustment and the trigger stop and a regular sear just like a 2240 or 1322/77 and the sear has no adjustment.
Now pull up the schematics of the Marauder pistol. It will have the pull pressure adjustment and the trigger stop. But hears the difference. It will have a different sear and a few other parts that make the trigger adjustable just like your Marauder rifle. In other words it will have two small set screws to adjust trigger legnth of pull and when the shot breaks.
The custom shop trigger is just a single stage trigger. You can feel a spot where the trigger stops then the shot breaks if you add more pressure to your pull with your finger.
Basically do this cock your 2240 and dry fire it. Then take the Tx or LGU and load a pellet and fire them. That will be the difference between the trigger feel of a custom shop gun compared to the trigger componants I’m talking about from the Marauder pistol.
Believe me you will want the trigger componants I’m talking about from the Marauder pistol.
Hope that helps.
I’ll second Gunfun1’s comments: The 2400KT includes the (long) steel breech and the adjustable trigger. If for some reason you want the short steel breech, the 2300KT offers that option and all the mods we’ll be discussing can be performed equally well on that gun. However, as far as I have been able to determine the 2300KT does not include the power valve in any variation, possibly related to the shorter barrel lengths for that gun.
Hiveseeker,
This is quite a nice primer for not just those who would “mod” a 2XXX, also for owning and maintenance of such. Your series has educated many concerning the basics of airguns.
Hello RidgeRunner,
Thank you, sir. I’ll have to say, having put thousands of shots through my 2400KTs, that they don’t need much maintenance, but I hope this does help when that time comes. I was petrified the first time I totally disassembled mine — but had no parts left over when I put her back together which the wife says is a good thing!
Hiveseeker
Ha ha. Sorry but had to comment. I at times intensionally have parts left on the bench after I get through modding a gun.
Sorry again. 😉
No problem. My wife tells a great story about the time she took her dad’s new cassette player apart to see how it worked and managed to get it back together with no parts left over. He never knew.
Hiveseeker
Maybe Mrs. Hiveseeker should do a modding blog. 😉
Hiveseeker,
Your guest blogs are the epitome of infotainment! Well done as always.
Carl
Hello Coduece,
Infotainment — I’ll take that as a compliment! Thank you, and I hope that as we dig down into the details I manage to keep everyone awake. I’m a kitchen sink writer, trying to include all the details that the one reader out there will desperately need when they come up with the same question or find themselves in the same situation. Part of my goal has grown from simply reporting on these guns, to providing a reference source. I’ve learned a lot — and much of it from my fellow readers. This is a fantastic forum which has tripled my enjoyment of airgunning.
HiveSeeker,
I’m pretty big on reference material myself and I’m thankful that you provide plenty of it, although it does add to what my wife tends to call “clutter”, if you can believe that. Speaking of clutter, where I set up to shoot I would have had trouble finding a clear flat surface big enough to display an opened Chrony case ! 😉
Great job with the blog.
Halfstep,
Digital stuff I’m actually much neater with than “real” stuff. It doesn’t take up nearly as much space! So my computer is pretty organized, and my desk . . . not so much.
Hiveseeker,
If you consider yourself a kitchen sink writer, well that makes my posts the garbage disposal under the sink. Sometimes I think my intent gets lost in the translation, which can be difficult at times with my wry sense of humor. Yes infotainment was meant as a compliment keep up the good work.
Carl
Hi Coduece,
Fear not, complimentary was entirely how it was taken. Also, enjoyed your contributions on the motion targets. When my wife shoots with me we always break out the spinner targets — they’re our favorites!
Very nice!
As somebody who has modied four of these guns, this will be fun for me to watch. Keep up the great work, Hive Seeker!
Hi Diaboloslinger,
Thank you, and please jump in with any comments you have as the mods themselves get underway in the next couple installments. There was a ton of information scattered about out there, and one of my goals was to sift it all out and collect a lot of it in one convenient place. Any additions from you would certainly be helpful.
Hiveseeker
your curiosities have inspired me to take the first steps into modding this platform. I’ve had a 2240 for about a year and recently changed to a steel breach and the 10.3″ barrel. I have a stock I could put on but I want to keep it as a pistol at this time. To that end I would like to get an open site to fit the new breach. Would you know of a source for this item? I’m afraid an optic would add to much weight.
Gerald
Hi, and good luck as you work on some modding! You’re actually getting us into the next blog, but here’s the open sight for you. Note that it fits into the slot on the steel breech, NOT on the dovetail scope rails:
/product/crosman-lpa-mim-rear-sight-for-crosman-guns-with-a-steel-breech?a=4385
There are also open sights that mount on dovetail rails, and they may also work:
/product/williams-diopter-sight?a=2003
Check the “other products” that pop up at the bottom of these product pages to see additional options. Good luck!
HiveSeeker
Thanks the sight #4385 is what I am looking for.
Gerald
Great work HiveSeeker!
My only complaint is that you are really tempting me to start exploring the 2XXX world of of mods 🙂
About the Chrony lights, I really think that they should be a standard part of the Chrony and not a separate (expensive) purchase. You can operate a Chrony without lights but it is a pain in the derriere. IMHO the price that Chrony is selling their lights for is WAY out of line.
I added a pair of $6.00 battery powered Led pocket lights (the oval ones with a “bar” of Leds work better than the multi-led designs) to my Chrony and they work very well. The magnets on the back of the flashlight makes mounting easy. I used a piece of Plexi-glass and a coin-magnet to provide a positive an consistent mount-point for the flashlight. A strip of steel would do as well.
Hank
Hank
Thank you for the Chrony mod trick I too feel like the led Chrony lights are a bit pricey, and this looks like a very equitable solution.
Carl
Carl,
The whole mod took about an hour to make and I had all the materials except for the lights.
I made new one-piece screen supports to replace the 3-piece ones and threaded the tops.
The light supports are made from Plexi-glass and button magnets but wood or a strip of sheet metal would be fine as well.
I added a sheet of translucent plastic as a sky-screen to shade the sensors from unwanted light. The thin plastic need some supports, I made them from plastic corner-edging used to finish the gyproc walls (in preparation for plastering).
A piece of 3/8″ plywood would be a better solution but I didn’t have any. It would be the sun-shade, light support and structure all in one piece.
I just love to tinker around with stuff. 🙂
Hank
Hank,
I think you could do a guest blog on this i for one would be very interested and I’m sure many others would as well.
Carl
Carl,
Guess that I could do a guest blog on my Chrony mods.
I have also added and aluminum base to the Chrony so that I can clamp it to a 2×6 that will be part of a rifle-rest I am planning. The idea of that is that the Chrony and the rifle are kept in the same alignment so I can test the pellet accuracy and the velocity at the same time.
The thing is that a lot of the tinkering I do requires a well equipped workshop and the knowledge to use it. I am sure that you are comfortable with drilling and taping holes, threading rods or welding/brazing/soldering bits and pieces together but most people aren’t.
I tend to write guest blogs for projects that are withing the scope of the average reader and if there is a “special project” requiring more skill I prefer to take it off-line. I have had numerous conversations with people that want to make something and ask for my comments – don’t mind doing that at all.
Hank
Hi Hank,
Nice custom setup! The standard skyscreens work okay, and most folks that don’t do a lot of chrony work will be just fine with them. But for the amount I’ve done, I had too many attempts ruined by too dark and cloudy, rain, or the sun directly overhead and shining down into the sensors. I came pretty close to buying them the day I had spent nearly an hour getting my shooting table, backstop, and chrony all set up only to be driven indoors by — literally — a 60-second thunderburst that drenched everything. Also, being able to test indoors and even at night has been a major convenience and I wish I’d bought the LED lights much sooner.
Good job HiveSeeker
Very interesting I’ve spent time looking at the custom shop someday I’ll get something from there for now having fun with the new stormrider I did take a springer out the other day so it wouldn’t get lonely. The wife says why do you need more than one airgun well why do you need more than one pair of shoes it becomes a addiction.
Excellent comeback Buckaroo! I think that response would work for many of us.
Well, Buckaroo, I recommend taking her out for a nice sit-down dinner and then explaining that you’ve got your target gun, your plinking gun, your hunting gun, the match pistol, the pump pneumatic, the CO2 pistol, the PCP, and the BB pistols, not to mention that one you found on clearance at Wal-Mart. She’ll understand.
Folks, my “real” day is starting but please keep any more comments and questions coming — I’ll be back online this evening.
HiveSeeker,
Great blog! Correct me if I’m wrong, but didn’t you say if you ordered one from the Custom Shop without the LW barrel, you get a “Hotter” valve? Maybe I just dreamed that. I too have looked at the custom shop a lot.
Doc
Doc,
That is what I remember too. If you want the hotter valve (which I believe is the stock valve) in your CS build, stay away from the LW barrels.
Hi Doc,
From my own purchases, the 18 inch and 24 inch barrels get you the Custom Shop power valve, and my two Lothar Walther-barreled guns (one in .177 and one in .22) got the target valve. However, to “sneak peek” to the next couple blogs, if you want a Lothar Walther barrel I recommend that you buy it on the gun when you place your order, and then plan on buying a commercial / third party power valve. The power valves are easier to come by than the LW barrels.
BB
I sent you a email at the blogger@pyramydair.com. I want you to look at something. It might of ended up in your spam box. So keep a eye out for it if you will.
HiveSeeker
I am not at all interested in CO2 guns, but you did an excellent job on this blog. It’s very well organized and written, with very good illustrations thrown in as well. In any case, I enjoyed the read. Nice job :’)
Hi Geo791,
I really appreciate your comment, and thanks for taking the time to read it even though you’re not a CO2 gun fan. When I first started reading this blog, I was on the same side of that fence with the more historical blogs on older airguns that I would never own. However, I read most of those anyway and was pleasantly surprised to find myself learning some new things that helped me appreciate the guns I do own a little better. I’ve also learned in my later years to “never say never,” and being a little more widely read than I otherwise would be has lead me in some new and interesting directions. Glad you still enjoyed the read — that is a great compliment.
Geo
The guns Hiveseeker is reviewing can be easily converted to HPA along with the 2240’s.
Quite true, and I’ll be touching on that only briefly because B.B. already covered it pretty well. The PowerMax HiPAC kits still seem to be some of the most popular, and is what I would buy if I decided to go that route. Stay tuned!
Hiveseeker
I had a couple 2240’s with the hi-pac HPA conversion.
Hit reply too soon.
That would for sure be the way I would go if I did another 2240 up.
Thanks, Gunfun1. The HiPAC seemed like a straightforward kit when B.B. tested it, and I haven’t come across anything that looks simpler or easier in all my research. If I was to go that route, it would remain my first pick. In fact, even though I’ve wrapped up the blog writing, I’ve been considering it!
Hiveseeker
I know some other people that have the hi-pac conversion and like it.
And you know you will have to throw it into your series if you try one out.
Very nice guest blog, HiveSeeker, mate.
Hello Chris,
Thanks for the kind words from across the big pond! I’ve noticed that a lot of the mod vendors are in Europe or England. One of the mods I’ll be covering I bought from GMAC Custom Parts on your side of the ocean.