by Tom Gaylord
Writing as B.B. Pelletier
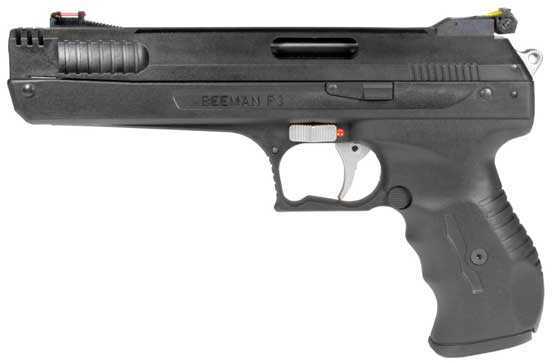
Beeman P3 air pistol.
Beeman P17 Part 1
Beeman P17 Part 2
Beeman P17 Part 3
Beeman P17 Part 4
Beeman P17 Part 5
Beeman P3 Part 1
Beeman P3 Part 2
This report covers:
- P3 first
- Disassembling the P3
- Springs installed differently
- Additional spring
- Valve assembly
- Assembly
- The difference between the P3 and the P17
- The finger pin fix
- Why did the pistol leak?
- How did I do? — the test
- Cocking effort
- Next
Today I will tell you the story of rebuilding both the Beeman P3 air pistol and the Beeman P17 pistol. Last Friday I resealed both of them and took a lot of video footage — 30 different clips in all. I’m still editing that footage and I plan to show you everything later in this series, but today I want to talk about the reseal jobs and also about the differences between the P3 and P17. I will also test both airguns today and compare them to where they were before the reseal. This will be an interesting report.
P3 first
I chose the P3 to reseal first because I wanted to see what made its trigger so much better than the P17 trigger. I did find out, plus I found out a lot more that I will tell you. Let’s get started.
Disassembling the P3
I filmed everything I did while working on the P3, but that wasn’t much of a distraction. I had the first two reports from 45Bravo on my laptop in front of me so I could follow what he said to do. That really helped a number of times. I referred to his photo of the assembled trigger many times!
The P3 came apart easily and exactly how 45Bravo said. However, when it came to the trigger parts I did a few things differently. I disassembled more than what he said to and in doing so I discovered a couple things.
Springs installed differently
In my P3 the tail of the coil spring that 45Bravo describes as the sear spring was tucked into the bottom of the left grip — not the top of the right grip.
45Bravo showed us how to tuck the tail of the sear spring up into the top of the right grip panel when assembling the pistol.
I assembled the tail of the P3 sear spring the same way that it was when it came apart (down inside the left grip panel) and it has functioned fine every time during testing. Later when I disassembled the P17 the same spring was in the same place as the P3, so I assembled it the same, too.
Additional spring
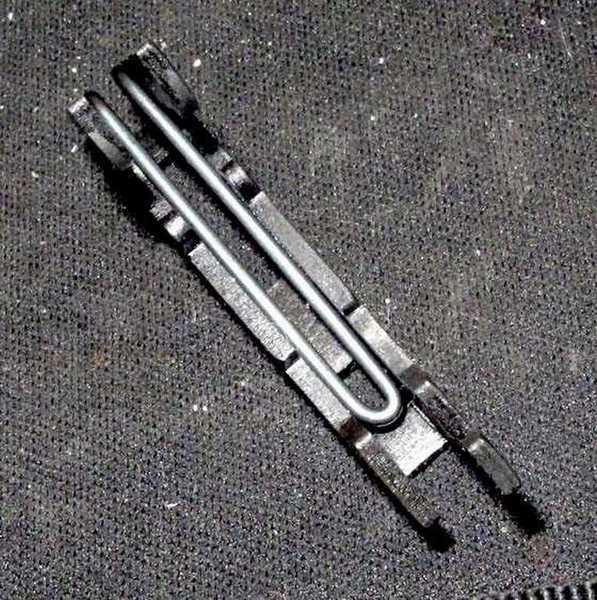
While removing the trigger and hammer parts from the P3 I discovered an additional wire spring that 45Bravo didn’t mention or show. It’s inside the hammer (the part 45Bravo says looks like the number 7) and if you don’t remove the pin that holds the hammer and trigger linkage together you will probably never even see it. I did remove that pin, and when I assembled it into the gun again, I noticed that the pin didn’t go through the ends of this wire spring. That was when I noticed it. So I photographed it for you.

You are looking into the P3 hammer at the wire spring that rests inside.
I have swung the top of the wire spring out of the hammer for you to see. The loops on the spring align with that hole at the bottom of the hammer where the pivot pin passes through.
The rest of the disassembly went according to 45Bravo’s instructions. I will say, however, that his naming of what constitutes the sear doesn’t include all the parts involved. I found the trigger to be a multi-lever affair — or at least that is how it seems to me. And that will become important when I discuss the P17 trigger.
Valve assembly
There are two o-rings that need to be replaced in the firing valve. The smaller one (006) that fits the end of the valve is straightforward and goes on and off easily. The larger one (009) that fits just below the threads of the brass valve cap is far more difficult to remove and replace. I probably spent 10-15 minutes fooling with this o-ring and after I got it on it didn’t want to seat in the o-ring channel in the valve. This is a MAJOR difference between the P17 and P3! The P3 valve has a machined groove for that o-ring, but the P17 doesn’t. I’ll get to the P17 valve in a moment, but first let’s stay with the P3.
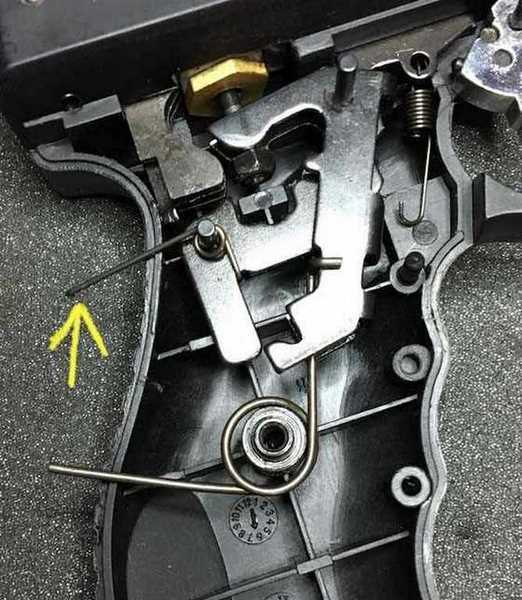
It took me at least 10 minutes to get the o-ring into its groove and after I did it sat high. It would never go back inside the valve that way. Then I rotated it on the valve and it seated down into its groove. Apparently it had twisted several times while being pushed onto the valve and needed to relax.
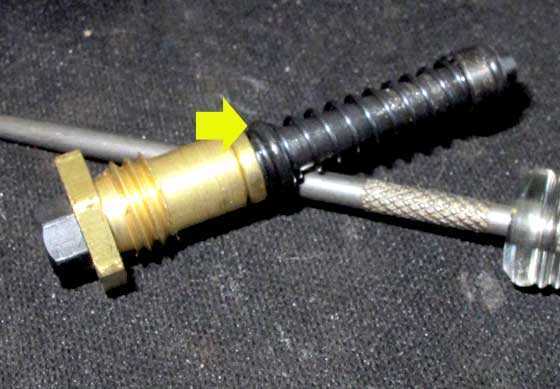
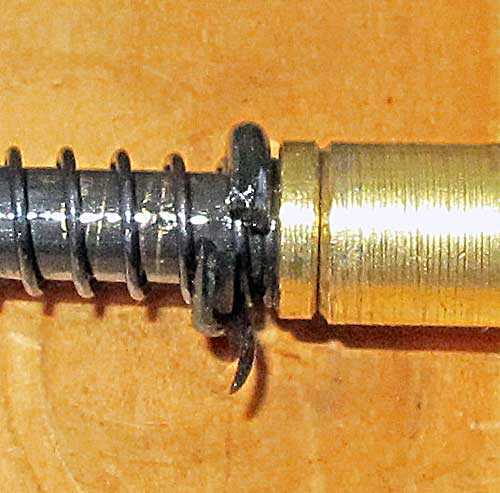
After sliding the o-ring (arrow) over the coiled valve return spring it had twisted and didn’t seat in the channel on the brass valve to the left of it. This is the P17 valve and isn’t exactly the same as the P3 valve.
Once on the valve, the larger o-ring sat proud of its channel and wouldn’t go back into the valve body. Rotating it made it untwist and sit down in the groove. This is the P17 valve, but the same thing happened with the P3 valve.
Assembly
The remainder of the P3 assembly went by the book. In all it took me 90 minutes to disassemble, exchange the o-rings and assemble the P3. And a lot of that time was taken up by the filming I did. I shot 30 clips in all. After assembly I tested the pistol, but let me tell you about the P17 disassembly and reseal first.
The difference between the P3 and the P17
The major difference between the two air pistols is the parts in the P17 trigger and hammer are rough and not finished well. Every surface is just rougher than on the same P3 parts. There was no one part that I could identify as the culprit for the trigger not being as smooth. I think they are all to blame.
The P17 had some major difficulties for me that I only appreciated after having disassembled and assembled the P3. The “fingers” (read 45Bravo’s description in Part 2) were particularly bothersome. I had to completely disassemble the pistol a second time because after the first assembly it would no hold air when pumped. I therefore had to remove those three fingers a second time and they were a major pain to assemble again. They are so tight in the slots they fit in that aligning them to accept the two crosspins is a bear!So I came up with a fix.
The finger pin alignment fix
To get the fingers aligned in their slots, I put them in one in at a time and then inserted the large crosspin to hold that one in place. Slide (with a plastic hammer!) the next finger in and tap in the crosspin through its hole to hold it. And a third time to finish the job.
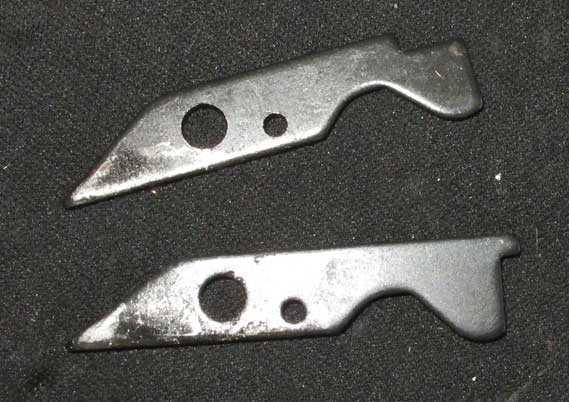
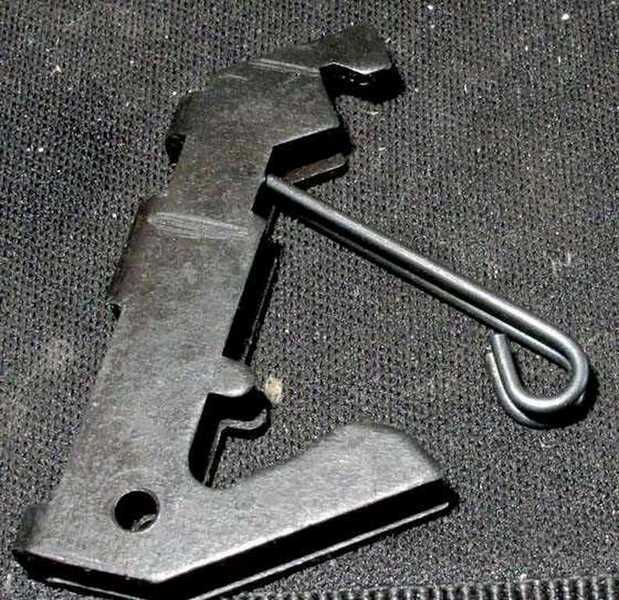
Two of the P17 “fingers.” The one on top is one of two that sit either side of the one on the bottom. The bottom one is really the center finger that interacts with the trigger when the gun fires.
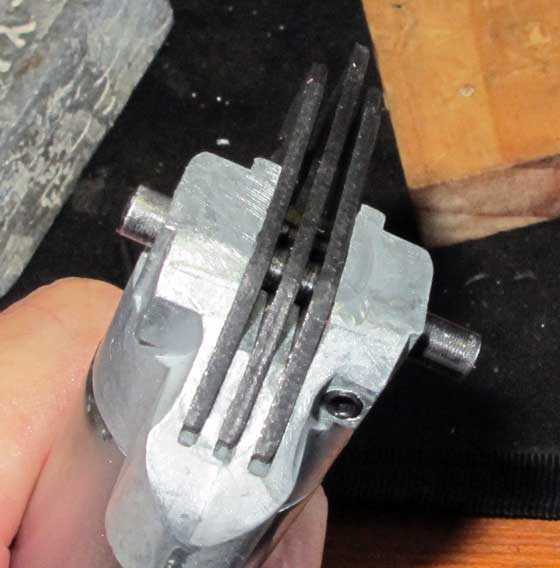
I used the large crosspin to align the fingers in their grooves on the P17 compression chamber. Once aligned this way the crosspin was tapped out so the chamber could be installed back in the pistol frame.
Why did the pistol leak?
After assembly the P17 leaked as it was bing pumped and had to be completely stripped again. Why? Because the large (009) o-ring on the valve had torn in assembly. Let me show you why. This is another major difference between the P17 and P3.
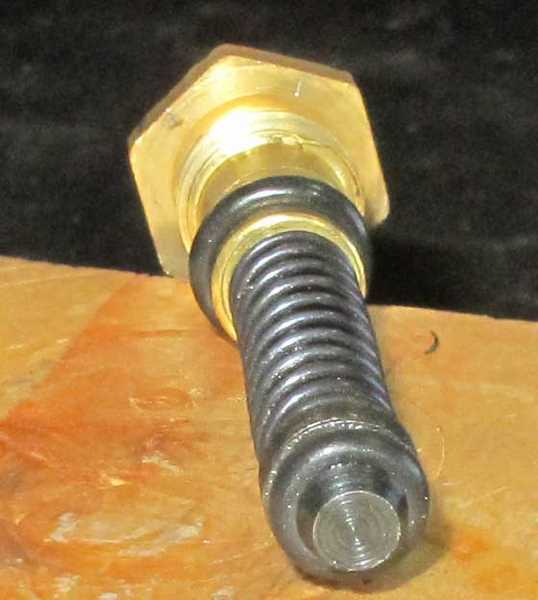
The larger valve o-ring in the P17 has been torn in two. It’s supposed to be behind the brass collar to its right. NOTE — that “collar” is separate from the brass behind it!
As I was installing the new o-ring (they send several with the overhaul kit) I noticed the small brass collar that is separate from the rest of the valve. THERE IS NO O-RING GROOVE ON THIS VALVE!!!!! The Chinese have made this thin brass collar take the place of machining an o-ring groove.
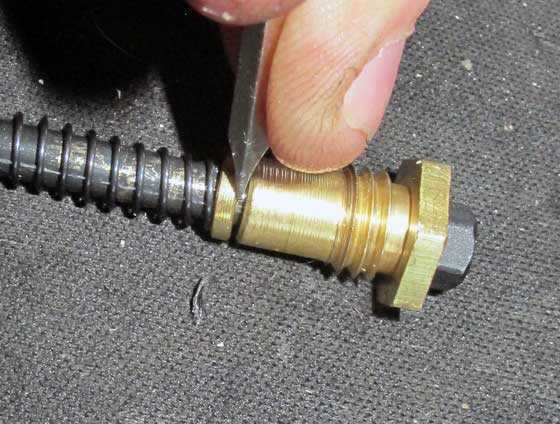
I’m prying the thin brass collar away from the brass valve. The valve return spring keeps pressure on the collar, making it act as one side of an o-ring groove.
This is an ingenious design because as long as it is inside the valve, the o-ring is contained between the collar and the rest of the brass. It makes it a little more difficult to install, but as long as you know how it works you can pay attention to it and get the o-ring where it needs to be. This time the valve went together easily and the gun was assembled correctly. I replaced the breech seal last of all on both pistols.
How did I do? — the test
First the Beeman P3. I shot RWS Hobbys to test the velocity the same as in Part 2. Here are the average results
Seated flush
Part 2………After overhaul
370 f.p.s……….402 f.p.s.
Seated deep
Part 2………After overhaul
378 f.p.s……….412 f.p.s.
Now the Beeman P17. I last tested the P17 for velocity in Part 3 of the P17 test. The link is at the top of this report.
Seated flush
Part 2………After overhaul
389 f.p.s……….404 f.p.s.
Seated deep
Part 2………After overhaul
401 f.p.s……….388 f.p.s.
I don’t know why the P17 dropped in velocity from deep-seating, but it was very consistent. The low was 383 and the high was 395, so only 12 f.p.s. between them.
Before the overhaul the P3 was shooting a little slow and the P17 was on the slow end of where it should be. The P3 gained considerably from the reseal and the P17 stayed about the same.
Both triggers remain where they were before the overhaul, so no changes from this work. I haven’t got a clue what could be done to improve my P17 trigger, short of smoothing every part in the trigger/hammer system. That’s too much for for a trigger that’s not that bad as it is.
Cocking effort
P3
Before……After
37 lbs……..28 lbs.
P17
Before……After
35 lbs……..39 lbs.
Next
Next I plan to shoot the P3 for accuracy. I will remount the Millett red dot sight that came on the gun for this test and shoot at 10 meters. Stay tuned!

B.B.,
Thank you for the peek inside the two powerplants. It appears that by putting some extra effort in polishing/cleaning the P17 trigger components might lead to a better trigger. Using a separate brass ring to form the groove decreases the machine work required to make the part this contributing to a lower overall cost.
Siraniko
PS: Section Why did the pistol leak Third paragraph last sentence: “I replaces (replaced) the breech seal last of all on both pistols.”
Siraniko,
Fixed it. Thanks.
You are right about that brass ring decreasing the machine work. It’s really clever.
As for polishing the trigger parts, that would be a real job! So many things are involved.
B.B.
BB,
It does seem strange to me that making an additional part would be less expensive overall than machining another groove in an already existing part while it is being machined, that is unless you are not concerned with labor costs. If you look closely at the “collar” it has machined chamfered edges and is not just “cut” from a piece of tube. Not polishing the trigger parts does indicate that “time is money” so this is not the entire explanation.
Now actual valve assembly would likely be easier and quicker since you would just “stack” the parts on the shaft and tighten the nut to required torque. As you can likely testify yourself, that would amount to a considerable saving in labor costs. Also, the “collar” may be common or an “off the shelf” part for another something or other. That would further reduce cost.
RidgeRunner,
The overwhelming majoprity of products manufactured in China are completely hand-assembled, so yes, in China the additional part is less expensive to the process than machining would be. The iPhone that would be assembled by robots if it were made in the U.S. is instead assembled entirely by hand in China. It is cheaper to have something manufactured by hand in China than robot-assembled anywhere, in the U.S. or in China.
If the manufacturing of something made in China is moved to the U.S., it will not be made by the same number of Americans as it was made by humans in China. Instead it would be made primarily by automation. Therefore, moving manufacturing back to the U.S. would not create nearly as many jobs as it required years ago, because in the U.S. automation has taken over in the meantime.
Michael
Michael,
Yes, labor is cheap and very plentiful over yonder. Some companies are still bringing their products home because of quality control, or lack thereof.
Does anyone remember the Crosman Maverick?
B.B.,
An excellent report! You have once and for all dispelled the belief that the P17 and P3 are essentially identical.
True, the debate over whether or not the one that costs nine times more is nine times better performing will continue, but that has to do with the comparative wealth of the individual consumer. The P3 has a slightly better trigger. Is it nine times better than the P17’s trigger? No. But to someone for whom price is no object, a trigger that is 1.2 times better is easily worth the extra $270.
My P17 is as accurate in my inexpert hands as any of my other air pistols. Your accuracy report might show that better accuracy is possible with the P3 in more stable hands than mine, however. (And most all hands are more stable than mine.)
Michael
B.B.
Nice detail in the report!
Seems everything about these guns is a pain…
-Y
It may well be made out of spring wire, but I had never thought that that extra p-shaped piece inside the hammer was actually performing any function as a spring – more of just a spacer/guide really.
The width of the hammer is governed by the two arms of it (the top of the ‘7’) that must pass either side of the valve stem. There are though the two other parts in the mechanism that are a single thickness of steel, the sear that holds the hammer and the trigger sear (?) that holds this in place, and is contacted by the trigger. These two parts must be kept in alignment – in the same plane, essentially – and while the internal contours of the frame and grip panel can play some part in this, consistent alignment is best achieved with this extra piece.
This piece seems to control quite nicely where the sear holds the hammer, and where the trigger sear holds the sear.
Iain
Iain – UK
When I first saw it in BB’s photos, I suspected that it was a centering device rather than a spring because I couldn’t see where any tension would be stored up. Do you think that they did it this way for ease of assembly or because the rounded cross-section of the wire makes for less contact and, therefore, less resistance with the part being centered?
BTW, I copied and filed, for future reference, your explanation of the trigger further down in the comments. Thanks for that.
Half
Possibly both reasons. If you consider disassembly, the hammer pivot (pin D) can be pulled up slightly, enough to release the end of it from the frame, allowing the hammer, trigger sear and wire p-piece to come out as a unit, so clearly in assembly these three parts can be fitted together more easily out of the gun.
And, when you consider what the sear has to do – spring cleanly out of the way to release the hammer – I suppose the obvious other material to use would be the sheet steel the trigger components are made from: the hammer could have two extra plates on its inside at this point. What sort of finish, or even burrs, might that have?
Iain
Thanks for the work B.B.,
See, this just reinforces my opinion that the Crosman 13xx series of pistols is the way to go, most of the time.
It has variable power, and 2 or 3 pumsp gets the same velocity in .177. Would making the valve compression chamber volume a bit smaller with a spacer get the user the same velocity on two or even possibly one pump,
at the expense of high power shooting?
If the P3/17 were easier to charge with air, then it would make it more fun to shoot a lot., but my brothers’ is a
pretty accurate pistol. I guess it’s the trigger that is nicer than on the Crosman, but my 1377 is more accurate.
I like that they are both affordable, sorry P3, no deal.
1stblue
1stblue,
The Snow Peak s400 is a comparable pistol but has a longer barrel housing, so it cocks MUCH easier than the P17. My guess is in the neighborhood of 20 pounds, but it could be lighter than that. It cocks lighter than my Air Venturi V10 by quite a bit.
Michael
B.B.
On the cocking effort:
Cocking effort
P3
Before……After
37 lbs……..28 lbs.
P17
Before……After
35 lbs……..39 lbs.
So the P3 went down 9 lbs yet got more FPS? Should it maybe have read 38 lbs? If not, then what a bonus!
Thanks,
Doc
Doc,
Those numbers are correct. I was surprised, but I chose not to comment because I couldn’t think of anything to say about it.
B.B.
B.B.
Are these two statements contradictory? I am confused because it appears the pin does go through the ends.
Paragraph: Additional spring
“I did remove that pin, and when I assembled it into the gun again, I noticed that the pin didn’t go through the ends of this wire spring.”
Picture Caption:
“I have swung the top of the wire spring out of the hammer for you to see. The loops on the spring align with that hole at the bottom of the hammer where the pivot pin passes through.”
It would seem that a small sleeve that would go over the spring on the valve would keep from cutting the large O-ring. I can’t tell from the photo what size would be needed. Maybe cutting a piece from the body of a ball point pen would work. Another special tool needed here it would appear.
Geo
George,
I showed the spring with the loops aligned. They were not aligned when I assembled the parts the first time, which is why I noticed the spring.
There is no room inside the valve for a sleeve over the spring. The o-ring has to squash down to fit. It’s a fiddly job.
B.B.
Perhaps looking at it from this angle explains where everything fits.
The hammer is being held back by the sear at point A. The sear pivots on pin C and is spring loaded to naturally rotate up and release the hammer.
The sear is held by the trigger sear at point B. Pulling the trigger rotates the trigger sear, which releases the sear, allowing it to move and therefore releasing the hammer.
Pin D is the pivot for both the hammer and the trigger sear, the loops of the ‘p’ piece are also sitting either side of the trigger sear on the same pin. One of the long legs of this piece can be seen above the sear between A and B. Notice how the sear and trigger sear are both much thinner than the gap between the two sides of the hammer, which is determined by it having to fit either side of the valve.
This, by the way, is in a Weihrauch HW40.
Iain
P.S. a German supplier I’ve used a few times lists this spare part as a ‘Distanzstück für Luftpistole Weihrauch HW 40’, and not as a ‘feder’ (spring) of any kind.
Speaking of ordering pellets, when I ordered some from PA this weekend they are shipping out of Utah. Did PA set up another shop or are they using another company to supply some of their products?
RR,
I think I mentioned that awhile back. Ship direct from the source that has them in stock. That would require (for example),…. someone like A of A honoring (working with) P.A. orders and visa – versa. Some compensation for the “provided services” is of course expected,….. but the consumer gets what they want.
The product ships as normal,… but the sender address (might) be from a different state. Warranty/return would be the responsibility of the (original) seller,… regardless of where the product shipped from.
Chris
Chris,
Like I read all of the posts to this blog. I am doing good to read my posts.
RR,
Pyramyd AIR and Air Gun Depot are all the same company, Air Venturi fits in there somehow, as well, as part of their design and importing operation. AGT is located in Utah and PA is in Solon, Ohio, as is Air Venturi. I get stuff from PA all the time that ends up coming from AGT and vice versa.
Half
Half,
Those tidbits were once noted in my head, but they must have fallen out. I do have a question though. What does Americas Got Talent have to do with airguns? 😉
RR,
LOL, of course that should be AGD. Just finished watching this season of AGT and I guess it’s still on my mind.
Half
Half,
We watched for many years, but recently became bored with it and quite. The same thing happened with Survivor a while back. Same stuff, different day. Yawn.
Off Topic,…
I see P.A. is offering an “adult” Red Ryder. It would seem that the meager approx. 1 1/2″ length increase in overall length seem to be in the LOP (length of pull),… butt to trigger. I say,… very good!!!! At least a very good step in the right direction and I feel a very good (and long overdue move) on their behalf.
Now,…. if it could only “drills holes” like the Avanti 499,…. which BY THE WAY!!!!!!,…. could (also) use an “adult sized” upgrade!!!!
Rant,…. done. 😉
Chris
Chris U,
Did you see this on Rick’s Expert Airgun Reviews?
https://www.youtube.com/watch?v=GQDj2qUcw5s
Half,
Thanks for the link. I did watch it. I can not say it enough,…. if you want the ultimate in accuracy with a bb gun,…. get a 499! Plus,…. with a simple mod.,…. you can bump it another 150 fps. Same great accuracy with extended range.
Thanks again,….. Chris