

The HW 50S breakbarrel from Weihrauch.
Part 1
Part 2
Part 3
Part 4
Part 5
Part 6
Part 7
Part 8
Part 9
Part 10
Part 11
This report covers:
- Scope
- Mounts
- Sight in
- The test
- Safety — note to self
- Trigger
- Falcon pellets
- RWS Meisterkugeln Rifle
- Air Arms Field
- JSB Exact RS
- Discussion
- Summary
Today we shoot the tuned HW 50S for accuracy and learn a lot of things! This one will be of interest and hopefully help for those who want to tune their springers.
Scope
The stock on this new-style rifle makes it impossible for me to use the open sights. I’m not going to commission a new stock for this one because I have already done that with the HW 30S. On this rifle I’m going to mount a scope. I chose the UTG Bug Buster 3-12X32 scope that seems ideal for this size air rifle.
Mounts
For the mounts I used those Burris XTR Signature rings that I used to solve the Gamo Arrow’s barrel alignment issues.
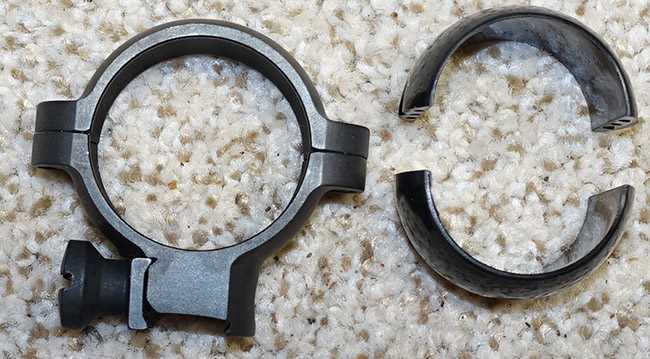
Each ring gets an insert, shown to the right. The inside of the rings are hollowed out to accept those inserts. That allows angling the scope without straining the tube.
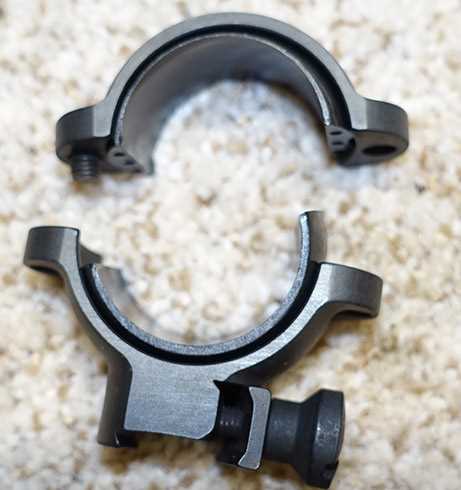
This view shows how the inserts fit inside the ring cap and saddle. By rotating the inserts you also get left-right adjustment.
I have more to tell you about these rings, but I get to that in a bit. Suffice to say the scope was mounted in short order.
I removed the front sight and put it in a baggie with the rear sight parts. I doubt I’ll use the open sights again with this rifle.
Sight in
I sighted in initially at 12 feet. Because the scope is a Bug Buster I could focus at that distance.The first shot hit the target 3 and one-quarter-inches (8.255cm) below the aim point at 12 feet. There is no way I can recover from that with simple scope adjustments. Fortunately I have the highly adjustable Burris rings on the rifle, so that’s a plus. The downside is they can take an hour or more to adjust, so I continued the test with them set as they were and will return another time to set them straight. As it turned out that was a fortunate decision.
The test
I shot the rifle off a sandbag rest from 10 meters. The rifle was rested directly on the bag. I shot 10-shot groups with each pellet.
Some pellets were light and some were heavier, so the groups moved around a lot. And I must comment on the safety and the trigger.

Safety — note to self
The safety doesn’t go off every time I pressed it in, but it stopped short of going fully off. When I pressed harder a second time I heard a quiet click. This is the same thing that happened with the safety of my HW 30S and I thought the return spring wire was getting caught in the safety hole. Now I think there might have been a small change in the Rekord trigger design and it may have resulted in a safety that doesn’t always go off. This is a note to myself to watch this. When I pressed the safety deliberately hard it went off every time.
Trigger
This trigger is perfect! It’s crisp and not too light nor too heavy. It’s just what I want.
Falcon pellets
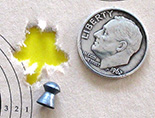
The first group was shot with Air Arms Falcon pellets — the same pellets that were used in the velocity test. Ten of them went into a 10-meter group that measures 0.49 inches between centers. Remember, I don’t care where the groups hit today.
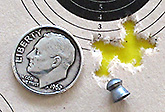
The HW 50S put 10 Air Arms Falcon pellets into 0.49-inches at 10 meters.
I wanted to try a few pellets I hadn’t tested in this rifle before. Looking back on the pasts tests I have mostly focused on the power of the rifle and not its accuracy. Now that the power is dialed in it’s time to get her to group.
And speaking of how the rifle shoots — boy is it smooth! This is the way I want a springer to function.
After shooting this group I noticed that the scope rings had slid back on the rifle. I tightened the ring bases that had loosened and continued the test.
RWS Meisterkugeln Rifle
Next up were RWS Meisterkugeln Rifle wadcutters. Ten of them went into a 0.723-inch group at 10 meters. That was not what I was looking for.
Ten RWS Meisterkugeln Rifle pellets went into 0.723-inches at 10 meters.
After shooting this group I noticed that the barreled action was loose in the stock. I tightened all the screws except the rear triggerguard screw that is stripped. I need to get a replacement screw and the nut that holds it inside the trigger box. Come to find out this is something almost nobody sells.
I found what I need on eBay for about $10 and I’ll tell you about it when I get it. This is a weakness in the Rekord trigger design that I have dealt with for at least the past couple decades and it needs to be discussed.
These stock screws loosening, plus the scope mount screws loosening is why I said it was fortunate that I didn’t take the time to align the Burris scope ring inserts today. I have a lot more to do to get this rifle ready to shoot, and that’s going to entail another report.
Air Arms Field
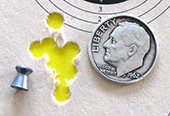
The next pellet I tested was the 8.4-grain Air Arms Field dome. Ten of them went into 0.456-inches at 10 meters. This is a pellet to watch!
The HW 50S put 10 Air Arms Field domes into a 0.456-inch group at 10 meters.
JSB Exact RS
The last pellet I tested was the 7.33-grain JSB Exact RS dome. Ten went into a 0.475-inch group, but only because the seventh shot went wide. The other nine pellets are in .305-inches. Another pellet to watch.
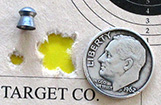
Ten JSB Exact RS pellets went into 0.475-inches at 10 meters with nine in 0.305-inches.
Discussion
I read about guys who say they take all afternoon to sight in their pellet rifles. I have to mount a scope, sight in, shoot groups, photograph the groups and write the report in the same time they have to sight in. Because of that I’m always compromising. Well, no longer with this rifle. With the exception of the stripped rear triggerguard screw that I have placed on order, I’m going to put Locktite on the two other stock screws and I’m going to adjust the Burris scope rings with their rotating shims. I’ll document this as a full report for you — tomorrow. I don’t want this stuff to get old, lest I forget something.
I have a gut feeling that this HW 50S is going to become one of my favorite air rifles after all of this.
Summary
After reducing the power in the HW 50S it’s turning into a very nice air rifle.

Hi B.B., I have one of the Beeman Chinese clones. I’ve learned to make sure I hear a “click”, otherwise the gun isn’t off safe.
B.B.
I hope you find the magic Pixie Dust to sprinkle on the rifle!
Right now with all the problems it is just shooting into 4 MOA at best.
NOT Impressed by the rifle thus far….
shootski
That is why he needs to shoot it at 25 yards!
-Y
PS Blame it on the scope….lol
Yogi,
”PS Blame it on the scope….lol”
Maybe. Most of the groups Tom shot are well shaped containment ellipsis; just a bit LARGE for my taste! That kind of target print usually isn’t the shooter.
shootski
shootski,
Remember these are ten shot groups. 5 shot groups would be MUCH smaller.
Probably would help if B.B. cleaned the rifle bore.
-Y
Yogi,
Maybe.
There are a bunch of things that could do in group size. Kevin certainly covered one of them well a few down.
I read a bunch of the reviews on PA after discarding most the ones that seemed most applicable are the ones complaining about build quality.
They are expecting too much for the price point!
shootski
Shootski
How is your eye, everything going well as planned?
Bill,
Hd my one week follow-up with my Opthalmologists and everyone is happy. Only a little swelling remains so i get to stop two of the three drops and taper down one administration per week.
Next appointment is for the one month follow-up.
Makes me happy.
Looked through the MEOPTA on my DAQ LA .308:
https://meopta.store/products/meopro-optika6-5-30×56-ffp
and reset my Ocular for the “new” eye just like i had already done on the rest of my Scopes. I must say that in the dark i can get by with much less illumination on the lowest power (5) since i can see so much better already. I had a brown Cottontail rabbit in the backyard during Nautical Twilight and had no problem seeing individual hairs at 20 or so Meters on low or high. I actually targeted and tracked an ant, who stayed out far too late, scurrying in the grass back to the colony.
In the daylight i can pick out the antennae on the ants at 40 Meters on 30 power… can’t wait to shoot that air rifle again.
shootski
Shootski
I’m glad to hear the good news. What a scope by the way. Expect to hear more good news as you proceed, using the “new” eye-scope-DAQ combination.
Shootski,
Let’s see.
New tune.
Stripped stock screw.
Loosening stock screws.
Safety issues.
Rings slipping.
Thick reticle.
I think we need to give him a break for a bit. You might also remember that to get under 2 MOA just might require some of that Pixie Dust. 😉
RidgeRunner,
“I think we need to give him a break for a bit.”
I had NO Intention to level criticism at Tom’s shooting.
I think his shooting isn’t the problem with this rifle and noted it in my Reply: ” Right now with all the problems it is just shooting into 4 MOA at best.”
Guess i need to be clearer in what i think is the potential issue. I might point out materials and build quality look suspect on this airgun as well as containment ellipsis growth common with FAT reticles.
B.B. is shooting just fine and i don’t think i need to cut The Godfather of airguns® any slack.
shootski
shootski,
My reply to yours I do believe preceded your other replies to Yogi and Bill. As far as build quality is concerned, my personal experiences with such are limited to my grandson’s HW30 and briefly shooting a few other top shelf Weihrauchs that belonged to other shooters, such as an HW98. I have looked at and handled pretty much all of the Weihrauch line at one time or another and am quite impressed with quality.
I must be honest and say I have not looked back through the previous posts concerning this particular air rifle. I also do not own a Beeman R1/HW80 because BB himself has stated that despite all of his modifications to that particular air rifle, it still is very difficult to shoot accurately.
It was not my intention to be critical of you. I was pointing out the many stated issues with this particular air rifle that BB was experiencing. I misunderstood your critique to be one of BB. I must admit that even with what many would classify as a top shelf airgun, there are times I would be most fortunate to hit the side of a barn while standing inside.
Tom,
Looks like the shoemaker is going to finally get his shoes!
Siraniko
BB,
There’s a typo in the caption under the photo of the first group.
Bob,
Found it and fixed it. Thanks,
BB
B.B.
I love the HW 50. If you want to borrow the older style HW 50 stock, let me know. I have extras…
Don’t you just love the shorter cocking stroke that the articulated linkage provides?
Time to take the gun to 25 yards. So which is THE pellet? Seems to shoot them all well!
-Y
BB,
Not too shabby, most especially considering all of the problems you are having with that air rifle. I myself am looking forward to what you can do with it once you overcome those issues and get used to this thing.
P.S.
The Test
The rifle was rested directly in (on?) the bag.
And I must comment on the safety and the trigger, (.)
Air Arms Field
Tens (Ten) of them went into 0.456-inches at 10 meters.
RR,
Fixed all of them. Thanks,
BB
I’m wondering about those scope rings. Seems like a lot to adjust and a lot to potentially move and go wrong. Do they have a built in stop?
Is there a muzzle brake under consideration?
Nice rifle. I think that scope compliments it perfectly.
Derrick,
The rings are the challenge. That’s why I waited two years to even take them out of their package. But when installed correctly they do work.
BB
BB
Just wondering why you didn’t use the stop pin holes in the dovetail receiver.
Deck
BB,
You mentioned that a small design change has been made to the Rekord trigger and I think you’re right. The new HW30S that I bought in July, 2022 has a stop to the large adjustment screw that hangs down behind the trigger, and I can’t make the trigger as light as I can with my older HW35E.
I haven’t opened it up to see, but it is not removable like the older one is. The trigger has broken in some and it’s well behaved, but they have imposed a limit on how light you can adjust the trigger.
Has anyone else noticed this?
Regards,
Will
Will,
My HW 50’s triggers are set at 8 oz. and 9 oz. respectively. 8oz for my target rifle and 9 oz for my FT rifle.
Do you really want any lighter than that?
-Y
Yogi,
I figured someone would ask that question. I don’t have a trigger pull gauge and I certainly don’t want a hair trigger. It seems that Weirauch has recently idiot-proofed an upper level trigger assy that is meant for high level users. My 35E and the FWB300 have triggers that you “think” off, once you reach the second stage. I’d like that potential for the 30S. However, it is a fine trigger and is very serviceable.
Regards,
Will
PS there is no false off when I push the safety button, like BB’s 50S.
Vibratite for the screws.
Both 30S and 50S will be in BB’s one of most favorites list and become his go to springers for small pest control purposes – but not taking 27’s special spot at all, I believe.
You see, 27 was the favorite out of the box; it had good trigger, barrel, weight, stock, sights and etc… No work / upgrade had to be done on 27. Perfect weight, size, power, and $s. Good accuracy. Not excellent in every tiny detail but good over all. Plain and simple, how a springer has to be. It was not out there to impress anyone, it hadn’t become more powerful in time and it was not designed to fill an empty spot in a product line. But its stock, trigger, and sights had matured the right way. No ‘trendy’ features had popped up in its figure over the decades. The link at the bottom defines how a springer should evolve – in my ‘perfect’ world.
https://airgunwarriors.com/wp-content/uploads/wpforo/attachments/365/21614-8D4892E1-8E71-4CDA-AD55-87EBED2D1CC1.jpeg
I’ll be back for one last time in fall and share my 27’s photo.
Since there has been a lot of talk recently about blue Lock-Tite and springer stock screws I wanted to share this:
I definitely ‘love me some springers’, but springer accuracy can be daunting. We all know it, whether fan or foe. There are numerous reasons for that. They range from poor build quality to less-than-ideal hold technique, and everything in-between.
But, I’ve found that there’s one common thread that sort of ties all the other accuracy problems together. It’s accuracy problems caused by loose stock screws. You might think the solution is easy: just add a little (blue) Lock-Tite (or generic) to the screws, and snug them up nicely when you install them. Surely, that’s going to take care of it, right!!?? Well, maybe not so fast…
I want to start by explaining both the root of the problem and its solution: First, let’s assume that you already have your sighting system securely attached to the receiver–Allen screws, all that stuff. So, when I mention, “the receiver” here, I really mean both the receiver and its sights. So…
The Problem, Theory Explained: The stock is the part of a rifle you hold to–hopefully–send the pellet accurately on its way to target. Given: The receiver needs to stay aimed in the same direction you aim the stock, or none of it works right. That’s because you don’t hold the receiver, it’s a separate part. You hold only the stock.
In an ideal world the stock and receiver would always function as a single unit, so that where the stock stayed or went, the receiver did, too. That works. OTOH, if the stock moves in one direction, and the receiver in another, it’s going to be a problem. So we need to do something to prevent that from happening.
The Crux of the Solution–i.e. the Stock Screws: Since we don’t dip our springer stocks and receivers into a giant vat of epoxy like we would some battered chicken into a big kettle of hot oil, we’re forced to ‘weld’ the stock to the receiver in some other way. Specifically, we have to use our stock screws, usually only 3 or 4 of them, and they’re rather small in comparison to the parts they hold and the job they have to do. We ask a lot out of them if you think about it, so, “What can we do to help them do their job in the best way possible?”
The answer is ‘simple stupid’, and by that I mean no insult to anyone. Now, if you’re not having accuracy problems with your springer, and your stock screws are never loose when you check them, feel free to skip this post and have some fun doing something else. Obviously, you’re already doing it right. But, some years back I read a method that was described on the Old Yellow for installing stock screws with thread-locking compound, and it was just wrong, period. I’ve never read anything that corrected the error, either. I would never drop a name. This post is about the method, not the person.
(If your stock is synthetic, you can skip the next couple of paragraphs, because so far I’ve never run into a synthetic stock whose material compressed under the stock screws like wood does. But, what follows after than about using Lock-Tite on the stock screws still applies. And, please read the “Caution” at the very-bottom of this post to avoid a dangerous situation that will arise if you misuse Lock-Tite on your synthetic stock).
First, Prepare Your Wooden Stock–Hardening the wood near the front screws on your wooden stock:
Before you proceed to install the stock screws themselves, the wood with which they are in contact needs to be hard-enough to keep it from being compressed by the screws when they’re tightened, even after those screws have been in there for a good long while. Why? If the wood isn’t hard-enough, even if you do everything else correctly, over time the wood will likely compress, and a gap will be left in-between the head of the screw and the wood. (Yes, even worse on soft beech than on hard walnut, maple, etc). When that happens, once again you have loose screws–not good. This primarily tends to be a problem on the front two 5 mm screws on the side of the fore-end of a stock, like the ones on the R1, HW77, RWS/Diana 34 as examples (I won’t name them all). There’s usually a lot more wood strength due to thickness where the main trigger guard screw is installed, so you can usually torque it down a little more without causing any serious damage.
Preparing to harden the wood: You’ll need a small tube of ‘runny’ or ‘thin’ Super Glue C/A, 3 or 4 cotton swabs, a paper towel, and a small piece of 4/0 steel wool if you have a spill onto a surface that shows. Don’t buy cheap or old glue–you’ll be wasting your time. And, don’t use the ‘gel’ versions of Super Glue/ cyanoacrylate–the gel isn’t thin-enough to penetrate down into the pores in the wood, and that’s what you’re after.
For use after you’ve hardened the wood, you’ll also want to buy two 5 mm metric flat washers, one for each side of the stock, to use in-between the head of the screw and the wood. (Screw cups with Allen screws are sort of a different animal, but hardening the wood is still the right thing to do).
Remove the receiver from the stock. If your stock has serrated lock washers on those front 2 screws, or has spring-type lock washers resting directly against the wood, I suggest you throw them away or use them for something else. The serrated type tends to fight you when you try to tighten a screw as much as it helps to keep screw heads from loosening, and either type can chew-up the wood pretty badly over time if it’s in direct contact–that’s where the new flat washers come in.
Getting ready to move: Give yourself some elbow room, because some of this next part where you apply the Super Glue needs to be done pretty-quickly, even-more-so if you’re not too precise as to where you apply the glue, or how much glue you apply. You’re going to be doing one side of the stock at a time.
Lay the stock down on either side first, and have the paper towel ready to soak-up any runs that occur onto the finish of the stock as quickly as possible. FWIW, I always wear a pair of reading glasses when I do this, because precision is a big plus. Drop about 2 or 3 drops of glue down onto the ‘open’ wood grain where the screw head rests when installed, and quickly whirl a cotton swab around the perimeter so the whole area is covered, and any excess glue is soaked-up. While the swab is still wet, you can swirl the swab around the ID of the hole itself to harden that part of the wood, too. That gives the area even more strength. (Note: I tend to stay ready to move my face away from the stock if necessary, because the C/A apparently reacts with polyurethane, and fumes often start to rise in a small plume of smoke. I don’t know that breathing the odiferous gas is a good idea).
Immediately look-for any glue that runs down through the screw hole and wipe it up ASAP with the paper towel. Also, if you accidentally got some glue on the side of the stock that’s facing the ceiling, wipe that off ASAP too. (Any small traces can be removed after the glue is set, with some VERY-careful buffing of the finish with the 0000 steel wool).
The glue will usually be fully-set in less than 1 minute at the most. At that point you can start any clean-up that needs done. Then, turn the stock over and repeat the same process on the wood down inside the other screw hole. With that, you’re done.
Now, if you read all of that and can stand to read any further, this gets a lot easier. It still needs to be done right. This is where that method I read about on the Old Yellow fell short in a pretty-big way.
It said to carefully-de-grease the threads of the stock screws and in the receiver with something like acetone (correct), apply a small amount of Lock-Tite to both the male and female threads (correct, and I’ve found that a toothpick is very-good for removing any excess Lock-Tite on the threads), then install the screws until snug (yes), and let the rifle sit overnight before doing any shooting (nope-nope-nope–lol).
What’s wrong with that?
If you do it exactly as described in that last step, after you’ve shot your first 5 or 10 pellets, the receiver will have immediately jumped-around inside the stock, and moved to its ‘favorite’, ‘original’, or hollowed-out spot inside the stock, and there will be gaps formed in-between the screw heads and the wood. That means all stock screws, front and rear. With the stock and receiver not able to remain in unison as was your original intent, inaccuracy will surely be the result. (You PCP guys are getting a good laugh out of this, aren’t you? It’s OK).
Instead, do it this way…
Actual Stock Screw Installation: Assuming you’ve already hardened the wood (if that applies to your stock), de-greased all related threads, and have applied the Lock-Tite to the threads, go ahead and install the screws and snug them up nicely. There’s no need to ‘gorilla-hand’ the tightness of the screws, especially not yet, and especially if your screws have Allen heads. It’s easy to over-tighten an Allen type stock screw if you’re using the long-arm part of an Allen wrench, because it allows you to use so-much torque compared to a regular screwdriver).
Now, immediately shoot 5 or 6 pellets into a backstop or whatever, and check the screws again to see if they’re still snug. If your rifle is like every one I’ve ever worked on, you’ll be able to tighten the screws by another 1/10 of a turn or so. Then immediately shoot 5 more pellets, and check the screws again. They’ll probably move just a little more, which is good. But, go ahead and do it a 3rd time. With that step, you probably won’t get much more movement out of the screw head. That tells you the stock has ‘found its home in the stock’ for the most part. If you found you got a lot of movement in the previous tries, it won’t hurt anything to do it again, etc. But, I think you’ll soon find there’s no more tightness to be had.
At that point you can let the Lock-Tite set-up as per the directions on the label. Even a few hours is pretty-good, but, yes, overnight is great.
After the rifle has sat overnight, you can check the screws one more time to see if anything has changed with any looseness of the screws. Keep in mind a couple of things about the blue version of Lock-Tite: 1. When you go to check it after its set-up, you may have to give the screw just a tiny bit more torque than you might think is necessary, to break the bond and allow the screw to move to its new position. 2. You might think that doing that (breaking the bond) will have destroyed the grip it can maintain on the threads, but IME that’s not the case. The set-up compound that remains on the screws will hold again at its new position after being moved and still keep the screws tight.
It doesn’t hurt to re-check the stock screws after 50 more shots, and maybe again after a couple of hundred more shots. If you see what I’m getting at, things should stabilize pretty-quickly with a little time and shooting.
I should add one last point: I mentioned that it can take a little extra torque to get a screw moving once it’s been set-up in Lock-Tite, and that’s true. But, it can be easy to mistake ‘some needed tightening’ for the crushing and thus damaging wood fibers under the head of a screw. So, again, while you want to have your screws properly-tight, you definitely don’t want to damage your stock. I’ve seen that before: I had one stock come in here whose wood was so-thin at the front screw holes that I had to rebuild them to a proper thickness using JB Weld. It’s even possible to pull a screw all the way through the stock at that front end location where the wood tends to be fairly thin. Then, a full-blow repair–like drilling out the wood and gluing-in pieces of a dowel rod–has to be done so the rifle can be shot again. When I send a tuned rifle back to a customer, and include a note to remind him to check the stock screws from time to time, I often tell him: think ‘snug’, NOT ‘tight’.
If you use the above tips, I absolutely believe that you will eventually-encounter a springer somewhere whose accuracy was thought to be beyond reach, but that just needed the stock screw remedy(s) correctly-applied. (R7’s et al are so-calm they aren’t as subject to loose screw problems, and the R7/HW30s doesn’t even have any screws on the front and sides of its stock). I think I can say this better: the harder recoiling your springer is, the more it will be subject to the screw-tightness problem I described, and the more important the solution I described will become.
(A caution re: the use of Lock-Tite on ‘plastic’ or ‘synthetic’ stocks, like the RWS 34 Panther, and some Gamo models, for instance: Lock-Tite and other thread-locking compounds with the same base liquid: Lock-Tite can dissolve a plastic stock, and it can do it fast! It says it right on the tube or bottle. If that happens, your air rifle may become dangerous to cock and or shoot. There was a case years ago where someone’s Gamo stock dissolved/melted and when they went to cock the gun, the main trigger screw pulled-through the stock and the receiver hit them in the forehead, causing serious injury. You might want to search for another thread-locking compound that doesn’t have the problem. Or, you might be like one of my past customers, and choose to use Teflon tape on your stock screws, instead. I own an RWS 34 Panther myself. In my case, I was able to avoid a problem by applying 2 thick coats of polyurethane varnish all around the areas wherever the Lock-Tite could come into contact with the stock material. I’ve had the gun apart since then, and there were no signs of damage). (End of this caution).
My thanks to Marc for suggesting his superior method to me of how to harden the wood near screw holes–the way I did it before I started using his method worked, but it took a lot longer.
kevin,
Thank you for your guest blog! 🙂
BB
BB
The only thing that would have made it better would have been pictures. Kev did a very good job of explaining his process in a way that was easy to understand (I think he has been using your style as an example).
This could easily have been a guest blog. Wasn’t even any editing needed.
Ed
kevin,
That is why all my rifles are “bedded” to the stock. No movement inside the inlet stock.
Good tip on hardening the mounting screw holes. I also use bevel washers and no Loctite or even better Vibratite!
-Y
Kevin, thanks for making today’s blog a two-fer. I remember you made similar comments a while ago but now I bookmarked this and may print it out. I have several vintage air rifles with the toothed washers that I will now make an effort to replace.
kevin,
Have you tried any of the Wood Hardeners? Even JB has one! I have used Minwax High Performance Wood Hardener but not on stocks. The wood hardeners are generally used to stop rotting/deteriorating wood from getting worse by most folks. I used it on new wood to keep tabletops/benchtops from being easily dented and it seems to have done that well.
I guess i should have done half of the top to compare over time.
On synthetic firearm stocks most have Escutcheons.
I will look at my two SIG ASP20s since one is wood and the other is synthetic.
I think this issue is why metal/solid synthetic Chassis are the future since they can be torqued and will shrink and expand far less than wood or cheap synthetic furniture. For those that like wood it could be in laid strategically for look and feel.
Last comment…us Dark Siders (and other PCP owners) shouldn’t be laughing! Having the barreled action and the furniture be loosey-goosey doesn’t help with precision shooting.
Wiggle, shake, rattle and vibrate is driven home in the Big Bores for sure.
shootski
Kevin,
Thanks for the mini blog! Even the synthetic stocks will suffer from those serrated or star washers. Had to look for some flat stainless washers to prevent my synthetic stock from getting chewed up too.
Siraniko
I had not considered the obvious thing of “hardening” the wood fibers thus internally reinforcing them. That makes total sense, and I will likely be doing that to several of my loose pieces, the guns, of course! Otherwise one is chasing one’s tail and crushing the wood stock as one so does.
The added proviso of shooting a number of very small groups while the Blue is still setting up makes really good sense as that allows the action to re-bed in the stock were it has a wear-fit. That would preclude, or inhibit, a lot of motion and runs contrary to the usual (and wrong) thought to let the Blue cure.
I will likely go after the gun locker soon for some PM. Included in this will be getting a new bottle of cyano-acrylic and following the prescribed drill. It beats all the, literal, “screwing around,” with perpetual forestock tightening.
Thanks, again, Kevin. A timely and good article worthy of Tom’s Bloggery!
You know I once read that a nit-picky perfectionist will never fully enjoy riding his custom chopper because he is always listening for that unusual noise that may indicate a problem. I think something like this may be happening around here?
Must everything be perfect to enjoy an airgun? Relish the one that is and enjoy the rest for what they are. Fat chance of that happening. Just thought I’d throw that out for consideration 😉
Fish
Just notified that the pair of Crosman 362 100YR are out for delivery to me in CA … TODAY?
Thought they were in El Paso and being returned to Crosman?
Let you know about the stock if they arrive.
BB,
Since we are talking Weihrauchs today, I got to thinking that your Air Venturi Avenger “Goldie” might be lonely and could do with some company from this golden oldie 😉
What a beauty, eh? It’s a mint condition, gold plated HW77K in an unblemished walnut stock (original shape, none of that Minelli nonsense) and is on auction on a well-known German website this very moment.
Better hurry though, as the auction ends in a couple of hours! Current bid price is just 905 Euros. Take that, Great Enabler! 🙂
Another pic.
One more.
Another.
Even the stock screws are gold plated!
Yet another angle.
Bob,
I think I remember those. Were they something Robert Beeman did?
BB
BB,
I don’t think so, at least not this particular rifle, as it is a sub 7.5J German “Freiwaffe”.
Bob,
Gotcha.
BB
Fish, One just showed up the other was returned to Crosman. Explains it all now.
The forearm is solid wood and the rest is beautiful as well.
The wood on the 362 100YR is actually a darker walnut the flash changed it a little and the Williams sight is not gold tone for sure.
Bob, I was not going to be back till fall, but I had to compliment you on your purchase. I’m glad to see the forearm is solid wood. Kudos to Crosman. That 362 is just perfect. Enjoy!