by Tom Gaylord
Writing as B.B. Pelletier
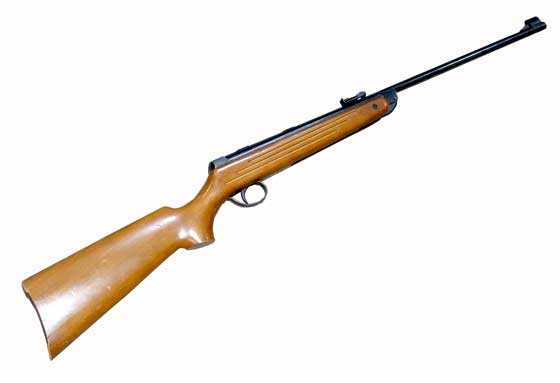
BSA Meteor Mark I.
This report covers:
- Disassembly
- Mainspring compressor
- The trigger!!!
- Rust!
- Other parts
- Trigger parts
- Mainspring
- Lubrication and assembly
- Trigger
- Cocking effort and trigger pull
- RWS Hobbys
- RWS Superpoint
- JSB Exact RS
- Discussion
Today I am disassembling the BSA Meteor Mark I for cleaning, inside and out. I’m going to get rid of that pesky rust, plus all the grit I saw when the gun was apart last time. I’ll also be able to tell you how well Tune in a Tube had spread throughout the action,. which is something most owners will never know. There is a lot more to today’s report, so let’s get started.
Disassembly
This time I knew exactly how the Meteor would come apart. Even the trigger that I told you is different from the trigger in my Meteor Mark IV was easy to disassemble, although I will come back to it at the end of the report.
Mainspring compressor
I used the new mainspring compressor from Sun Optics to disassemble the rifle. It only comes into play for about 8 minutes, but it is essential to have. This time I knew the compressor better and was able to install the rifle quickly. I needed it for 5 minutes for disassembly and about 3 minutes when the gun went together again. It worked perfectly and I have to give it a good rating as an essential piece of equipment for spring gun disassembly.
The trigger!!!
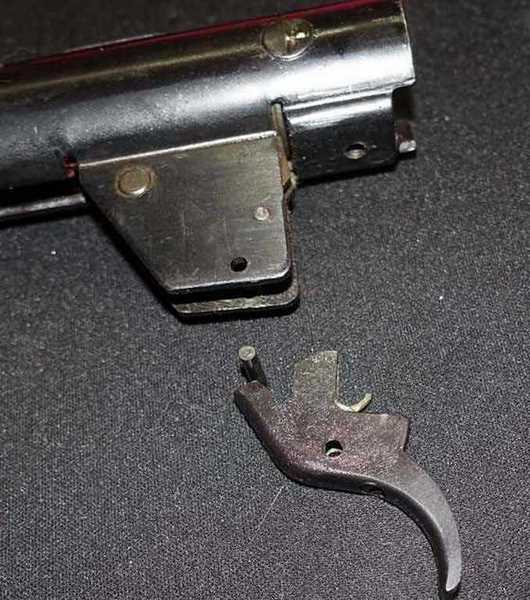
The trigger in the Mark I (and I believe the Mark II, as well) Meteor is different that the later triggers and a bit more complex. This trigger is held in by three pins, one of which doesn’t hold anything, but does serve as a spring anchor point.
The trigger blade is held by the lowest pin that passes through the walls of the trigger assembly box. That pin is easily pressed out with finger pressure. When it comes out, the trigger blade and the separate trigger return spring come out of the trigger box.

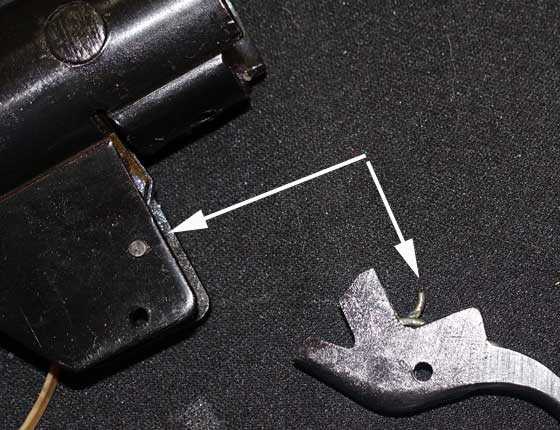
BSA Meteor Mark I trigger blade out. The pin above and to the right of this one holds no parts in the assembly. It anchors two wire springs and keeps the sear positioned at the top of the trigger.
Once the trigger blade is out, press out the pin above it and the sear will flop down. Press out the larger sear pin at the front of the trigger box and the sear comes out of the rifle with its spring. All pins came out with little coaxing.
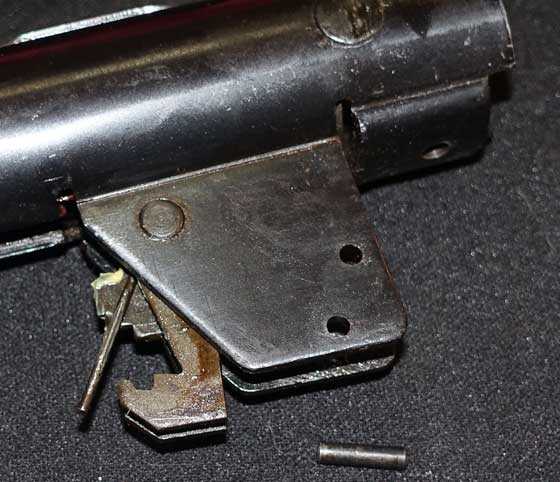
When the second pin is out the sear drops down, away from the piston path. Its wire spring tip, seen here, was resting on top of the second pin when it was in the trigger box. It kept upward pressure on the sear, to pop it up into the piston’s path when the gun was cocked.
Once the sear is removed set all the pins and parts aside for cleaning. The mainspring and piston can now come out of the spring tube. Since I covered that in detail in Part 2 of the Mark IV report, I’m not addressing it today.
The internal parts were all well-coated by the Tune in a Tube grease, except for the outside of the piston body. That was relatively dry. I think the ridges on both ends of the piston scrape the inside of the tube wall dry and don’t allow the grease to get on the side of the piston. But since that part never touches anything, it can be as dry as a bone.
Rust!
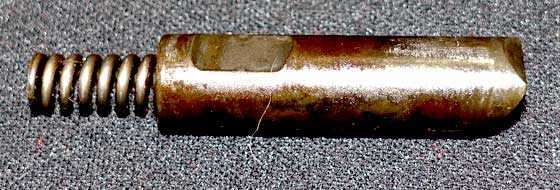
The piston body was covered with some deep rust patches, though. I showed you a picture of that in Part 3. I had to get rid of the rust because it was preying on me, so I started with steel wool but wound up using a sharp knife to scrape it off. I thought it would leave a deeply pitted surface, but it proved to be surprisingly smooth after all the rust was gone. For the future I wiped the piston body with Ballistol. I then cleaned the inside of the piston body with a paper towel and cotton swabs.
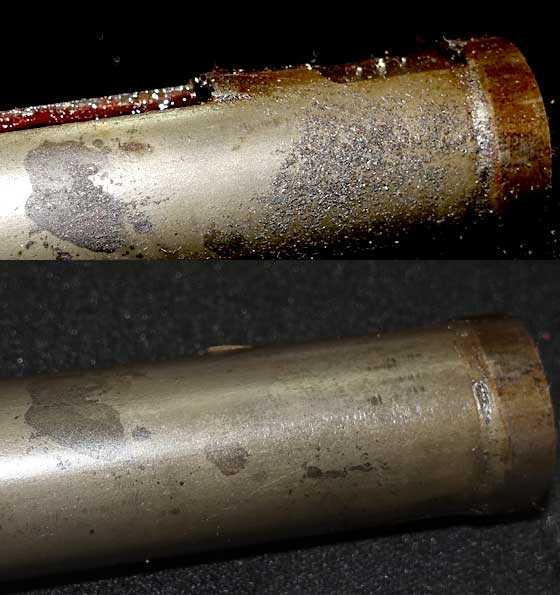
A quick scrape with a sharp knife, followed by a rub with 0000 steel wool and Ballistol and the piston is rust free.The clean piston is on the bottom.
Other parts
The inside of the spring tube was relatively clean, but I wrapped some paper towel around the end of a dowel and wiped it dry. I then turned to the barrel and cleaned the breech pivot area and the detent and spring. I oiled the detent spring with Ballistol and lubed the outside of the detent body with moly grease.
That cutout in the detent allows the barrel pivot pin to pass.
The sides of the breech were lubed with moly grease. They have some places where there is galling and this will hopefully end it.
Trigger parts
The trigger parts were all covered with grit, but no rust. I brushed them with a steel wire brush, followed by steel wool and then a light coat of Ballistol. The sear and trigger contact points got a smear of moly as the trigger was assembled.
Mainspring
I threaded a paper towel through the mainspring coils and threaded it along the entire length of the spring. This removed the excess grease from Tune in a Tube, but left a thin film.
Lubrication and assembly
A spring gun gets lubricated as it is assembled. Depending on the design of the gun, lube is added just before the parts go into the gun. That keeps them clean and also prevents spreading grease around the workspace.
The piston went in first. The front and rear rings were lubed with moly grease and then inserted into the spring tube. The barrel must go on after the piston is installed because the cocking link interfaces with the piston. The tip of the link that connects to the piston got a dab of moly grease and the pivot pin was lubed with moly before it was slid through the hole. The detent must be pressed in for the pivot pin to clear it. Then the pin slides all the way through the breech fork and the barrel is on!
Now the mainspring can be slid into the piston. I lubed it lightly with some black tar grease I have had for years and was careful to slide it into the gun as it was greased. That kept the outside of the gun as clean as possible. With the spring guide back in the spring (black tar on the outside of the guide), the action is ready to go back together. That went quick.
Trigger
I assembled the trigger in the reverse order from disassembly. First the sear and sear pin go in, then the anchor pin slides in place and finally the trigger blade with its return spring and pin go into the trigger box. But, when the rifle was back in the stock, the trigger was difficult to pull and the blade didn’t reset after firing. I had not gotten the trigger return spring back in the right position. When I removed the stock again to look, I saw that the end of the trigger return spring was not anchored by that middle pin I showed you.
The end of the sear return spring goes above the anchor pin, and the trigger return spring hook goes below the anchor pin. Each spring keeps their respective part tensioned correctly.
That short leg on the trigger return spring sticking out of the blade has to be hooked beneath the anchor pin to work.
There is nothing online that shows this, but if you don’t do it this way the Meteor’s trigger cannot function. This is what I was referring to when I said this trigger is complex. It isn’t difficult, but all the parts have to be in the right place for the trigger to work. You don’t have to force anything into place; it all fits as designed.
That done, the rifle went back in the stock and now functioned perfectly. Except for one small thing. The rifle now buzzed just a little with each shot. It was much better than before we began, but not as good as it was following the first application of Tune in a Tube.
I wasn’t going to allow that after all the work I’d done, so the rifle came back out of the stock and I applied some Tune in a Tube without further disassembly, just as I had before. Then back into the stock and this time the action was dead calm with each shot. That’s real irony for you!
Of course I could have stripped the rifle a second time and put more black tar on the parts. That would have made it dead calm upon firing, but from past experience I knew it would also slow the rifle down by 20-30 f.p.s. or more. In the past I would have accepted that, but after seeing what Tune in a Tube can do I knew I didn’t have to. Of course the question remains, what does the velocity look like right now?
All the parts are clean, and that shouldn’t slow the rifle by any amount, but it also might not speed it up. Moly was used on those parts where the reduction of friction was important. I applied black tar to the usual places — mainspring and spring guide — but I kept the amount very light, so not too much velocity should be lost, if any.
Now I applied Tune in a Tube on top of the black tar, because I didn’t disassemble the rifle to apply it. What did that do? It got rid of the last bit of vibration, but what about the velocity? Only one way to find out!
Cocking effort and trigger pull
I will show today’s velocity test in the tables below as test 3, along with tests 1 and 2 from before. First, though, let’s establish the cocking effort and trigger pull — neither of which has changed much since I started the report.
The rifle cocks with 14 lbs. of effort. That makes it one of the lightest-cocking spring guns I have ever tested.
The trigger breaks with 3 lbs. 3 oz. of effort. The pull is single-stage and the break is crisp and clean.
RWS Hobbys
The first pellet I tested was the RWS Hobby.
Test 1…………………………Test 2……………………………Test 3
Shot…………….Vel…………Shot…………….Vel…………Shot………..Vel
1…………….….624…………..1……………….616…………1……………609
2…………….….615…………..2……………….613…………2……………612
3…………….….612…………..3……………….610…………3……………606
4…………….….618…………..4……………….607…………4……………618
5…………….….605…………..5……………….605…………5……………607
6…………….….619…………..6……………….604…………6……………620
7…………….….622…………..7……………….610…………7……………616
8…………….….600…………..8……………….616…………8……………610
9…………….….616…………..9……………….612…………9……………617
10………………615…………..10…………..….611…………10………..…616
Test 1…………………………Test 2……………………….Test 3
Avg……Spread…..FPE………Avg……Spread…..FPE…….Avg…….Spread….FPE
615……….24……..10……..…610……….11……..9.83……613……….14……..9.93
As you can see, there is not much change from either previous test. The rifle still performs much as it always has, though the extreme spread is still tighter than it was before any lubrication was applied.
RWS Superpoint
Next up were RWS Superpoints.
Test 1…………………………Test 2……………………………Test 3
Shot…………….Vel…………Shot…………….Vel…………Shot………..Vel
1…………….….552…………..1……………….546…………1……………546
2…………….….551…………..2……………….545…………2……………551
3…………….….559…………..3……………….549…………3……………556
4…………….….548…………..4……………….546…………4……………556
5…………….….532…………..5……………….548…………5……………548
6…………….….541…………..6……………….540…………6……………551
7…………….….550…………..7……………….541…………7……………545
8…………….….542…………..8……………….549…………8……………547
9…………….….549…………..9……………….552…………9……………554
10………………545…………..10…………..….539…………10……..……550
Test 1…………………………Test 2……………………….Test 3
Avg……Spread…..FPE………Avg……Spread…..FPE……Avg…….Spread….FPE
547……….27……..9.64………545……….13……9.57……550……….11……..9.74
JSB Exact RS
The last pellet tested was the JSB Exact RS.
Test 1…………………………Test 2……………………………Test 3
Shot…………….Vel…………Shot…………….Vel…………Shot………..Vel
1…………….….571…………..1……………….567…………1……………586
2…………….….572…………..2……………….570…………2……………577
3…………….….566…………..3……………….567…………3……………579
4…………….….558…………..4……………….564…………4……………577
5…………….….563…………..5……………….566…………5……………574
6…………….….563…………..6……………….568…………6……………565
7…………….….565…………..7……………….561…………7……………577
8…………….….568…………..8……………….563…………8……………571
9…………….….566…………..9……………….566…………9……………572
10………………561…………..10…………..….563…………10………..…569
Test 1…………………………Test 2……………………….Test 3
Avg……Spread…..FPE………Avg……Spread…..FPE……Avg…….Spread….FPE
565……….14……..9.52………566……….9…..…9.56……575……….21……..9.86
Discussion
The test reveals that the rifle is firing as good as ever. In some cases it’s slightly faster, but it’s still almost exactly where it was before I started tuning. So, what have I accomplished?
First, We now know beyond the shadow of a doubt that Tune in a Tube works well in this air rifle. It ends all vibration and doesn’t slow the gun down.
Next, we saw the insides of the rifle — how dirty and rusty the parts were after a half-century of sitting around. From the condition of the rifle we can safely assume it hasn’t been shot much. The wear and dirt are mostly due to the passage of time.
Next, we learned that the old way of tuning, namely a thin coat of black tar grease, isn’t as effective as Tune in a Tube. Black tar works, but it doesn’t go all the way. But when Tune in a Tube was applied on top of this thick grease, it smoothed the action the final amount. And it did it with no loss in velocity.
The rifle is now clean inside and out. It’s ready to continue testing, and accuracy comes next. While I will test it with that cheap BSA scope, I plan mostly to shoot it with open sights, so that will comprise the major portion of the test.
I checked back for a report of the .22-caliber Diana model 27 rifle (it’s actually a Hy Score 807) that is my most favorite air rifle of all and was unable to find a report that had velocity. As best I recall, that rifle is lubed with lots of lithium grease and puts medium weight pellets out in the lower 500s. It might be time to disassemble that one and give it a Tune in a Tube treatment as well.


Come on, guys!
You all said you wanted to know about this, and it took me two full days to do all the work, take the pictures and finish this report. I expected you to go nuts over these results!
B.B.
Isn’t this a little early for a response? 🙂 But there’s certainly a ton of work here.
Matt61
B.B.,
Nice. Quite the exhaustive test, not to mention the tear down. You spent some time on this one.
You know the question that will be on everyone’s mind will be,….. “What would happen if you used (only) Tune-in-a-Tube”?
Chris
Chris USA,
The better question would be how long would it last if only Tune in Tube was used?
Siraniko
Chris,
Ain’t a-gonna go there. 😉
B.B.
B.B.,
No, I did not figure you would,.. nor would I. Maybe something to try in the future with some other “twangy” test subject. You never know, it could replace the black tar grease for springs.
Chris
Chris,
Already in the works. In fact, I have already done it to a second rifle and it works as well as the first, but with a different type of problem.
This stuff works!
B.B.
B.B.,
Will this be a long term test? Was it the the .22 cal Hy Score 807?
Siraniko,
Yes and yes. I didn’t intend testing this stuff this long, but the surprising results have committed me to a long test.
B.B.
B.B.,
I guess it is subjective regarding how to judge how much grease one should apply to the mainspring.
You used the black tar sparingly but realizing you used too little you used the Tune in a Tube to further dampen the buzz instead of tearing it down again which would have taken about 10 minutes (Disassembly > Tar application > Reassembly) not to mention messier.
Siraniko
Siraniko,
Very subjective! It’s an art, really. At least with the Tune in a Tube you are saved the extra time and mess of the additional teardowns, as you noted.
B.B.
B.B.,
Your determining that in this case Tune in a Tube alone made the shot cycle smoother than did a traditional tune is about as convincing an endorsement of that stuff as is possible. Even during a tear-apart tune, Tune in a Tube seems to be a sure bet. I know I will order some soon.
Michael
BB,
LOL! So I have won you over! It is so easy to use and works great! Until you actually experience using it, it is hard for someone to understand the difference it makes. No, it will not fix torn seals, broken springs, etc., but if used properly it really does quiet and smooth out a sproinger and as your tests show you may not lose anything else.
I have used it on two air rifles, a Diana 46E and a Webley Tomahawk which is really a Hatsan in a really nice stock. The Diana was in bad need of lubrication as it had probably never had anyone inside since it was built. It shot really nice, but had a horrible grinding sound when you cocked it and buzzed like angry bees when fired. You could feel the vibration. After I applied Tune-In-A-Tube, the cocking stroke was smooth and quiet and the firing cycle became a thunk with no other noise or vibration. It became quite pleasant to shoot.
The same is true of the Tomahawk with the exception that it being an uber magnum, the firing cycle cannot be described as pleasant, but at least it is not buzzy.
RR,
Yes, this stuff really works. better than anything I have tried over the years.
Because of the special interest I’m going to take some time and tell you guys about what is coming up and how it all came to be. Tune in a Tube figures into all of it.
B.B.
RR,
Do you think there would be any warranty issues using it on a new rifle?
Belgrath04,
Probably with some makers. And not with others.
B.B.
B.B.,
Due to the lower viscosity of Tune in a Tube compared to the usual open gear grease (Black Tar) I am curious if you noticed if any seeped into the stock after getting flung around by the mainspring?
Siraniko
Siraniko,
There was no seepage, but of course my shot count was very low. I’ll watch out for that as time passes.
B.B.
B.B.,
Clicking on Part 4 leads me to /blog/2016/10/sheridan-blue-streak-part-4/ instead of Part 4 of the Meteor.
Siraniko
Siraniko,
Fixed. Thanks.
B.B.
BB,
I absolutely love these rapports. That slow and painstakingly checking of conclusions, the teardown and rebuild of the rifle, the love of shooting that goes into it makes it a joy to read.
A small question on the rust displayed in the piston picture: In the upper right ring I see red rust indicating oxidized iron. The silver coloured rust in the middle of the piston looks more like oxidized zinc or another coating. Also the way you can remove it with a knife and the relatively clean patches left behind give that impression.
Did BSA use zinc coating on their pistons or is this just a trick of light? If you still have some of the scraped stuff you can test it with a magnet.
Off subject: You never did a Diana 50 in your blog as far as I can see? I would be quite interested as I have acquired one recently.
Regards,
August
August,
The piston is all steel and not plated with anything that I can detect. The photos may mislead you.
I once owned a Diana 50. I’ll see if I can find those files and give a small report.
B.B.
B.B.
“Tune in a Tube” seems like magic stuff. What exactly is it? Is it petroleum based? Will it cause detonation if it gets in front of the piston seal? Does it play well with FTPE based lubes?
Inquiring minds want to know….
-Yogi
Yogi,
The Tune in a Tube folks don’t say what it is. Petroleum-based? I doubt it, but I really don’t know.
How does it play with Teflon? Well, I assume, since Pyramyd AIR uses it for all their spring gun tunes.
B.B.
B.B.,
Can you ask the technicians at Pyramyd AIR their experience with Tune in a Tube?
Siraniko
Siraniko,
They have used the product for years and recommend it highly.
B.B.
B.B., if they (PA) have used it for many years and recommend it, I wonder why they don’t sell it? Maybe a tuner’s secret?
Doc
Doc,
Business decision, I guess.
B.B.
What about temperature variations? I have thought that black tar thickens and lowers the velocity in cold weather. Does this happen to tune in a tube ? What about the warm days when the rifle stays in the car for an after work shoot. I have noticed that some guns had a harsher feel after being heated.
I use a Williams peep sight on the Meteor that I have and it works well. The origional sight fit had a loose fit that I believe was mentioned in the report.
Bill,
Black tar does do what you said. You might have missed it but I put some Tune in a Tube grease in the feezer overnight and noticed no thickening. I haven’t checked the other end of the heat spectrum yet.
The mark IV rear sight was loose. This one is as tight as Dick’s hatband.
B.B.
This report is GREAT, Tom! It’s great that you “discovered” so to speak a good product (low cost & easy to use, too!) that works so well on sproingers. Your report thoroughly covered its use. I was going to ask how well it works ON TOP OF existing black tar lubes, but you answered that too. My order for T-I-A-T is underway now! I just hope my small fleet of cheap sproingers responds as well as your reports say they should. Thanks!!!!!
B.B., I loved this report. Nice to see a simple product out there that does what it says it will do. That said, I know it’s not possible for me and the guns are too low powered, but it sure makes me want to put that tune in a tube on my red ryders 🙂
Doc
Glad to see nothing was lost and its still performing as well as it was, I assume you didn’t oil soak the piston seal otherwise the detonations would have shown in the chrono string, it might be an idea to pop a few drops down there?
That tune in a tube sure looks an awful lot like some red Moly bicycle grease I have a big tube of…
Is it at all snappy?, I’ve found Meteors get a bit harsh even at 9fpe.
I’m interested to see the accuracy results, wish you’d put a decent scope on it otherwise its hard to be comparative..however, these things were shot, by and large at under 25 yards with open sights…get under 0.75 inch and that’s enough for a hedgerow rabbit or barn rat….and certainly enough for a garden baked bean can 🙂
I expected the RWS to do a bit better in the chrono tests, the soft skirts being more suited to blowing out to the imperial measurement barrel but the others seem to be doing just as well.
I cut my teeth on these, as well as the Diana 23 and 27 and used to get ragged one hole ten shot groups at 15 yards or so on opens, I guess about half inch or so.
My Meteor took care of a few hundred crows off the dry stone wall at the end of my garden I can say that much 🙂
Dom,
As you can tell, this Meteor is fast becoming one of my favorite air rifles. I sure hope it is accurate.
As for the scope, I HAVE to test it with that vintage scope. But that doesn’t mean I can’t return and test it with a more suitable one.
Gotta test the open sights,. too.
Absolutely no snappiness to this rifle.
B.B.
I’m rather fond of the V and perlkorn sight picture of this era of BSA’s, you can get a very fine sight picture indeed, my preference was always to nestle the “korn” in the “V” and make a figure of 8 with the Bullseye and the “Korn”, though I think the accepted method is actually to cover the bullseye with the Korn (a throwback to shorter range German gallery shooting I believe).
I vividly remember knocking 5 crayons in a row over at 30 yards with one of these and a Nikko 6×32 scope to much admiration from my friends (and some personal surprise that I internalised coolly)
They are good rifles, I hope a Mercury falls into your hands at some point, in many ways the best rifle in the range having the Airsporter internals and ” rolling wave” styling in a break barrel.
I wonder if any of the BSA Buccaneers made it over the pond?, a long barrelled Scorpion in an ABS stock (from the future!)
Dom,
Buccaneers? Oh, yes, we have them. In fact I think David Enoch on this blog has one.
I will keep a watch for a Mercury.
B.B.
While you had your Red Ryder’s we had our Cadets and Meteors to live out our movie matinee fantasies with (though a touch more trouble could be got into with the BSA’s I think)
A few broken streetlights then being pulled by your ear the long way home to your parents by the local bobby seemed to feature quite heavily in most lads school summer holidays 🙂
Its an odd thing testing .22 with 5.5mm pellets, on one hand the loose fit isn’t going to help accuracy much, however the original pellets that were in imperial .22 were pretty dreadfully made compared with modern pellets so I suspect it more than equals itself out.
I remember my first “metric” 22 was an HW35 and trying to fit Champion pellets into it nearly needed a mallet.
Champion, BTW are still in production and I can’t imagine they have gone metric, mind you, I can’t imagine they’ve got a lot better either….very, very soft
Tune in the Tube seems to work well enough, but I was particularly pleased to see Ballistol making a contribution. I just spray that on my guns, and they all work fine so far. I figure that anything that the Germans used in both World Wars has to be good. You will never find a better laboratory than that. My same reasoning has led me to pursue a German trench knife made by Boker…
Also, in my recent study of Chinese martial arts, I see that the Chinese invented the process of plating metal with chromium oxide to preserve it which they did to swords in the bronze age. This process was then lost for 2000 years until rediscovered by German and American scientists in the 1930s. I’m guessing this must be the process of chrome plating guns that is so universal. Maybe it’s not such a bad thing that products are made in China.
Matt61
B.B.,
Great work on this post. Thanks for all your efforts on testing Tune in a Tube. I mentioned previously that RidgeRunner’s recommendation, and your work with it as well, had convinced me to order TIAT. This post finally moved me to use it. I put some in my HW 50s this afternoon. I fired about 20 shots through it to see what it felt like, and to, hopefully, distribute the TIAT around where it needed to be. I also “pumped” the barrel a dozen or so times. I just took it from the point of breaking open, to right before it would cock the spring. After that I set up my chrony and ran a string of JSB 15.89s through it. This is a fairly new HW50, so not even fully broken in yet. I’d say I have about 400 to 500 shots through it. I chronied the JSBs two months ago, so here’s the comparison:
August 3rd October 10th
High 553.11 557.80
Low 539.17 547.70
Avg. 544.99 552.10
ES 13.94 10.12
SD 4.24 3.31
I shot several shots over the chrony before running this string today, and it actually seemed to get a little bit faster. Not by much, just a few feet per second, but I could see it getting “tighter”. I will say this — I am convinced the rifle has less “twang”, that the spring is quieter than before TIAT. There is noticeable improvement in that regard.
Jim M.
BB and RR
Tune In A Tube arrived. Used it on my Diana 34 and the twang nearly disappeared. The remaining sound is about half as long in duration. I am impressed. My only other metal springer is a Weihrauch HW30S which is already so quiet I see no reason to tune it. Maybe I need another steel spring gun. I wonder how long the tune lasts and is it okay to keep applying more?
Decksniper
Decksniper,
See my post above yours. I just put some TIAT in my HW 50s — a rifle I thought was pretty smooth and quiet already. It made a noticeable difference. I would say go ahead and use it on your HW 30s as well.
Jim M.
Decksniper,
I wonder those same things.
B.B.
Off Topic — Shooting Chrony problem.
I went to use my Shooting Chrony this afternoon — it’s the Beta model, if it matters — and kept getting “Error” messages. Turns out my battery was low. Easy fix. The problem is, when I first got it out, one of the batteries in my printer had just started leaking. They worked fine the last time I had used it, but it has set for about a month with the batteries in it. I cleaned out the battery compartment with rubbing alchohol. There wasn’t any of the “white gunk’ from the acid, just some clear fluid. After it dried, I replaced the batteries and plugged it in to my Chrony. The lights light up, and the printer activated. It feeds paper like it should. That was it though. It would not print any of the strings I chronied. Any ideas on what to try, or is it hosed?
Jim M.
Jim,
The clear fluid was probably acid. Use a base like baking soda to neutralize it.
I think you might want to send your Chrony back to the manufacturer who promises to rebuild their instruments.
B.B.
Thanks B.B. I just emailed them to start the process.
Jim
The only disadvantage I can see about the “Tune in a Tube” is that the lacking of a full disassembly one would not notice internals needing further work or replacement. Such as: canted or broken spring, bad piston seal, galling, rust or serious scratches. That are noticed and fixed during a full disassembly. Also, it does not get into other parts of the mechanism that also need lubrication.
It does lube the mainspring and spring guide which is a primary need in maintaining performance.
Might warrant more info on situations to use it and the situations where it might, or will not help.
Silver Eagle
GunFun 1—I just did a pellet drop test with my Sheridan 2260MB. Here are the results— Distance 10 meters, indoors. Crosman hollow point hunting pellets. Target 1″ Birchwood Casey target dots ( 1/8″ black diamond center.) Th Shot # 44 hit the dot at 6 o-clock. I switched to a new dot. 44-46 formed a 1/2′ group, 6 o-clock in the dot. 47 hit the dot at 6-oclock in the white, just touching the dot . 1/2” below center. 48-49 1 1/ 16 ” low ( one hole). 50 low, 1 6/16″. 51, low, 2 2/16′. 52, low , 2 3/4 ‘ . 53, low 4 1/16″ and left 6/ 16″ of center. 54 low, 7 4/16″ and 1/2’ left of center. 55– hit the floor, test ended. This is only one test but it shows a slight drift to the left.The last 2 shots would have hit the 1″ dot at 3 o-clock. I will repeat this test with other pellets. I will not post results, unless they show different results. Perhaps some other bloggers will try this test at longer ranges. —Ed
Ed
Sorry for the late response. Seems like the time off my day goes by faster than I like here lately. And I do thank you for doing the test.
So it looks like even at the closer distance you recorded a shift in point of impact (poi) as the co2 got lower and your were getting close to the end of your shot count. If you were shooting out at a farther distance I bet you would of seen that drop and shift sooner in the count. And I bet it would be more drastic of a change.
I’m really thinking those guys that do their long range shooting like the Pepsi Challenge use tethered pcp guns for a reason. Consitancy in shot placement. Now think the other way. Us shorter range shooters that shoot at a 100 yards and in. Even though we’re not stretching it out like them. But we still have variables the more the distance grows of shot impact.
The changing of shot pressure with a air gun can make group sizes change if you shoot the gun on the edge of the guns happy spot of pressure from its pressurized air source. Even pump guns seem to have a happy spot that shoot more consistent related to amount of pumps you use.
You know me I could go on and on. But seriously if you want a accurate gun we all need to shoot it and document what it does. And what it likes and don’t like. Some guns just shoot and show variables more and are harder to get to group. Some guns shoot and group like I don’t know what and you can’t hardly make them shoot bad.
Air guns. As we all know. There’s more than meets the eye. And thanks again Ed for your findings.
BB,
I have really enjoyed this series and the Blue Streak series.
Thanks,
Jim
BB– Would there be a problem if someone used tune in a tube on a rifle that was still under waranty? Would removing the action from the stock cancel the waranty ?———Ed
Zimbabweed,
Probably yes with some and no with others. Don’t use it if you feel uncertain.
B.B.
Yes great series. Wonder if you can get tube in a tune here in UK? Looking forward to accuracy.
Ogilkes,
The American company that packages Tune in a Tube is not shipping overseas. I guess you need to wait for a larger company to market the same grease by a different name.
B.B.
Rebuilding a Mark 5 with a CUSTOMAIRSEALS GAS RAM. Just waiting for the new piston head O Ring and buffer seal to arrive. Parts are cheaper from Australia than from the UK. Anybody done this before?
Signetring54,
Welcome to the blog.
B.B.
I know this is an older blog, but thought I’d weigh-in in case anyone was wondering on the final disposition of this particular rifle.
Met BB @ the Texas show, earlier this month. (A very nice gentleman, but a hard trader) and bought the Meteor Mk1.
Dieseled some for a very short while, but quickly settled and now clocks the .22 Hobbies @ 600 even, FTTs do 540.
Drifted the rear sight some and it’s dead-on now. It even groups well with some old, chinese Daisy “Precision Max” pells.
(I’d bought stacks of these, yrs back on closeout) These pells proved to be near junk in every other gun I’d tried, they were nearly relegated to the casting-pot.
Looks like I’ve got a lifetime supply of plinking ammo for it.
Anyhow, here it resides and here it stays, not for sale. Was just bouncing some cans around through the kitchen window with it and it seems to just shoot better everytime I pick it up.
Thanks for selling it to me BB. Be looking for you @ the next Texas show!
Hey there B.B
I’ve just come across a MK1 in my grandads basement. I know this is an old thread. however I was wondering if you know where I could find the trigger springs the cocking mechanism and the trigger. As the one place where I do find it costs about $120 which seems a little steep for replacement parts on the Mark 1. However giving my lack of success I would assume that these are the only available parts which is why they are so expensive. So I was wondering if you know anyone or if you yourself have spare parts for this gun?
Once again thanks for this detailed post,
Scarecrow
Scarecrow,
I don’t have parts for one. Did you look at Chambers and the other UK parts houses?
B.B.