by Tom Gaylord
Writing as B.B. Pelletier

Second-generation Benjamin Marauder in a synthetic stock.
UTG Bubble Leveler scope: Part 1
Part 1
Part 2
Part 3
Part 4
Part 5
Part 6
Part 7
Part 8
Part 9
This report covers:
- Mounting the Bubble Leveler scope
- Back to the Marauder
- Sight in
- Shooting with this scope!
- Unanticipated problem
- I quit!
Oh, boy! This week I get to report on two world-beaters! First there was the Diana AR-8 N-TEC and today it’s the gen 2 Benjamin Marauder. I will show you why I am so happy in a moment, but first, there is another story to tell. I mounted the UTG 4-16 Bubble Leveler scope on this rifle and that gives me a lot more to talk about.
Mounting the Bubble Leveler scope
Why would mounting this scope be any different from mounting any other scope? Simple — because it has a bubble level inside. My trick of bisecting the rear of the receiver with the vertical reticle line took on a whole new dimension when there was a bubble below it. I had to rotate the scope in the rings until the vertical reticle line bisected both the bubble and the receiver, which meant how I held the rifle entered into the process for the first time. It took me a while to get the scope to where the sight picture looked right with the bubble level and the rifle feeling right in my hands.
However — and what I am about to say is even more important now that we have this new scope — there is nothing that’s “level” on any rifle, so you have to do this until it looks (and now feels) right to you. It makes absolutely no difference if it looks right to anyone else, because you are the one who is going to level the bubble for every shot. The rifle will therefore always be fired in the same attitude — irrespective of what your best friend thinks. Sure, you can hang a plumb line at 50 yards and line up on it if you want to — it makes absolutely no difference. Now that you have this bubble to check, you will always fire with the rifle in the same position. Today I learned just how important that is!
Back to the Marauder
The scope was now mounted and I was ready to shoot. But my house was being cleaned, and I could not use my 25-yard indoor range that shoots from the bedroom through the living room into the garage. Don’t want no dead housekeepers! So I moved outdoors to a range I used to use. But it’s only 20 yards — not 25. My testing today was done at 20 yards. I used to close the bedroom door and pop out the window screen which gave me 25 yards, but that was when I had Edith to control the cats and there wasn’t another person walking around the house. So, 20 yards it was.
I also used my quiet pellet trap, since this was shot outside. Even with that, though, the .25 caliber pellets still whack the duct seal pretty hard and make a lot of noise. And there was one other problem I hadn’t counted on that I will cover at the end of the report.
Of course I am still shooting the JSB Exact Kings that do so well. When you have a proven winner, why change?
Sight in
I must tell you that the bubble made me hold the rifle in an odd position. At first it seemed to be strangely canted, but as I shot, the more I realized I was holding it straight up and down for the first time. The amount of difference was way more than I would have believed.
I have used bubble levels on the outside of airgun scopes for years. But having a bubble inside the scope makes it so easy to center that bubble — especially when shooting from a sandbag. I know that I can have complete control over my rifle when shooting with this bubble.
I sighted in and discovered there is quite a bit of droop in my Marauder. I got on paper okay, but wasn’t able to get the pellet as high as the crosshairs were on the paper. This is good to know, because I want to go to 50 yards next, and with the scope mounted this way it will never be able to shoot that far. I used 2-piece scope rings, so I will swap them around, front and rear, and I’ll also add a shim in the rear ring.
Shooting with this scope!
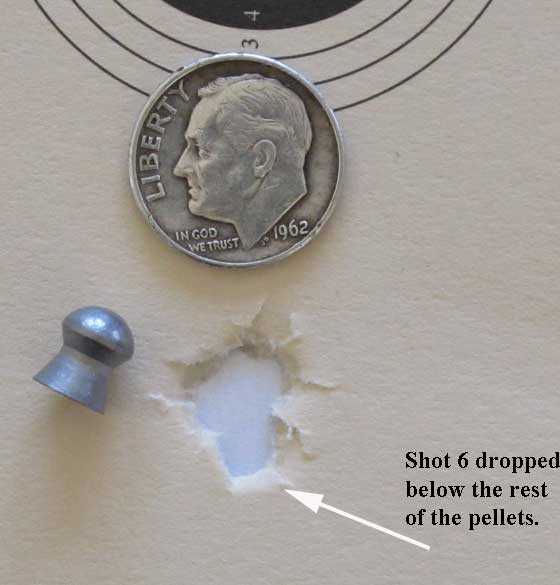
But, it was shooting with the Bubble Leveler scope that really opened my eyes! Once I was “zeroed” (as best I could) I started shooting a group. Only the hole didn’t appear to get any larger! Yes, I was only shooting at 20 yards, but the pellets kept going to the same place — until shot number 6. With shot 6 I relaxed my concentration just a bit and the pellet dropped low to double the group size. After the shot fired I looked at the bubble and noticed that the vertical reticle was passing through the right edge rather than the center of the bubble. That answers the question someone asked about how centered the bubble needs to be.
Shots 7 and 8 passed through the group without enlarging the hole and I was finished. Eight shots went into 0.239-inches at 20 yards, with 7 of them going into 0.122-inches! Yes, folks, that is how that is done!

Eight shots in 0.239-inches, with 7 of them in 0.122-inches!
Unanticipated problem
Remember I mentioned an unanticipated problem with using the quiet pellet trap? Here it is. When pellet after pellet go to almost exactly the same place, they dig their way through the trap material. First the duct seal gives way and eventually the steel backing plate gets punctured. That actually happened on the 7th shot in this test. After that the pellets start working on my new cedar fence. So, no more quiet traps for this rifle!
I quit!
This one group was all I needed to see. The scope has to be remounted and shimmed for 50 yards, but I think I have just seen what the UTG Bubble Leveler scope can do for accuracy. The Marauder is a PCP, so there is no vibration with the shot. The trigger now breaks at mere ounces, so this rifle is set up to do its best. I need to get it to the 50-yard range quick!
Tom Himes, who tuned the action on my Marauder, said this is the most accurate .25-caliber Marauder he has seen, and I’m starting to believe him. This UTG Bubble Leveler scope really brings out the best in the gun. And the trigger that I consider too light is ideal for what I’m doing here. But let’s see what she will do at 50 yards.
After the 50-yard test I plan to mount the UTG Bubble Leveler scope on an accurate centerfire rifle, to test it there. This scope will get a workout from me!


All I can say is WOW.
Are there any other hunting rifles that can compete with that?
B.B.,
Did you use the Air Venturi Quiet Pellet Trap, Incl. Ballistic Putty + Steel Backstop or the DIY one you previously made /blog/2015/04/worlds-best-pellet-trap/ or /blog/2011/05/something-for-you-a-homemade-pellet-trap/? From your description it sounds like you used the Air Venturi Quiet Pellet Trap which is only rated up to 20 fpe. Your Marauder is punching at 37 fpe. Definitely no contest!
That there is a very interesting rifle.
Siraniko
Siraniko,
I used my homemade trap that is full of tens of thousands of BBs and pellets. It can withstand pellets up to 50 foot-pounds the way it is now, but not when they all hit in the same place.
B.B.
BB
Do you think this scope would also help someone improve their trigger pull or at least change the way you pull it to avoid any movement ? Probably really would with a pistol scope. Assuming the pull is more than a few ounces.
Perhaps some sort of floating ‘ T ‘ like a plum bob would really help you line everything up perfect.
Bob M
Bob,
The bubble does force you to concentrate.
B.B.
B.B.
The scope says it has a MIL dot reticle. From the info at PA’s website it looks like a Duplex reticle. Are the dots noticeable?
-Y
Yogi,
Like the reticle lines (etched glass) the inner mil dots are very small.
B.B.
B.B.,
Very cool! It seems that the bubble-level scope might improve groupings with any accurate long gun. Would you re-test other models to see if this is so, and learn what these airguns can really do? How would your Talon perform? Or is that too much rigamarole, and we can deduce that any accurate gun will benefit from this scope? Of course, I just bought the same scope without the level…Murphy’s Law strikes again (chuckle)!
Am looking forward to the results of your testing with a centerfire rifle.
Cheers!
Walt
Walt,
I hadn’t thought to test this scope with other air rifles, but that’s not a bad idea. Let me give it some thought.
B.B.
Does anyone know what size screw holds the rear open sight to the Barrel on a Diana 34?
Not sure if it makes a difference but it is roughly a 2004 model with the T05 trigger
How about a bore sized magnetic rod that would allow you to mount a mirror perpendicular to the bore. It could index on the front sight, then you could possibly use autocollimation to align the vertical cross hair.
It really doesn’t need to index it just needs to be square in both planes.
That initial figment of a scope to a rifle is far more critical than most people imagine (though the bubble doesn’t help in that instance) as the zero will move at different distances, in fact its one of the ways I can tell if I’ve got it right is shifting from 20 to 40 yards, if it starts to come off zero diagonally then its likely I need to revisit the crosshair/ rifle alignment.
I often measure and lay a piece of maskingtape between the scope grooves with s pencil line, then put a little mark on the scope at my best judgement of the vertical crosshair and then line them up.
I’ve heard some right nonsense spoken over the years about how it needs to be consistently vertical to the shooters eye in the position he holds it in etc, which is fine, I guess if the shooter only shoots at 30 yards, if he’s hunting and has to jump from 10 to 45 yards, you’d better be sure that vertical line is vertical to the bore axis or you will be offsetting your barrel due to a canted hold, and your initial zero at 30 yards won’t hold water at 50 on the horizontal axis.
Dom,
You are spot on. There was a gal, I think she was on the Chinese Olympic team that held her rifle with a significant tilt. Obviously she was very good at being consistent at a fixed distance.
I also hunt squirrels with a friend that does not believe the vertical alignment matters. His results are for sure a testament that it does. I may get two of these scopes and give him one to see if it helps.
Don
B.B.,
Nice shooting!!! 🙂 Too bad my .25 M-rod is already scoped with it’s non-level Sister. If the 50 yard holds up,.. I personally vote for a 100 yard test. Without looking back,…. I believe you did a 100 and all of the comparison data should be readily available. Maybe just 1 group,.. while you are doing the 50 yard,…. just to see.
Chris
BB, such a nice group leads me to ask a question about zeroing. A scope always sights in a rifle at two distances, the first is the one I am firing at, how do I know the other distance, I.e. where the sights cut the trajectory? I mean a way other than shooting at 5 yards increment.If I sight in at the highest point of the parabola, that will result in only one zero right?
Does the same principle apply for iron sights?
Riki,
There are software programs that will tell you that and yes, iron sights act the same.
B.B.
Riki,
Go to the Hawke scope web site and look for the free down load of “Chairgun”. Play with that for awhile and all will become clear. Of course,….. if you want to really know,…. the ONLY way to really know,….. is too shoot it at every 5 or 10 yards. There is no cheating or short cutting that fact.
Riki,
If there is any short cut,…. it would be to actually shoot every 10 yards and you can split the difference on holdover from the “5” yard points. You could push it to every 20 yards. As you will see from Chairgun,…. the hold over really multiplies when you get out to the 70 ~ 100 yard range and you may want to drop it to every 5 yards at those distances.
The easiest and quickest way I found was to just set out targets,…. shoot at bull,….. bring cross hairs down to point of impact,…. note mil dots,….. hold over to that same amount. That is where mil dot scopes are a real advantage.
Again,… you have to shoot (your) gun to know for sure.
Riki, I’ll echo Chis’ Chairgun endorsement. In my experience, with good input data like velocity, BC, and scope/bore distance, Chairgun’s results match reality shockingly well.
I now trust Chairgun enough that I start with the Chairgun data and then simply verify Chairgun’s results in the real world. I think you can skip an exhaustive every-five-yards confirmation. It’s probably more effective to verify Charigun results at the more sensitive distances along the trajectory. I.e., probably more useful to confirm some very short and very long distances, perhaps at one-yard increments. Plus your zero range, which is what you would have started with after doing a Chairgun workup.
You’re absolutely correct that you can choose a “one zero” setup if you zero your scope to the apogee of the pellet’s flight. That’s my simple-minded preference, since that way, all clicks and hold-overs are “down” from your zero. With a typical airgun setup, this’ll often translate to a zero around the 25-30 yard mark. Others prefer to zero for a longer distance like their most common hunting distance. If you zero a typical airgun setup at say 50 yards, you’ll usually wind up with a second near zero around 10-12 yards, with the middle distances in the 20-40 yard ballpark being “up” clicks and hold-unders.
And yeah, all the same applies to iron sights. The main difference there is that the distance between sights and bore is a BIG factor in all of this, and the advantage goes to the much smaller distance of the iron sights. With iron sights at like an inch or less off of the bore compared to say 2+ inches for a big scope, the iron sights will give you a *much* wider range on either side of your zero where you’re on target without any compensation (or PBR == “Point Blank Zero”).
-Jan
Love that Marauder and glad to see it taken to new heights. I take it that the bubble level is completely out for offhand shooting and only for a rest. But what exactly does it accomplish? I know the theory is that you will hold the rifle consistently, but if your rifle is canted slightly, don’t you just become consistent with that new position? Even if your bubble level does not make the rifle vertical, it should keep you consistent. A canted reticle will make holdover difficult. But if the angle is slight, it won’t make any difference, and with a bubble level, you wouldn’t be using holdover anyway. I guess the question is whether the benefits are worth the level of effort. But the test groups are certainly attractive.
B.B., for the AR8, it does sound like there are no options for tuning. But if Diana could make their guns with such precision, you think they would do it in a way that eliminates vibration which is a quality of a cheap gun.
Matt61
Matt61,
Accomplish?,…. Consistency in reticle level,… rested (or) off hand.
I think B.B. was saying up top that no matter how the rifle sits on you shoulder, the reticle being level,…. same,…. each time is what matters.
Yes,… you can still use holdover. No reason why not. In fact,… the further out you go,… the more critical it will become that the reticle is level or,… the same each shot.
As for tuning gas pistons,… I think B.B.’s original answer hit it pretty well. With that rifle,… I think it’s more a matter of just plain power coupled with the lighter weight,…… not so much any power plant quality issues.
Chris
Chris, Matt61
I agree with Chris about the weight. I have two heavy and bulky China made gas piston rifles capable of 1,000 FPS, a Black-Ops Sniper and a Valken Infiltrator . Both are surprisingly very comfortable to shoot. Both also have large adjustable stocks with rubber butt pads, making it even better.
Bob M
Really fun article, B.B.! Always a pleasure to see a very accurate rifle perform.
Cant is something that interests me a lot because it’s one of the factors that can really make a difference in ultimate accuracy. Like I think Dom is saying, I think you ideally need to go beyond a “looks right” setup, because there *are* specific things that need to be aligned to keep the impacts from wandering around at different ranges and in different holds. The plane of the scope’s vertical axis needs to be centered on the boreline. AND the plane that the scope and bore now share needs to be parallel to Earth’s gravity! I.e. “leveled”.
I’d be fascinated to hear from blog readers about how they get things all aligned and level. I like Dom’s technique because ultimately, the proof is in the pudding and you *will* see diagonal changes at different ranges if things are off kilter by much.
For me, all of this is most important on my own Marauder, which I use to nail Field Targets and the occasional rat or house sparrow skull. The Marauder has the luxury of a flat-top receiver. If you’re a little lazy like me and are willing to ASSume that the receiver top is “level” and thus sitting perpendicular above the boreline, you can take a shortcut and begin by slapping a traditional bubble level across the receiver top. In my own case, lacking a cool internal-level scope, I install a fussy, imprecise, dovetail-mounted bubble level and fiddle with it until it is level with the receiver top.
*Then*, you can mount the scope and, using the dovetail-mounted bubble level (and the receiver-top level if there’s room) to ensure the action is level, level the scope’s vertical reticle against a plumbline. Then, tighten the scope rings as the scope rotates slightly, curse loudly, and repeat.
Folks with non-flat receivers or who are unwilling to take a flat-top receiver’s level for granted have an even tougher problem.
I saw an ingenious post on the Yellow, recommended by the amazing Yrrah, where IIRC a fella dangled a bottom-heavy ruler or paint stirrer on a rod which was inserted into the bore to naturally show the bore/gravity/receiver plane while mounting and aligning a scope. Sounds like what I think Coduece is suggesting. Haven’t tried it, but sounds like it’d work great.
So, how do you folks do this? What’s your scope leveling/aligning ritual?
I was so stoked to see Rocket Jane post the other day. I want to hear how Jane does this!
-Jan
Jan,
Plumb line. Shoulder rested and natural and line up with string. Repeat several times to be sure. I do like the internal scope level “idea”,…. ( I do not have one).
Heh. In my ritual, the rifle is sitting in a rest or on sandbags, and I am in extremely unnatural positions, juggling multiple bubble levels while trying to rotate and tighten the scope just right against the plumbline.
Jan,
I did the bubble levels and even bought 1 and made 4. As for the rings,… I tighten them enough that I can still rotate the scope,…. yet it will not move freely, repeat, repeat, etc.. Then just tighten down with the normal cross over pattern. Unnatural is not good.
Sounds familiar. Except that I decided to shine a light through the eyepiece, and line up the shadow of the reticle to a plumb line. Don’t have to get into unnatural positions that way!
rocketsci,
Welcome to the blog.
B.B.
Thank you!
Is it only me or does anyone else have absolutely no use for the windage adjustment turret?, I have precious little use for the elevation either once the rifle is set up at a 25m zero with its best pellet
I think the only time I’ve ever touched the elevation turret after fitment is if I swap it onto another rifle
Dom,
I would say that you are lucky. Careful mounting helps. Good mounts help. I have found that is not uncommon to remove a scope and replace it to the (same) rifle and have to adjust the Windage a little. All of my good rifles have their own scopes.
Wind would be the other reason. I have mil dot scopes,… so I just use that. Then you have hunters and snipers that use turret clicks to compensate for both Windage and distance. But,… we are talking much greater distances in those cases.
Dom,
I use the windage turret all the time! How else are you going to zero a rifle? And changing pellets can mean changing impact points.
B.B.
I use it when I fit the scope to the rifle, the initial zero if you will, but I honestly can’t think when else I touch it, that turret could merrily fall off thereafter, I do tend to stick with one pellet type per gun, but even when I swap about my impact points tend to change vertically (though groups shrink and widen), I’m not sure I’ve ever changed pellet only to find it firing off to one side, I guess if I used a very heavy or light pellet the spin rate difference might affect this, but I tend to use a lot of JSB or H&N domes of much the same weight
It just doesn’t affect me, once I have found my favoured pellet, zeroed at 25m, and made utterly certain the crosshairs are bore aligned (if I find myself windage twiddling its more often a symptom of this imperceptibly out) , I almost never touch my scope unless it’s taken a knock,
I use hold over and mil dots for range and windage
I do watch a bit mystified at the range at the furious twiddlers
Thanks guys for the replies. I have Hawke chairgun installed, but the program demands scope height. The problem is I don’t have a scope, so what value do I put there? How do I measure scope height for iron sights?
Riki,
I would think that measuring from the top of the open rear sight to the middle of the bore should give you the equivalent measurement for the scope height.
Siraniko
Riki,
Siraniko’s reply sounds good to me. Add that amount to 1/2 the diameter of the barrel. As you can see, the site is really good for understanding ballistics. Play with the kill zone size too. There you will see the first and second zero points (the point where the pellet arcs in/out and in/out at 2 diff. distances). I use 1 inch. If you right click on a lot of stuff, it will bring up more tips/options many times. The site will really be nice when you get a scope. One with mil dots will help you the most because as you can see,… it will tell how many mil dots you need for various distances.
The other thing is to play with the zero range point. Depending on your rifle and pellet,… you see that the time that your pellet is in the “kill zone” will increase and decrease depending on where you zero at. I always zero at whatever distance keeps me in the kill zone the longest. Good luck.
Riki,
You put the height of the sight line — the line that you look at the target over the sights. It’s the top of the rear sight notch and ther top of the front sight (or center of the bead) with open sights,
B.B,
BB, do you have any insight as to the differences between airgun scopes and firearm scopes, besides the adjustable parallax? It seems to me that decent airgun scopes and similar reputation firearm scopes differ in prices by a factor of 2-3x, and I can’t tell if that indicates a lower level of quality on the one hand, or inflated values due to branding on the other. Or is it just an apples to oranges comparison?
Thanks!
BB,
I’m still waiting for my third-generation Benjamin Marauder in a synthetic or wood stock?
Why did Crosman back out at the last minute with the third-generation Mrod?
If anybody knows you would know BB.
Hope all is well BB.
Matt
Matt,
I’m not so sure they “backed out.” They just decided not to release it at this time. Did the Umarex Gauntlet have anything to do with it? Perhaps. We may never know.
B.B.