
by Tom Gaylord
Writing as B.B. Pelletier
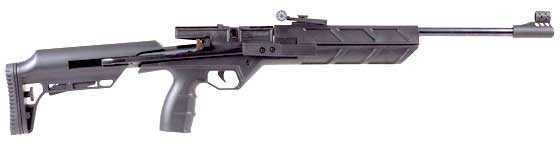
Air Venturi TR5 repeating pellet rifle.
This report covers:
- Something’s coming!
- A target rifle?
- RWS Hobby
- Discussion
- Trigger
- H&N Finale Match Light
- Pressing in the pellets
- Sig Match Ballistic Alloy
- Air Arms Falcon
- Trigger pull
- Cocking effort
- Summary
Today I test the velocity of the new Air Venturi TR5 Multi-Shot Target Air Rifle. Reader GunFun1 has been chomping at the bit to talk about this air rifle, but he has restrained himself until I reported on it. Today I will talk about the power you can expect from a factory gun. I know from reading the comments that you readers are way ahead of me in this discussion, but I have purposely avoided reading your comments, as I didn’t want them to color my opinion of the gun.
Sometimes when I test a new (to me) airgun I read up on it before I start testing. Most of the time, though, I don’t do that. I want to experience the airgun exactly as a first-time buyer would. Not everyone reads this blog, and, of those who do, not everyone tunes and modifies their airguns. Some readers just shoot the guns the way they receive them, and I want them to know what they can expect.
Something’s coming!
For those who do like to tinker, there is something major on the horizon, and I will begin telling you about it this Thursday, if all goes according to plan. But today I’m testing a TR5 straight from the box. Let’s get started.
A target rifle?
Air Venturi calls the TR5 a target air rifle, so I have to test it with target pellets. We know that it’s rated to 500 f.p.s. (Pyramyd AIR says to expect a little more) which means lighter pellets will be the way to go. Quick — what’s the lightest pure lead wadcutter you can think of? There are a few, but the RWS Hobby comes to my mind first.
RWS Hobby
I loaded both magazines for this 10-shot string. Hobbys averaged 548 f.p.s. with a spread of 16 f.p.s. from 539 to 555 f.p.s. At the average velocity Hobbys generated 4.67 foot-pounds of muzzle energy.
Discussion
If I hadn’t talked to Pyramyd AIR about this TR5 before receiving it I would think they had hand-selected this one, just for me to test. But Val Gamerman told me all the rifles he is seeing are shooting close to 550 f.p.s. They aren’t guaranteeing that velocity; it’s just what they are seeing and also what is coming out the gun I am testing.
The rifle shot Hobbys with very little vibration. There is a little, but its minor. I hate to make comparisons, but it’s about the level of a new Beeman R7.
At the start of the test the cocking lever did not want to come away from the receiver unless I jiggled it up and down as I pulled it back to cock. And, when it went forward again I sometimes had to jiggle it to get it to seat on the stud that holds it. I got used to this in a couple shots and after that I didn’t notice it.

The cocking lever locks down on the stud sticking out from the receiver.
After 30 shots the lever started functioning normally, with no jiggling required. So this was just a break-in thing.
Trigger
I was surprised by the trigger! It’s better than it should be at this price point. I will test it for you today.
All of that came from the first 10 shots! I was pleasantly surprised by the TR5.
H&N Finale Match Light
Next up were H&N Finale Match Light target pellets. The ones I shot had 4.50mm heads, but they do come in other sizes. Ten of them averaged 506 f.p.s. in the TR5 with a spread from 500 to 510 f.p.s. So, 10 f.p.s. in total. That’s tight! At the average velocity this pellet generated 4.48 foot-pounds at the muzzle.
Pressing in the pellets
If you read Part 1 you noted that pellets were falling out of the magazines unless I pressed them in. So I did that in this test and then tested every magazine afterward. Not a single pellet fell out!
Sig Match Ballistic Alloy
You know I’m going to test this rifle with Sig Match Ballistic Alloy pellets. I have to! And they were interesting, to say the least. They averaged 638 f.p.s. in the TR5! Wow! The spread was 12 f.p.s., from 633 to 645 f.p.s. Wow!
However — the TR5 powerplant made a strange noise with every shot. It sounded like it didn’t like shooting a pellet this light. I will still test it with this pellet for accuracy, and probably I’ll also test the H&N Match Green pellet. And, only because some of you commented on the green-stocked version of the TR5 (yes, it does remind me of the Umarex Embark), I will also test the accuracy of the TR5 with the SAR Journey pellet.
Air Arms Falcon
I thought I would also test the TR5 with a domed pellet, and the Falcon from Air Arms seemed like a good choice. Falcons averaged 532 f.p.s. from the TR5 with an 8 f.p.s. spread — from 529 to 537 f.p.s.
Trigger pull
Okay, the TR5 has a single stage trigger that has a release that’s fairly crisp, which is unusual for a single stage trigger. The release comes at about 3lbs. and is easy to get used to.
It does have adjustments for sear engagement and pull weight. I adjusted the pull weight down from 3 lbs. 2 oz. to 3 lbs. That seemed like as light as it wanted to go. There are no holes in the triggerguard for the adjustment wrenches, but the Allen screws are offset to one side so the guard doesn’t get in the way.
Also — hurrah! The safety is 100 percent manual — as in, you decide when it goes on!
Cocking effort
I can’t believe what I’m about to report, but I tested it and saw the number. The TR5 I’m testing cocks with 11 lbs. of effort! That’s right — eleven pounds! Given the geometry of the sidelever linkage, it does feel a little heavier, but this is a spring rifle a kid could learn to cock.
Summary
I’m impressed. This TR5 is stable, relatively free from vibration, feeds reliably and has a very nice trigger. I sure hope that it’s accurate!


B.B.,
Seems like this is something that shouldn’t be missed the second time it’s around. By all reports coming in it’s just the right amount of coolness, light power and accuracy to bring a grin all day. If it is not suitable for alloy pellets what could a tuner probably have to look into to allow it to use the alloy pellets? Lighter piston? Decrease spring length? Increase transfer port diameter?
Siraniko
PS Section Trigger pull, Second Paragraph first sentence: “It does have adjustments for sear ebngagement (engagement) and pull weight.
Siraniko ,
Got it. Thanks!
B.B.
B.B.
Hopefully you can fix the cocking lever linkage problem. Other than that, it sounds like a winner.
Having to jiggle the lever before release and to get it to set after cocking would get real old real fast, IMHO.
-Y
Yogi
Read my comment to BB below about the cocking arm.
Yogi, hiding under the caption of the picture following him describing the issue was this statement. “After 30 shots the lever started functioning normally, with no jiggling required. So this was just a break-in thing.”
Man…it’s a HORIBLE time to be an air gunner–too much good stuff arguing for the green in my pocket. So far on this years gotta have list is a compressor, a SIG gas piston, and maybe this. BB is hurting my pocketbook in e worst way.
Bejezus,
The Sig can wait. They have not even released the syn stock version yet. Go for the compressor.
Bejezus,
You won’t be sorry about having a compressor! Talk about freedom – You will never worry about having enough HPA anymore.
Looking good so far. I really like the length of pull adjustment and the butt pad adjustment. That was a very smart marketing move allowing ease of use by a wider range of people. The vertical grip is more ergonomic and natural for new shooter. I prefer that myself. So far, so good.
Good Day to all,……….. Chris
Is that chanting I hear? I do believe the cult is beginning to gather.
Seriously though, if this thing is able to hit the broad side of a barn while standing inside, it is going to be a big seller. This is shaping up to be a great little Price Point Sproinger that a parent can use to instruct a child and when the child loses interest, the parent can enjoy for years to come.
R.R.
What is this lose interest STUFF!
“…when the child loses interest, the parent can enjoy for years to come.”
Didn’t you really mean to say: …when the child moves on to another airgun the parent can enjoy for years to come. ?????
shootski
Shootski
That’s kind of what I thought RR meant. But ya never know. We’ll see.
Shootski,
Where I live, firearms are proliferous. I have seen many a youth start out with airguns and then “grow up” and start shooting firearms. The airguns of their youth move to the back of the closet, many times forever. Hopefully, this will not happen with my grandson. Not if I can help it.
“It sounded like it didn’t like shooting a pellet this light. I will still test it with this pellet for accuracy…”
B.B.,
This must be what you alluded to yesterday; it will be interesting to see the accuracy of these lighter pellets compared to those that fired more smoothly.
And the 11-pound cocking effort is great. If accurate…this could be the next Bronco?
Keep up the great work,
dave
BB
If I remember right the manual that came with my gun says to lift up a little before you pull out on the cocking arm. That’s the way I have been doing it with no problem. And yep the gun cocks very easily. Mine still cocks easy with 3/8″ spacer added.
And as you get into the accuracy part of the test you will see what your pellet seating does for some pellets and not others. Oh and I have tested about 7 different pellets through mine and one keeps coming up the most accurate. Before and after the mods I made.
And I know. Your not reading my comment right now. 😉
Oh and don’t know if you mentioned how light the gun is. It says 5 pounds even be from the factory. Mine I bet has to be close to 4 pounds now after the mods I made. Very easy to handle gun. It’s like holding a feather after shooting my other guns.
GF1,
Why did you have to add the spacer?
-Y
Yogi
Wanted more power. I like plinking out past 10-15 yards. Which is about what my particular gun was good for. Now I’m out to 25 yards and even a little farther.
GF1,
But I am.
RR
I see that. 🙂
WOW. Looks like another great must have gun (if it’s accurate). If you are OCD like me and wondering, The energy for the Sig pellets is 4.75 ft lbs and for the Air Arms Falcons its 4.61 ft lbs.
Can’t wait for part 3 on this one!
Doc
Doc Holiday,
You mean to tell all the regular readership doesn’t do the FPE math in their heads!!!!!
Now I don’t expect them to do Newtons or Joules in their heads; they are permitted to use fingers and toes if needed…Lol!
shootski
Doc
Nowhere to reply on Part1 so I replied here.
You said glue the front sight was maybe a quality thing. And you mentioned you had some Crosman front sights come off. What guns were they? Were they a press fit or glued or held on with a set screw?
My TR5 was a press fit. Found no glue. But I myself would rather have a set screw to hold the front sight on. Then I can remove or even replace it with other front sights.
And did you see where Edw took his front sight off of his TR5 and found a dovetail on the barrel. My TR5 has a dovetail also on the barrel after removing the front sight. So now after removing the front sight a nice globe sight could be put on if someone wants to go with a nice rear peep for the TR5. In this case it’s good the front sight was able to come off. Oh and how is the front sight held on a HW30s?
Gunfun1,
The front sight on my HW30 slides onto a dovetail (from the muzzle end) and is held on by one large screw.
I can take a pic if you like.
Take care,
dave
Dave
Yep I know how the HW30s front sight is held on.
What I’m getting at is I think that the screw is plenty good to hold the sight on. Even like some of the Crosman guns that use a single set screw to hold the front sight on. I have never had one come loose.
And where I’m going with this is I would rather a sight not be glued on. I like the option of putting what type of front sight on I like. Just me I suppose.
“And where I’m going with this is I would rather a sight not be glued on”
Hahaha! Sorry, man! I read your “question” last night at 11:30, and I was too tired to notice that you were not really asking a question, but making a point. Now that I see your point, I agree 100%. I would much rather have the option of changing out the front sight…on ANY gun. =>
Dave
All good. 🙂
Gunfun, I wasn’t glue meant quality, was meaning that it sounded like it was glued on well which means that is better than not enough glue. With the guns I had trouble with the front sight, they were 2260 and 760, if I remember right. That was many moons ago. I honestly don’t know/remember if they were glued or pressed on. I just assumed they were glued on. I had several Marlin 60 semi auto 22 lr that the front sight had a single screw. They would get loose often. Maybe from all the rapid fire and a brick of rounds (500) fired every weekend back in the day HA.
Doc
Doc
I imagine that rapid fire with the rim fires could loosen the front sight. And then thinking more. Probably the front sight on a springer.
So yep I guess glue would be good in some instances. And yep I understood that you meant that was a good thing quality wise to have the sight glued good.
BB,
What?! Wait for Thursday?! It had better be good!
RR,
I think it is.
B.B.
BB,
It sounds like GF1 has started tinkering with this one. I wonder if he has thought to shorten the barrel down to about ten inches yet?
RR
Go back and read the comments in Part1.
Me and Edw have been going back and forth with some stuff. Pictures too.
And mine already has a 1322 barrel in it.
Oh and odered a couple tins of those JSB Hades pellets this morning from PA. Don’t know how many they got left though if you or anyone else wants to try them.
GF1,
That is awesome! I especially like the green.
Can the barrel be free floated in the fore stock? Maybe you can make something to mount to the lower protrusion that would have a Picitinny rail for a grip and/or a bipod.
The Izzy stock was a style that was popular for a bit. I personally like that shape. It fits well in the hand.
RR
I actually like the green also. I may end up with a green one too.
And if I left the fore stock on my TR5 with the Crosman barrel it would free float and the barrel stopped flush with the opening in the fore stock.
But the factory TR5 barrel doesn’t free float. All you would have to do is open the hole up where the barrel passes through if you wanted it to float.
In other words the TR5 barrel is bigger diameter than the Crosman barrel. The TR5 barrel steps down at the breech end to about the size of the Crosman barrel. That’s how I was able to put a shim around the Crosman barrel and make it fit tight in the TR5 breech.
GF1,
That is what I was thinking. I like the idea of the bullpup sproinger and with the shorter barrel no power is lost. With a dot sight this might be pretty cool for tracking down the feral soda cans in the woods.
RR
I have that 3-9 magnification Optima scope on mine that came as a package deal with that .25 caliber break barrel Hatsan I got a while back. It’s perfect for the distances I’m shooting with the TR5.
But I keep wanting to put my Tasco red dot on my TR5 to try it out. But it’s on my WildFire and not wanting to take it off. Although I don’t shoot my WildFire that much anymore since I got my semi-auto Hatsan Bullmaster. So maybe I might give my Tasco red dot a try on my TR5. We’ll see.
B.B.,
I thought better of you!
PURE CLICK BAIT!
For shame! ;^)
shootski
I’m really wanting to see the accuracy tests on this one.
Birdmove
I’m curious to see what BB’s TR5 does.
Edw says he was shooting at 20 yards right from the get go if I remember right. We both haven’t said anything about group sizes yet. Waiting for BB’s results. I’m curious to see what Edw and BB get with their guns. Hopefully we all get similar results from the guns as they come from the factory. That’s what I want to see.
Here’s to hoping! I ended up having to travel this week, so I haven’t been able to get my barely shortened yet.
Edw
I was wondering if you did that yet.
Gunfun, I wasn’t glue meant quality, was meaning that it sounded like it was glued on well which means that is better than not enough glue. With the guns I had trouble with the front sight, they were 2260 and 760, if I remember right. That was many moons ago. I honestly don’t know/remember if they were glued or pressed on. I just assumed they were glued on. I had several Marlin 60 semi auto 22 lr that the front sight had a single screw. They would get loose often. Maybe from all the rapid fire and a brick of rounds (500) fired every weekend back in the day HA.
Doc
B.B., Gunfun1, others who have also shot one of these, and anyone else who is interested in them (which seems to be everyone),
I just received my Air Venturi TR5 from Pyramyd AIR, which is amazingly fast as I put in the order just 2 1/2 days ago. It is interesting in that everything about it is excellent or the opposite of excellent, at least after getting a few shots off just now in my backyard.
First, it is very small, yet heavy (as in solid-feeling) for its size. It feels and looks like a real firearm to my uneducated hands and eyes. Cocking is essentially effortless, the trigger is light and crisp and the sighting is immediate. It seems to be impossible to miss an aluminum pop can at 15 feet, but I will not make any further accuracy comments because I do not wish to step on any forthcoming accuracy installment. Also, I have not shot it more than three times and not at anything other than an aluminum can 15 feet away. It shoots pretty smoothly for an inexpensive springer, not really vibrating, although there is a slight twanging sound.
Here are the negatives, and so far they seem quite negative to me, although perhaps solvable. I inserted a mix of RWS Hobbys, RWS Meisterkugelns, H&N Matches, and Crosman Premier Lights into the two clips that came with the rifle, and some of each of these brand pellets fell to the ground the instant a clip was not facing downward. There was no point where a positive “pop” or sensation signaled a pellet would not fall out as easy as it fell in.
Second, when one cocks the lever back for the second shot, the clip springs partly out of the breech from the function of the cocking lever, and pellets four and five quickly fall out onto the grass, in my case probably never to be seen again. After shooting the three surviving pellets and not wishing to lose any more to my lawn, I decided to remove the clip, only to find it would not come out. I read the instructions, which directed me to “cock the rifle [and] with the cocking arm pulled back to full extension, depress the magazine [sic] release button” to release the clip.
There were no instructions explaining how to uncock the rifle after removing a clip. The manual simply says if one does “not intend to continue shooting after firing all 5 pellets from the magazine [sic], it is recommended that [one leaves] the rifle on safe, uncocked, with the empty magazine still in the loading breech.”
I guess I can live with keeping an “empty” in the breech until the next time I decide to shoot the rifle, but the clips that are provided with the rifle are unusable with at least the four pellet brands I have tried. There are a variety of plastic and metal IZH 61 clips for sale on the huge auction site, but they each cost 25 percent as much as this rifle does — for a tiny, passive clip! Besides, there is no certainty they will be any less bad, and I am not sure they will be allowed in the U.S. from Russia, which is where all the sellers of them seem to be.
Gunfun1, have you figured a way to modify the clips to make them usable? In wood-hacking, one fixes a hole that is too big by gluing a fitted piece of dowel rod into it, sanding it flush, and then drilling a properly sized hole in the center of the dowel rod plug. I would rather try something like that than send this back to P.A.
Michael
Huh. I guess this thread is kinda dead. I’ll bring it up Monday.
Michael
Michael
Was busy yesterday with yard work. Didn’t see your post untill today. I don’t have the rss feed or whatever it is and didn’t get to check back. Next time reply to me to read your post then I will get the notification on my phone.
I tryed deep seating and not deep seating pellets. What was weird is some pellets liked deep seating as far as accuracy goes and some pellets didn’t.
One was a wadcutter brand and is the most accurate in my gun hands down. And I have tryed 8 different pellets in it and all were different brands and shapes of pellets. I won’t say what brand name that wadcutter is yet that works in my gun untill BB gets into the accuracy tests.
But what has been working for me is that I just drop the pellet in the clips and point the gun straight down. Then load the clip all the way in.
And what I have found that helps my gun load each pellet in the barrel and to close smoothly and latch the cocking arm; Is to go slow and steady when closing the cocking arm. That has seemed to help with accuracy too.
If you try it out let me know. And would like to here more of what you exsperiance with your TR5.
I made a wire frame from a coat hanger and made a hook and attached a lid from one of my old pellet tins. I have it out at about 18 yards which is about how far I plink at cans. I can hit it everytime with my (modified) TR5 every shot. And that’s standing unsupported. And that’s with a cheap Optima bundled scope I got with a Hatsan break barrel. And it’s set on 4 magnification. But I totally like my TR5. Go back to the Part1 comments and you can see the mods I did.
And again interested in hearing more about yours and glad you got one.
D’Oh! Please look below. One day I will master using the respond function, honest.
Gunfun1,
I reallty want to figure out a way to make this work, because I overall like it a lot.
I have two ideas. One deals with pellets popping out (once a pellet was practically thrown) as I cock the rifle. I am considering fashioning some sort of “chute” on the left side of the breech that is like the one on the right side. That might prevent pellets from flying out when the clip pops backwards as the cocking lever is pulled.
Also, I am thinking that just slightly chamfering the clip holes on the back side and then gluing a thin O-ring to the chamfered area might help keep the pellets snug. Your thoughts?
Michael
I mean chamfered such as this metal aftermarket one ($25!) is, but with small o-rings glued to the chamfered areas.
Michael
How is a pellet getting thrown? Sounds like your using the clip wrong.
1)Have your clip loaded with pellets.
2)Cock the gun.
3)Point the gun down.
4)Push the clip all the way in till it stops.(no pellets should be exsposed at this time)
5)Close the cocking arm gently then shoot.
The next time you cock the gun the clip will automatically index out. At that time one pellet hole will be exsposed and will be empty. That’s the shot you just took.
Once you take all 5 shots the clip will be almost all the way out. That’s where you leave the clip if you don’t want to shoot anymore. If you do want to shoot you just cock the gun and the clip will be setting there ready to grab with no spring pressure.
Or maybe I misunderstood what your doing.
Gunfun1,
I am doing everything you say, but when the clip indexes out as I point the rifle down and cock it VERY gently, maybe half the time (now that I’ve shot it a bit more) a pellet will jump out of the clip (they’re in there totally loose) and end up on the ground.
I just bought a few IZH 61 magazines, plastic ones, from Russia. I hope they get here for me to try before the time when I have to decide whether or not to send the TR5 back.
Michael
Michael
If you do like I said there should never be a pellet left in the clip as it indexes out. That pellet should of got fired.
And forgot. After I load the fresh clip and close the cocking arm I never have to worry anymore about pointing the gun down when cocking. Only need to do that for the new clip when inserting fully in the breech.
Michael,
I found the same thing. Happened with the 61, too.
Press each pellet into its chamber with a ballpoint pen. Many will click, but not all.
B.B.
BB
Here is what I’m talking about with Michael’s original reply.
“Second, when one cocks the lever back for the second shot, the clip springs partly out of the breech from the function of the cocking lever, and pellets four and five quickly fall out onto the grass, in my case probably never to be seen again.”
If you cock the gun and insert the clip fully and pellets deep seated or not there should never be a pellet exsposed on the left side of the breech as the clip indexes out on each cock and fire cycle.
So I’m having a problem seeing how he is loosing pellets once the clip is fully inserted into the breech (all the way seated to the right).
Gunfun1,
My clip comes back to the point that two holes are always exposed, not just one, so there is an unfired pellet that might go flying. Talk about a bad flier! LOL.
Michael
Micheal
Right. But the clip should never have a pellet in it when the clip protrudes from the receiver on the left after firing and cocking.
Here is what mine looks like loaded and after several shots are fired. As the shots are fired more open holes are exsposed. No way for a pellet to fall out.
Here is after I load a full clip and the gun is ready to fire it’s first shot.
Here’s after I cock the gun and it’s ready for the next shot.
And again ready for another shot after cocking.
And again.
And notice how after I cock the gun it automatically indexes out.
And no pellets are exsposed.
Michael
See what I mean in the pictures I posted. There is no way a pellet will ever be left in the clip exsposed out of the receiver to where it can fall out.
If so it sounds like your clip is not indexing right if you load the clip all the way in.
And when you first install that new clip with the gun cocked the clip inserts very easily till it’s all the way in the receiver like in my first picture. No need to hold that little lever on top of the receiver above the clip either.
And if anybody is interested.
On the right side of the gun the breech encloses the clip. So no pellets can fall out that way either.
Here’s a picture of the right side of the gun.
Gunfun1, if it had a similar thing on the other side, that would make the flawed clips usable! :^)
Michael
Stop it.
Gunfun1,
Each time I cock the TR5, the clip comes out on the left side about as far as it is in your fourth picture, with two holes exposed. The second hole has a pellet in it for shot number 2, but half the time that pellet flies out when I cock the lever, and the second shot must be a dry fire, which I do not enjoy doing, but the design of the TR5 requires it. My TR5 has already been dry-fired multiple times, so to me it is already on the “Road to Deadville.” Until today I could count the number of times I have dry fired a springer on one hand. Two fingers, actually.
I have some time now to try to seat pellets with a BBQ skewer I blunted. I’ll get back and update you on that front.
Michael
Michael
I think I know what’s going on.
You might have one of the two going on.
You might have a pellet laying in the breech some way and the clip is not fully inserting.
And the most obvious to me is your not holding your cocking arm fully open when you load the clip.
The probe might be exsposed in the breech where you load the clip. That happens if you don’t hold the cocking arm fully open when you load the clip.
If that probes in the way then it will produce a situation like your describing also with the clip and pellets exsposed.
Can you check and let me know.
GF1, Hmmm. I definitely cock it fully. Is it necessay to hold the cocking lever open as you insert the clip? (If so, I have only two arms!)
Also, the first shot does go O.K., and I would know if two pellets had been shot at once.
Michael
Michael
It’s easy to do. Yes the cocking arm does need to be held fully open for the most part.
Cock the gun back and the bear trap system will hold the piston back and latched. But if the cocking arm moves forward it will make the probe start going forward. And if just a little bit of the probe is forward into the breech it will stop the clip short of inserting all the way.
Here’s a picture of how I hold the gun after cocking when I’m getting ready to insert the clip.
Gunfun1,
So be sure to hold the clip and the rifle facing down the whole time, cock the lever, hold the lever all the way back whil;e pointing the rifle downward, insert the clip . .
Gunfun1, have you ever driven a Model T? The shifter and the clutch are both on the steering column. As I had only two hands, this is how I learned to shift from one gear to another: Engage the clutch with one hand, shift into the next gear with the other hand, and steer with your knee. Once I developed my knee-steering skills, my confidence improved. ;^) But if the car backfires as you turn the crank, you still end up with a broken wrist! Ah technology, LOL
Michael
Michael
Why on Earth did you use your hand to start the Model T. 😉
Heh, heh. You have a point there. :^)
Michael
Model T cranking.
🙂
B.B.,
I just got home with a package of wooden BBQ skewers. I think if I nip the very tip of one, the remaining narrow but blunt tip will be perfect for seating them. I tried a pen, but it was just slightly too large.
Michael
BB
Oh and some of the pellets I tryed still fell out of the clips even after deep seating. Forgot to mention that.
So deep seating is not the total answer to that problem. Pointing the gun down when loading the clip is still the best option.
B.B. and Gunfun1,
I tried the skewer as a pellet seater technique, and I learned a few things. First, there is no “click” or “pop” sensation that I can feel. The pellet just goes completely through the clip. Second, I found that with a lot of fiddling, I could load pellets from the front, skirt first. That damaged the skirts of some H&Ns but not the Crosman Premier Lights. I wouldn’t even think of trying that with RWS pellets. It took maybe 15 seconds per pellet, however, which makes this being a repeater a bit beside the point.
Finally, I happened upon this technique: Firmly hold the empty clip on a hard table, face down. Drop a pellet into each opening, take a seating tool and push the pellet down to the table top. Then with your finger push the fronts of the pellets, which will protrude perhaps a millimeter, until they are flush with the front of the clip. I will probably get faster, but it still takes a long time to load five pellets.
I have a couple aftermarket clips coming from Russia. It would be nice if they would work. It is frustrating to have to buy aftermarket accessories because the factory ones don’t work properly, however. The TR5 isn’t quite the bargain I thought it would be.
Still, if it ends up being a tack-driver . . .
Michael
Michael
Done been through all that.
Yes holding the clip down on a hard surface works the best if deep seating.
And even if round nose pellets stick out a bit the clip will still insert in the breech. But not wadcutters. They had to be pushed back flush.
As I just said to BB. Some pellets wanted to fall out even after deep seating.
My best results have been pointing the gun down and inserting the not deep seated pellet clip in the gun.
Someone mentioned on Part1 that when Paul Cappella reported on the Izzy that they had best results by pointing the gun down when loading clips. That pretty well eliminates the pellet falling out problem.
Michael,
Not that you should have to,….. but flaring the skirts a bit would do the trick. Saying that,… it would not appear that yours and GF1’s are feeding the clip the same. Been watching this all day and flaring the skirt is the only thing I could think of.
Chris
Chris
Why do that if the pellets stay in the clip when inserting the clip in the gun with the gun pointed down.
That’s just another step that’s not needed. Plus more deforming the pellet.
Really it’s easy. Just drop the pellet in each hole till the clips loaded. Cock the gun and point it down which is what you have to do if your at a firing range and such. Then insert the clip.
Seriously that’s how easy my gun is to load. And as I mentioned and will say again. Some pellets were accurate deep seated and some not. Some still fell out some didn’t.
Here’s the bottom line. Didn’t want to go there. But the holes in the clips could of been a little smaller. And as BB mentioned in Part1 if some little ridges or lines was in the clip then there wouldn’t be a problem.
Kind of like what’s in a 1077 or WildFire clip.
Here’s a picture of a 1077 clip. See what I mean. Zoom in you will see what I mean.
GF1,
Got it. Just offering my 2 cents. Budget as it may be,… there seems to be some issues with “out of the box and ready to use” for everyone.
Chris
Chris,
Tomorrow, after I forget some of today’s frustration, Hah!, I will dig out every lightweight .177 pellet I have and try them all in these two clips. I have several JSBs, RWS Cubs, Diabolos, Superpoints, and Superdomes, some Gamo lead pellets, Crosman hollowpoints, even .177 Gamo round balls.
Beyond the Superdomes I might even have Thunderdomes and Astrodomes! ;^)
Michael
Chris
I don’t think so yet.
Read my comment below to Michael.
GF1,
The second pellet wants to fly out even if the whole thing is pointed straight down. The clip bounces outward when the lever is pulled back. I am pretty uncoordinated, but it can’t be easy If I haven’t been able to get it to cooperate after all this time with all of this help.
Something is wrong with my rifle.
Michael
Michael
I just checked more.
The cocking arm has to be moved forward pretty much before the probe is out in the breech.
Not sure what you got going on. How about post a picture of a fresh filled clip inserted in your gun with the cocking arm closed like it’s ready to fire.
Gunfun1, your second pic (round nub exposed) is how mine is before the first shot. After I cock the rifle for the second shot, it looks like your fourth picture, with two pellet holes exposed. If the second pellet stays put, it is in the hole closest to the breech, and so on. It does seem as though my TR5 operates differently than yours. In other words, I think I got a bad apple off the tree.
I will try to get it to behave tomorrow if it is nicer outside, because I do like everything else about this air rifle. Can you imagine — five straight hours of snow on April 27th in Chicago? The world has gone crazy.
Michael
Michael
Yep crazy with the snow.
And thinking more maybe there is something in the ejection spring in the reciever not allowing it to collapse fully. Like there is maybe pellet particles that got sheared off.
Or that top latch that stops the clip is not free. Maybe oil it.
All in all your clip is not fully inserting for some reason. You need to look in the receiver where the clips loaded and see if there is something restricting how the clip is loaded.
Gunfun1,
That would explain every issue with the breech. Tomorrow with fresh eyes. Also, I just had a pint of Guinness.
Michael
Michael
Ok I want to see what you find. Will be waiting.
Michael,
You’ll need to scrape off 0.010-inches from the bottoms (with the large end of the mag on the left) of those Russian magazines to get them to fir the TR5.
B.B.
B.B.,
Ouch! Thanks for the tip. I think I can manage that.
Michael
Michael
Don’t only try the lightweight pellets.
The one that’s working in my gun is a heavier pellet. And no it’s not my favorite JSB 10.34.
And yes both barrels liked this particular pellet I’m talking about for some reason.
Gunfun1,
Thanks for the tip. I will try some Winchester branded pellets I have that I believe are over 9 grains.
Michael
B.B., Gunfun1 and Chris,
A new day! First, thanks to all who took pity on me and chimed in yesterday, especially Gunfun1, who obviously has a lot of insight with the TR5.
This morning I put a crevice tool on my shop vac and used it to blow a lot of air through the breech of my TR5. I did not see any debris before I did it, during the “blow-dry” or afterwards. But of course that does not mean that something was not blown out.
Also, my TR5’s probe stays completely out of the breech when the cocking lever is totally open, even if I do not hold it open. The anti-beartrap holds it tightly open on my rifle. Good.
Then, for the first time, I inserted a clip of only fully seated pellets, H&Ns. These I pushed in with a slightly modified BBQ skewer and while tightly holding the clip face down against a table top. Some of the pellets protruded slightly from the face of the clip, but a gentle push of my finger made them flush. For the first time the clip inserted all the way into my rifle! It looked just like the picture Gunfun1 provided of the left side of his TR5 before taking a first shot.
And then everything worked perfectly. No clip bouncing outward on the left side, no pellets flying, no unshot pellets exposed. This is the only way I will load pellets for the TR5 from now on.
I do not discount using a shop vac to blow out the breech made a difference in addition to the tightly seated pellets. I suspect earlier that loose pellets inside the breech prevented the clip from being fully inserted.
I am eager to see what results B.B. gets with seated pellets vs. pellets simply dropped into the clip. I haven’t chronied my rifle at all, and this morning I did not wish to put on boots to step out into the snow, so I just shot into my backyard berm from my rear stoop. Accuracy with seated vs. non-seated is another thing I really wish to see in B.B.’s testing. When I shot my TR5 yesterday, it was at aluminum cans only 5 yards away.
I am relieved. This TR5 is a lot of fun to shoot.
Michael
Michael,
I am happy that everything worked out for you. So, the chambers have a bit of taper to them? (bigger on the inlet side VS the exit side) Or, are they straight and the bigger skirt is the compression/friction factor holding the pellets in? It is interesting on how the clip backs itself out (as opposed to) exiting from the opposite side.
Chris
Chris,
That’s a good question about the chambers. If there is no ridge in them, how does ultra-deep seating make the pellets secure? There are still some .177 brand pellets in my “arsenal” I have yet to try, so it is possible one brand will go in with a bit of pressure and stay put. But so far, none will.
Michael
Michael
Because you push past the chamfer. The skirt of a pellet is usually bigger than the head of the pellet.
I think they have the holes sized down a bit in the clip. It catches the skirt. But maybe it needs sized down to a bit more to catch the head sooner when loading the pellet.
Michael
Ok good glad you got it working.
Can you do me a favor though. I’m curious to see if this works now in your gun also.
Load 5 pellets in the clip but don’t deep seat them. Cock your gun and pointed down then insert the clip and see if it goes all the way in now. Basically do the same as your doing now but not deep seated.
I want to see if your gun works correct doing it that way too. That will be something you will want to try when you get more into accuracy with different pellets.
And if you don’t no big deal. But would like to know.
Gunfun1, Will do, and then I’ll post back later today.
Michael
Michael
Ok thanks.
Michael,
You are beating a dead horse! The new rifle and or clips (possibly both) is obviously defective, send it back for one that works.
Also, being that the IZH61 clips are larger in height than the ones for the TR5, if you modify them to fit your rifle by removing .010″-.015″ from the bottom, this may cause the pellets to sit too low in relation to the breech and probe. This would then make the modified clips useless in either rifle.
Loading the TR5 sounds to me like a serious design flaw opposed to the IZH61 (I have three of them). To load the Izzy’s you do not cock the rifle, you just push the probe release lever (located on the right side of the receiver around 2″ behind the loading port) forward with your thumb and the spring loaded probe will fully retract which will then allow the removal of the clip after depressing the lever on the top of the receiver. This works the same whether you fired one shot or five.
In my opinion, to leave the clip hanging out of the rifle unsupported after shooting (TR5) with the probe holding the clip in the last (#5) hole leaves it prone to damage. You would be better off loading a full clip and firing the first shot which would then leave the clip fully inserted (protected) within the receiver. Just my 2 cents.
This everyone agrees on, load the clips with the muzzle down to avoid pellets dropping out, but once inserted into the rifle the pellets are held captive and can go nowhere but into the breech.
If you decide to not modify the IZH61 clips I may be interested in them. Is there someway to contact you privately?
Bugbuster
Bugbuster,
With the loading technique I am using, my TR5 is now working properly. And it feels so solid despite its compactness, it feels good in the hand and shouldered. Cocking is essentially effortless, and it is quiet and low-powered. It would be nice if Air Venturi made extra clips available.
The IZH-61 clips are coming from Russia, so there is no telling how long it will take. Sometimes it is remarkably fast, other times . . . But I will let you know here by answering your post to let you know should I decide to part with them.
Your point about it being better for storage to leave a partially loaded clip rather than an empty one in the rifle — I hadn’t thought of that. Good idea. I will always do that from now on.
Michael
Bugbuster
What I do when I’m finished shooting is I put one pellet in the clip. The hole on the left side of the clip. Insert the clip all the way in the breech after opening the cocking arm. Then I close the arm and shoot.
Kind of the same as you mentioned but then I have no pellets left in the clip.
I was going to mention that yesterday but I didn’t want to complicate matters with what we was trying to find out with Michael’s gun.